
- Details
- Written by: The DIY Hunter
- Category: Firearms & Shooting
- Hits: 6181
This summer I was able to shoot at Spirit Ridge Rifle Golf course on two occasions. The first trip I used my Winchester Model 1885 in 300 Win Mag and shot 215 Berger Hybrid bullets.
On this first trip there were a few fliers that I just couldn't explain other than there was something wrong with the rifle. Upon returning home I shot some groups at 300 yards with the 215 Berger Hybrid and the 208 A-Max. Both five shot groups were in the 5 inch range. Not very stellar. I looked over the rifle and found the the forearm wood was touching the barrel. I thought that I had fixed this when I first setup the rifle. A little sanding and some polyurethane and the barrel was back free floating.
A second trip to the range to shoot groups at 300 yards turn in much better results. A 3 inch five shot group for the 215 Bergers and about a 2 inch five shot group for the 208 A-Max. This was much better. I was now ready for another trip to Spirit Ridge.
On my second trip to Spirit Ridge I decided to shot the 208 A-Max out of my Model 1885 since they grouped better at 300 yards. I'm probably going to tweak my 215 Berger Hybrid load a little more before I shoot them at long range again although a 3 inch group at 300 yards is a minute of angle I think I can get them shooting a little better.
The biggest thing I learned from this trip is that I need to learn to judge and calculate the wind.
Being able to make shots on targets at long range requires a good rifle, high ballistic coefficient bullets, a good tactical scope, sub MOA accurate loads and a ballistics app to calculate the shots. My app of choice is Strelok Pro combined with the weather censors inside my Samsung Galaxy S4 android phone. Strelok Pro was dead on both days with targets ranging from 350 to 1,000 yards. My misses were always the result of judging the wind incorrectly.
The highlight of the round was hitting the small Master's course 1,000 yard target. For hitting the target a got another 1,000 Club cap from my friends at Spirit Ridge. I got my first 1,000 Club cap last year shooting my Model 1885 chambered in 270 WSM.
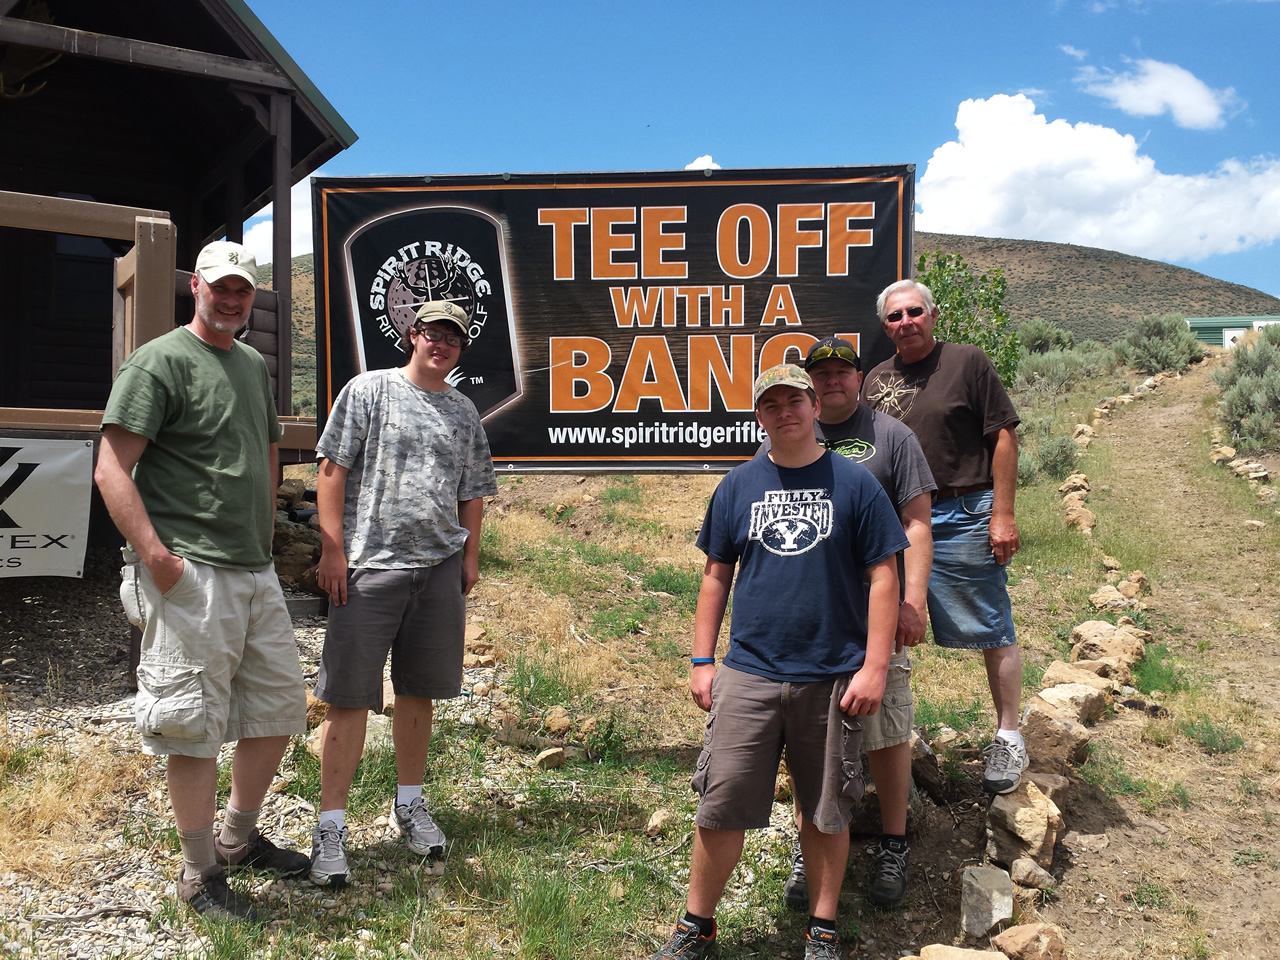
Dallen, my father in law, brother in law and nephew at Spirit Ridge.

Using the slope angle camera calculator feature inside of Strelok Pro. This is really cool. You touch the Slope Angle field in the App and a camera view opens up with a crosshair. Just place the crosshair on the target area and press ok and it uses the phone to give you the angle of the shot.

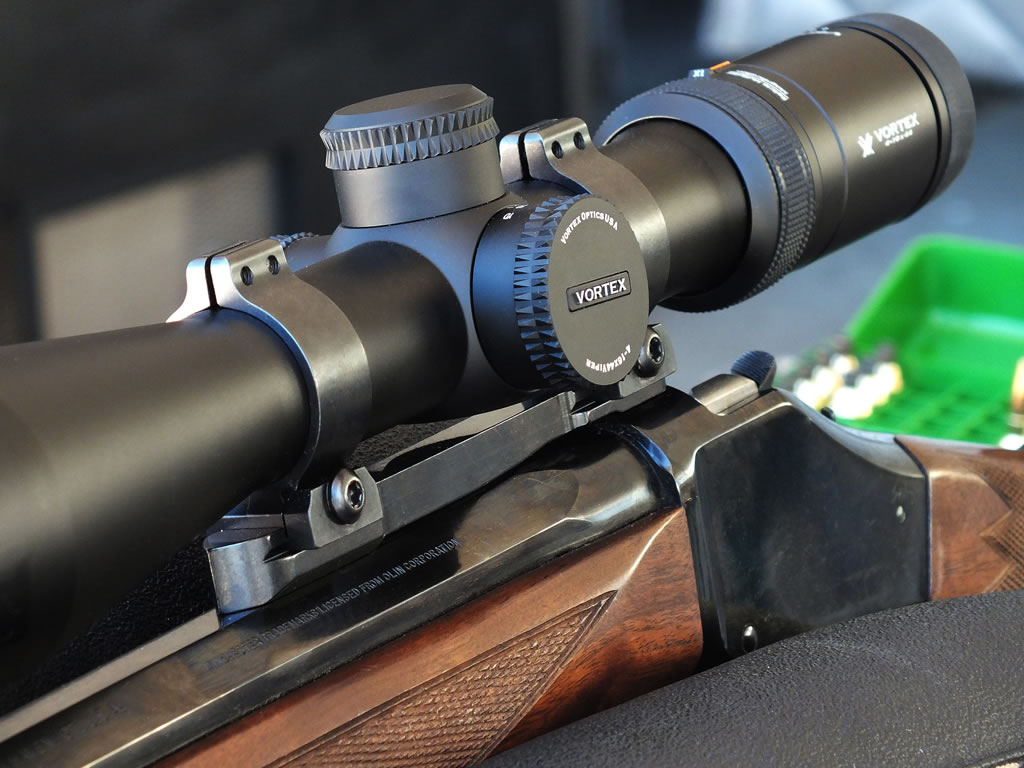
Winchester Model 1885 in 300 Win Mag sporting a Vortex Viper PST 6-24x50 MOA second focal plane rifle scope and my 208 Hornady A-Max load.
- Details
- Written by: The DIY Hunter
- Category: Firearms & Shooting
- Hits: 46810
I have been getting into long-range shooting and have had great success with my three Model 1885s, in 270 WSM, 300 Win Mag and 243 WSSM. You can check out some long-range action with these rifles shooting steel plates at the following links.
- Spirit Ridge Rifle Golf — Shooting With 243 WSSM Model 1885
- Rifle Golf with a 270 WSM at Spirit Ridge
- Spirit Ridge Rifle Golf - 300 Win Mag Model 1885
In 2014 Winchester brought back some of the WSM rifles in the Model 1885 and did a small run of 45 rifles chambered in 300 Win Mag. Being a guy who prefers smaller bores I have never owned a rifle chambered in anything larger than 270 WSM. To achieve better performance at really long ranges I figured that a 30 caliber was in need. With the Model 1885 being produced in both 300 WSM and 300 Win Mag in 2014 I compared the two cartridge's benefits and in the end opted for the 300 Win Mag. If I was going to get a bolt action rifle the advantages of a shorter action and the non-belted 300 WSM cartridge would probably sway me to go with an X-Bolt. However, in the single-shot Model 1885 the action length is the same. I can overcome the belted cartridge issues by setting my sizing die to just barely bump the shoulder so that the shell will seat up against the shoulder in the chamber giving better alignment with the bore. Also, the 300 Win Mag easily gets greater velocities over the 300 WSM in hand loads. So I ordered one of the 45 rifles that would be made in 300 Win. Mag.
What draws me to the Model 1885?
- I've always been really fond of octagon barrels. My first firearm was an octagon Marlin 39a lever action 22 rifle.
- I like that the Model 1885 has an extra long 28-inch barrel. Longer barrels mean greater velocity and with no action length to speak of I get a rifle with the overall length being roughly the same as a bolt action rifle with a 24-inch barrel.
- With 1885's there are no magazine restrictions for the overall length of the cartridge. For instance, in my new 300 Win Mag I have found that the 208 A-Max shoots best out touching the lands in the barrel for a cartridge overall length (COAL) of 3.571 inches, a length well beyond the 3.34 specified as the max for this cartridge.
- There is also something really cool about hunting with a single shot. And how cool is it that this is John M. Browning's first firearm that he designed and sold? Really cool.
Over the years I have been mounting different scopes and using different bases and rings on my Model 1885 rifles. It has often been a challenge to find a scope mount that I would like to use. Here's what I have learned about this great rifle and what has worked best to mount my rifle scopes.
Scope Mounts
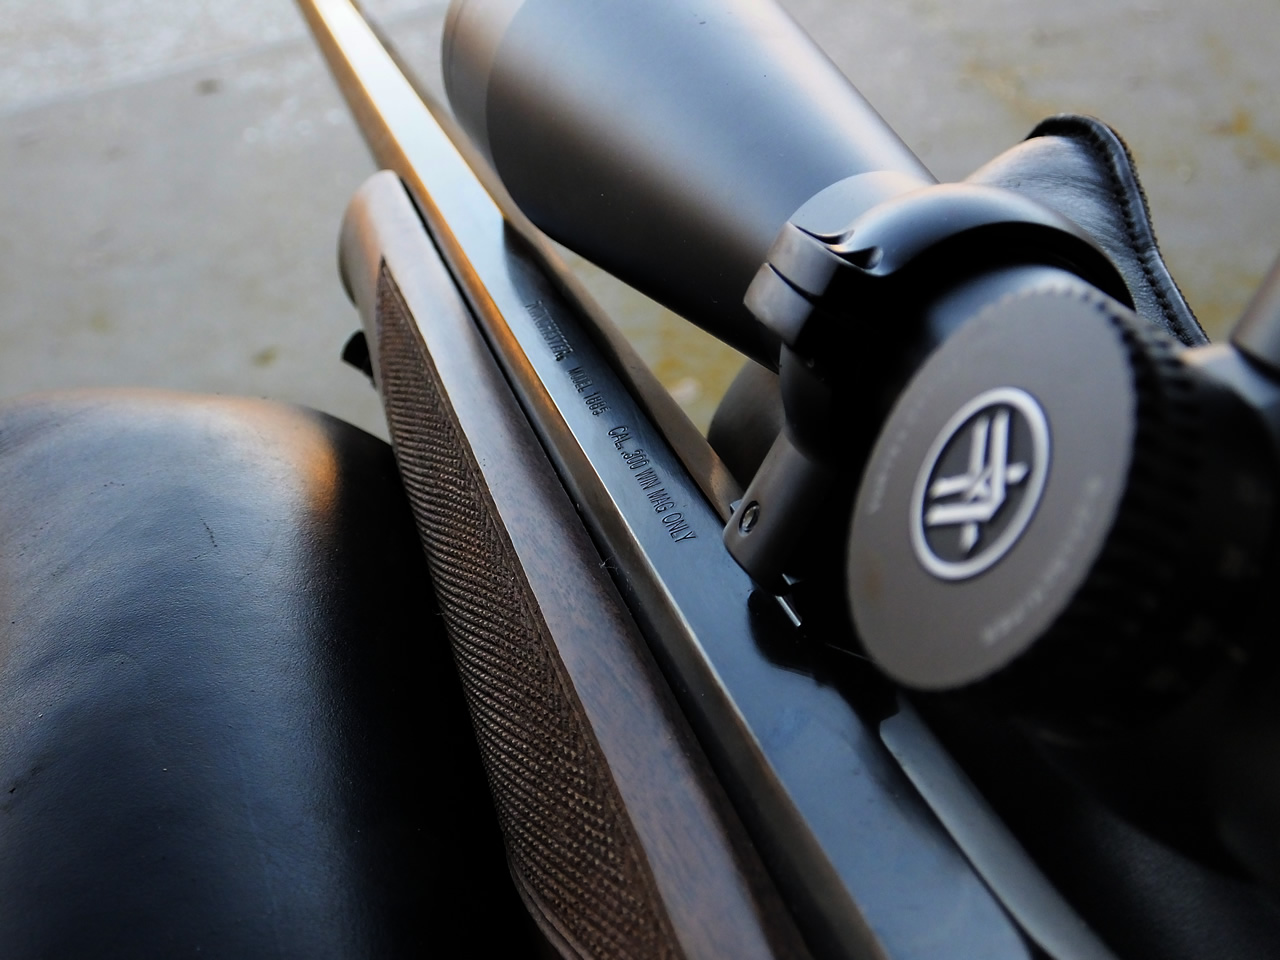
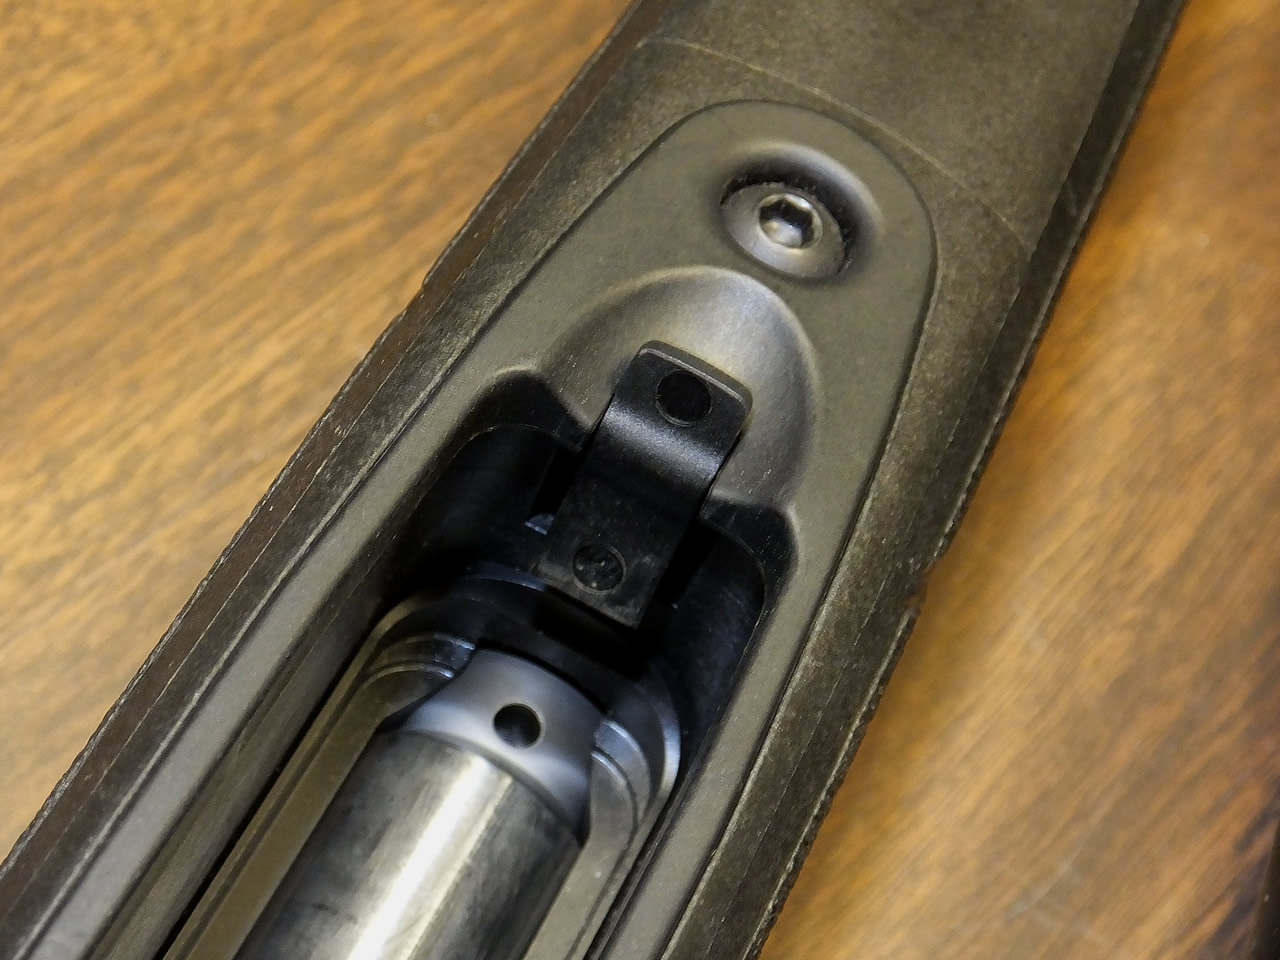
One of the challenges with the Model 1885 is mounting scopes. The rifle is drilled and tapped on the flat area of the barrel right about four inches in front of the receiver. It is also drilled and tapped on top of the rounded receiver. As I have learned the taper on the barrel isn't exactly the same from one rifle to the next. Basically, to get the octagon barrel it is just ground out until it "looks right" is how it has been described to me. I'm sure that it is a little more sophisticated than this but in the end, no two tapers are exactly the same so with a base mounted on the taper of the barrel it presents a problem in getting the rings to align.
This is a good base and ring combo for the Model 1885. It's a Talley system built for Winchester. The drawback with this system is that there is no way to achieve any MOA in the mount. I also recommend lapping your rings once you have this base secured on the rifle.
I have tried a few different base and ring combinations in my 85s throughout the years. One system I like is a one-piece blued steel base that Talley makes for Winchester. I did find that the set screws for the rear of the base to be a little too long on both of the bases I have and I had to get shorter screws to get the base locked down tight in the rear. The screws for the front of the base are a little to short to securely hold the base making it vulnerable to stripping the threads when you torque the screws. The base is designed such that it should work on most Model 1885 High Wall rifles even with the inconsistencies with the barrel tapers. With the base being made from a hefty piece of solid steel it doesn't flex much across the two mounting points and put torque on the scope however there can be a little miss alignment of the rings so it is always best to lap the rings when the base is secured and the rings attached. This is a good system for the 1885 however for my new 300 Win Mag that doesn't shoot as flat as my 270 WSM I wanted to have some MOA built into the mount so that I could have enough elevation adjustment in the scope to shoot to 1200 yards and possibly beyond.
I personally think Winchester should design the Model 1885 just slightly different so that better scope mounting options would be available. I think that the barrel should continue full bull barrel round for a couple of inches before the octagon tapering starts. I then think that the barrel should be drilled and tapped in two locations and not drilled and tapped on the receiver. Winchester could drill and tap the barrel with the same spacing as the TC Encore and many base options would immediately be available to mount a scope with 20 MOA.
So with my new 300 Win Mag rifle, I set out to find the best solution to get 20 MOA out of the bases and rings. For starters, I really like the 20 MOA EGW Picatinny rails I have on my X-Bolt and A-Bolt rifles. I had hoped that I could find some way to get a Picatinny rail to work. I studied the specs on rails and bases galore. I found that I could mount Weaver #29 and #11 bases to the rifle. I then found that I could clamp on a 1/2 inch AR riser rail across the two bases. The span between the slots in the Weaver bases is right at four inches. To get a riser rail to clamp across the bases I needed one with cross bolts that were 10 slots apart. The Lion Gears 12 slot 1/2 inch riser rail was the best option I could find, although it wasn't a 20 MOA riser. At the inexpensive price of the Lion Gears riser, I ordered one just to test the system to see if it would work. Well, it works perfectly... almost. I found that there is a huge height difference between the two bases (39 MOA to be exact, more on how I found that out later). I found that if I clamped the rail onto the bases it would cause the aluminum rail to flex because the two bases are on different levels and if I had a scope mounted it would put a lot of torque on the scope so this idea was shelved.
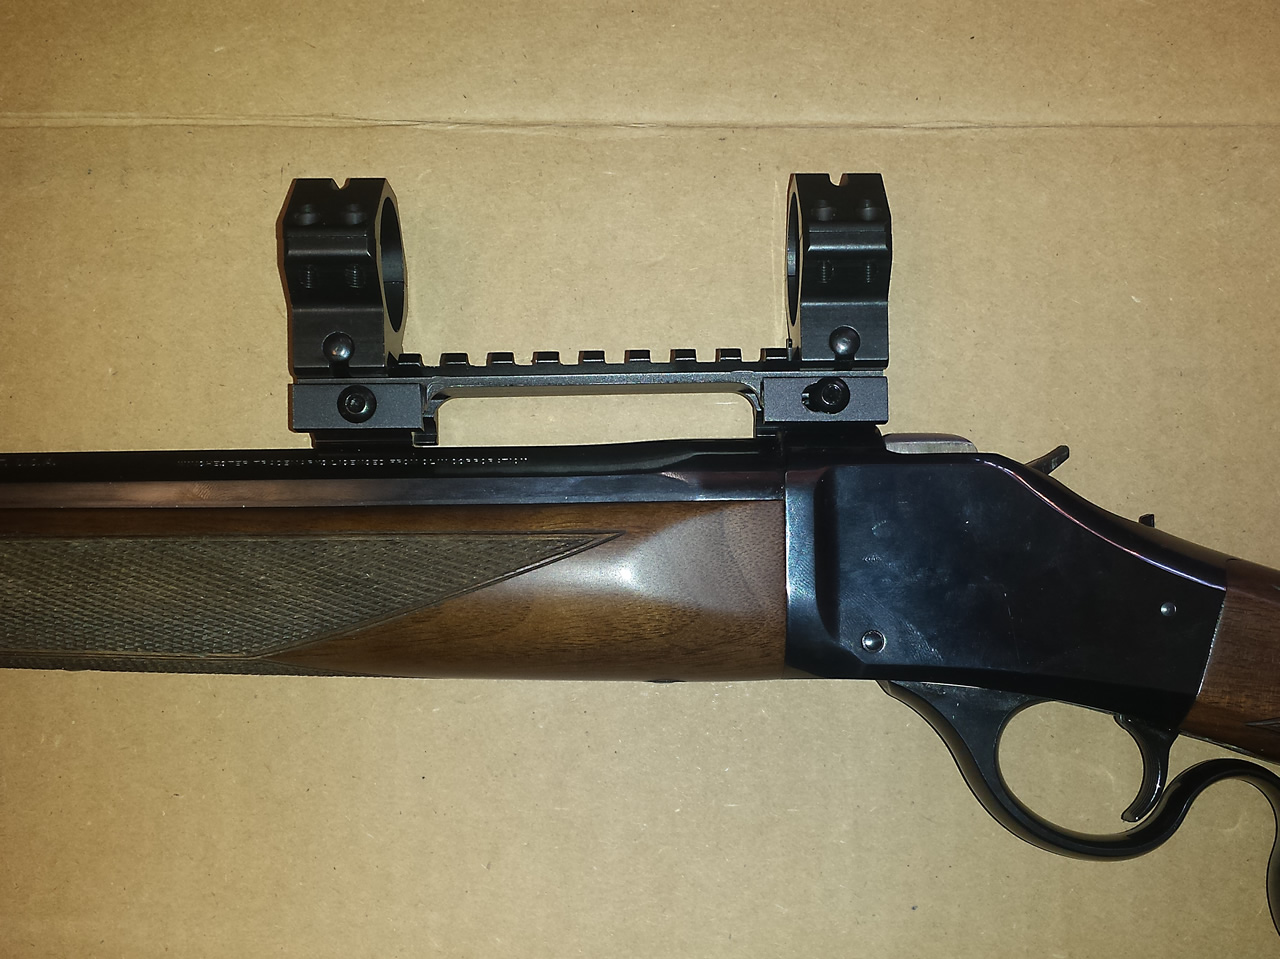
I fell back to my second option to mount the scope. I used the Weaver #29 and #11 bases with High Burris Signature Zee Weaver Rings. The Signature versions of Burris' rings have plastic inserts that not only self-align to keep any pinching of the rings into the scope tube but there are also 10+ and 10- inserts that can be used to add or subtract MOA.
To start I mounted a Vortex Viper PST 6-24x50 using the Zero MOA inserts. This on a normal rifle would place the scope with Zero MOA. On my first trip to the range, I found that I had 39 MOA and my scope was about 7 MOA short of getting the scope zeroed at 100 yards. I then used the 10 plus and minus inserts to lift the scope up in the front and drop it in the rear. So I placed a 10 plus insert on the bottom of the front ring and a 10 minus on the top of the front ring. I then did the opposite in the rear, a 10 plus on the top and a 10 minus on the bottom. In theory, this should raise it up around 20 MOA and on the next trip to the range, I found that is exactly what it did. I now have right at 20 MOA built into the elevation of the scope mount.
Triggers and Lock Time
I found on a forum some help with the trigger. The advice clearly worked however in my excitement I didn't take the time to find a scale to measure the difference. What I did was dry fire the rifle 10 times while applying pressure to the back of the hammer. This helped smooth out any roughness on the sear. I also learned that the trigger pull is lighter when the hammer is cocked without using the lever. So I cycle the action with the lever then lower the hammer and then cock the hammer with my thumb before firing it. I can noticeably tell the difference in the trigger after doing the dry fires and always cocking the hammer with my thumb.
Below is a table showing the trigger pull weights of my High Wall rifles. One of the things that the averaged numbers don't show is that after I did the ten dry fire technique the trigger pulls were more consistent and varied less. It is interesting that on my 300 Win Mag I get a full half-pound lighter trigger pull by decocking the hammer then pulling the hammer back to cock it again before I pull the trigger. Then on the 270 WSM it is right at a quarter of a pound lighter and the 243 WSSM is only slightly lighter. I have been annoyed with the trigger pull on the 243 WSSM rifle so I am going to have a Gunsmith lighten it up for me, down to around two and a half pounds.
Update March 24, 2015 I had Denny's Gun Repair in Plain City, Utah do a little trigger work on my 243 WSSM trigger. I know he replaced a spring and maybe some other adjustments. Anyhow the trigger is nice and light now, right at one and three-quarter pounds. With this being my primary varmint rifle I was wanting a light trigger. I have one now. Thanks Denny!
| Trigger pulls from the center of the trigger arch with a Wheeler trigger pull gauge. | ||
| My 1885 High Wall Rifles | Decock hammer then re-cock | Cocked from cycling action |
| 270 WSM | 2.83 lbs | 2.98lbs |
| 270 WSM (after doing 10 dry fire technique) | 2.73 lbs | 2.96 lbs |
| 243 WSSM | 3.25 lbs | 3.42 lbs |
| 243 WSSM (after doing 10 dry fire technique) | 3.23 lbs | 3.29 lbs |
| 243 WSSM (after spring replacement and work done by Denny's Gun Repair) | 1.75 lbs | 1.83 lbs |
| 300 Win Mag (after doing 10 dry fire technique) | 2.46 lbs | 3.04 lbs |
Obviously, you can also lighten the trigger with the little set screw that is right behind the trigger. Just tighten the set screw tighter to lighten the trigger pull. My rifles have been set from the factory near the bottom already so the little I have tightened them hasn't offered a lot of adjustability but has lightened them some.
The lock time on the 1885 is the greatest drawback to the rifle. It just takes a lot of time for that hammer to fall all the way to fire the cartridge after the trigger breaks. Any slight movement of the rifle during this window of time can really hinder accuracy. The lighter and smoother you can get the trigger the better off you'll be in lessening any movement during this window of time. 1885 rifles always get a bad rap for their trigger and lock time however I have always had great bolt action comparable accuracy in my 1885 rifles with the factory triggers.
WSM and WSSM Primer Shearing
One thing that I have found with the 1885 and my 270 WSM and 243 WSSM is that the primers extrude back into the firing pin hole upon firing the rifle. Then the falling block shears off the extruded brass when I open the action. Every so often I will get a miss fire because the built-up brass in the firing pin hole prevents the firing pin from striking the primer hard enough. What I like to do to prevent this is to dry fire the rifle every so often and then open the action and blow down the barrel with an air compressor or with my mouth in the field, blowing out the small pieces of brass that get thrown into the barrel and chamber upon dry firing the rifle.
The primer shearing happens on all of my loads both factory and hand loads and I have heard that all the 1885s in WSM have the same issue. Now on my new 300 Win Mag I have had no issues at all with this happening. I'm guessing it has to do with the pressure curve of the higher pressure WSM and WSSM cartridges. I also think that the rebounding hammer allows for the extrusion to happen where it isn't a striker system like found on a bolt action rifle. I'm not really sure but I know the pressures are not too high. Shells in my X-Bolt or A-Bolt rifles show normal primer indentions.
Butt Stock Shapes
The straight buttstock looks cool however functionally I would really prefer a traditional pistol-grip style stock. Obviously, a pistol grip stock is more comfortable to shoot. I find that I actually place my fingers along the lever using it as a pistol grip when I shoot. A pistol grip would be more comfortable however it is not the main reason I would like a pistol grip. The main reason is that while hunting, with the rifle, slung over my shoulder the lever catches on the pack shoulder straps and my clothes causing the action to open, often dropping out the cartridge or worse, cocking the hammer while leaving the cartridge in the chamber. A pistol grip would contour right behind the lever making the lever less exposed to catching on everything. To solve this problem for the time being I wrap a velcro strap around the stock and over the lever. I can cock the hammer and take the shot. For a follow-up shot, I have to spend an extra few seconds to pull the velcro so that I can open the action.
I have debated shaping a piece of wood to attach to the bottom of the stock to create a pistol grip. I may add one to my rifles in the future or purchase an aftermarket stock. For now, the velcro trick is working just fine.
I have the 208 A-Max shooting sub MOA. I still want to tweak the load when I have some more time but it's shooting good enough to take it on a cow elk hunt. Once I have the 208 Gr Hornady A-Max load tweaked a little more and I will have an awesome long-range rifle.
View my 300 Win Mag Handloads.
First Time Out Hunting With 300 Win Mag
I took the rifle out to hunt cow elk in January of 2015. At the bottom of this article is a video of a shot taken to verify the trajectory of the 208 A-Max while I was out elk hunting. With no cow elk in the area, I tested my new 300 Win Mag Winchester Model 1885 High Wall shooting a 208 A-Max load on a rock at 612 yards. The shot was uphill considerably so I calculated (educated guess, but have since learned I can calculate the shot angle with Strelok Pro using the camera in my phone) the horizontal distance of 590 yards for the shot and plugged in the data into Strelok Pro on my Galaxy S4 phone. The shot appears to hit a couple of inches low so another 1/4 MOA was needed or I wasn't completely steady off my shooting sticks. :)
My Model 1885 in 300 Win Mag at the range testing 208 A-Max hand loads.
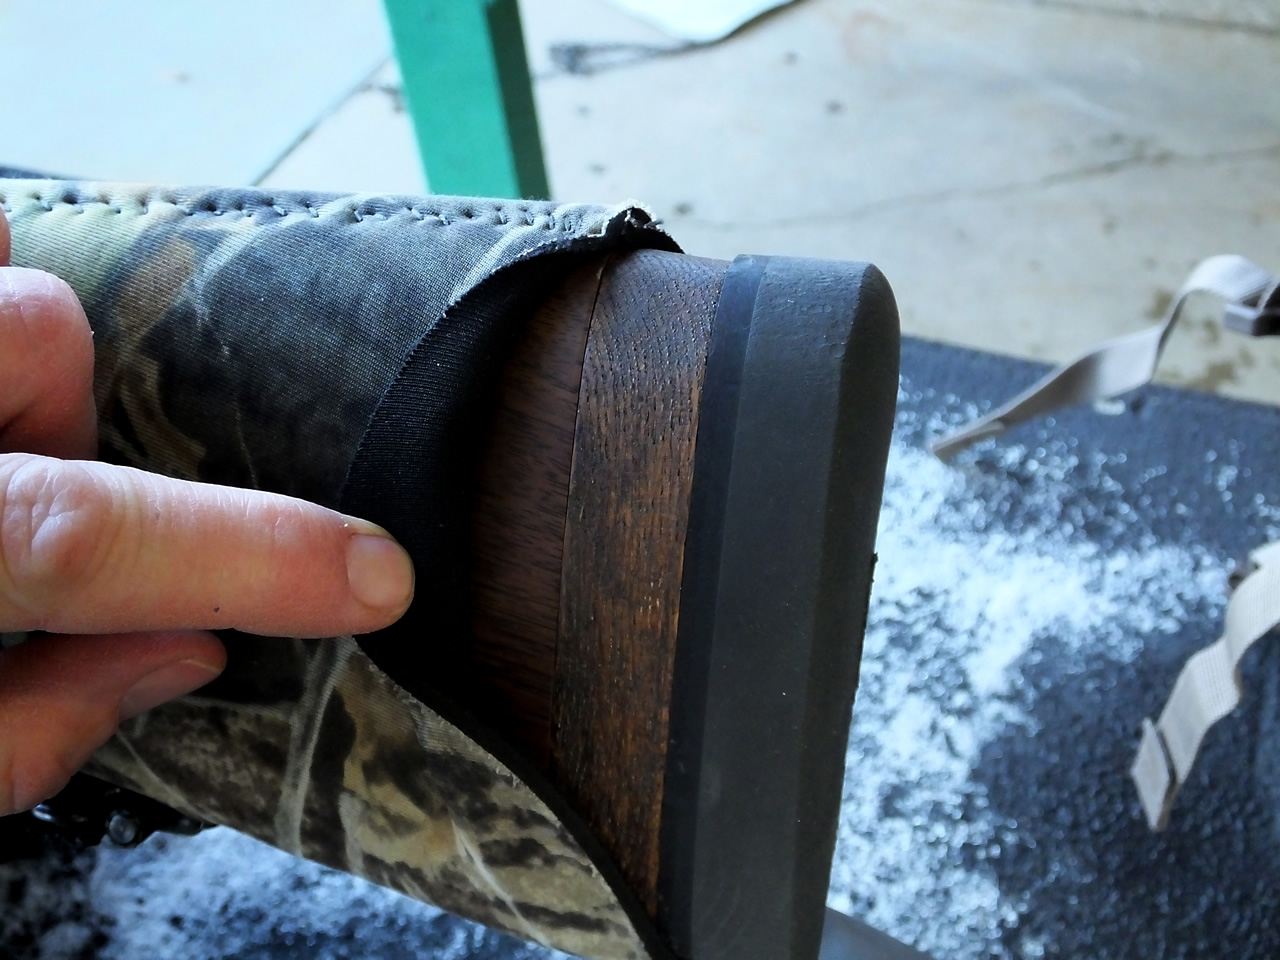
Being a tall lengthy guy I always have to add about 3/4" extra length of pull to my rifles to keep the scope off my face when firing the rifle.
I often just cut a piece of oak to fit, oversize two holes through the spacer, and then get longer screws to extend through the recoil pad and spacer.
I hide the ugly, not so perfectly sized spacer with a neoprene stock cover with shell holder.
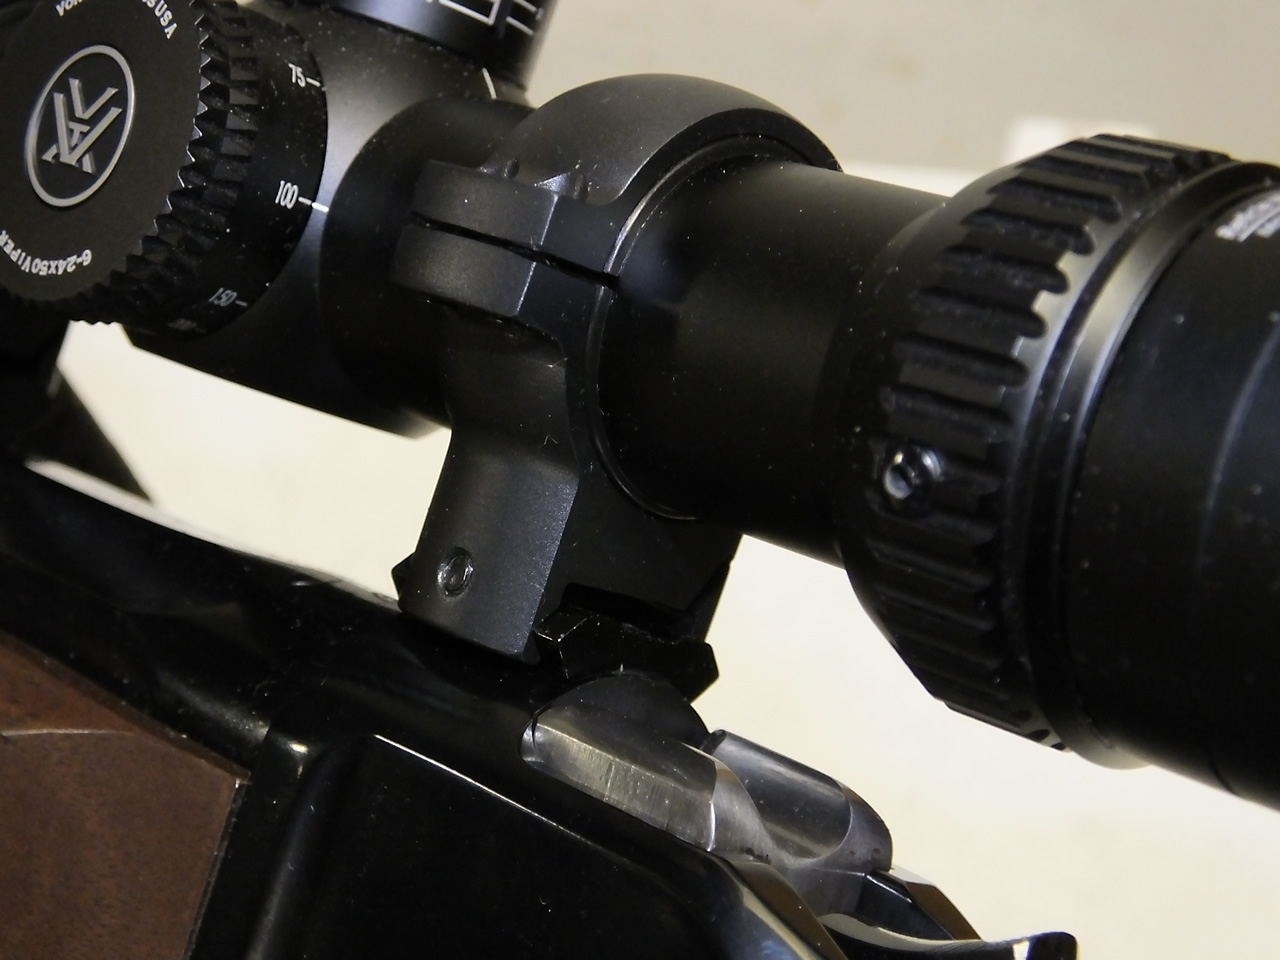
This shows the rear Weaver base with the Burris Signature Zee Ring. You can see the plastic inserts between the metal ring and scope tube. On this rear ring I have the 10+ spacer on the top and the 10- spacer on the bottom.
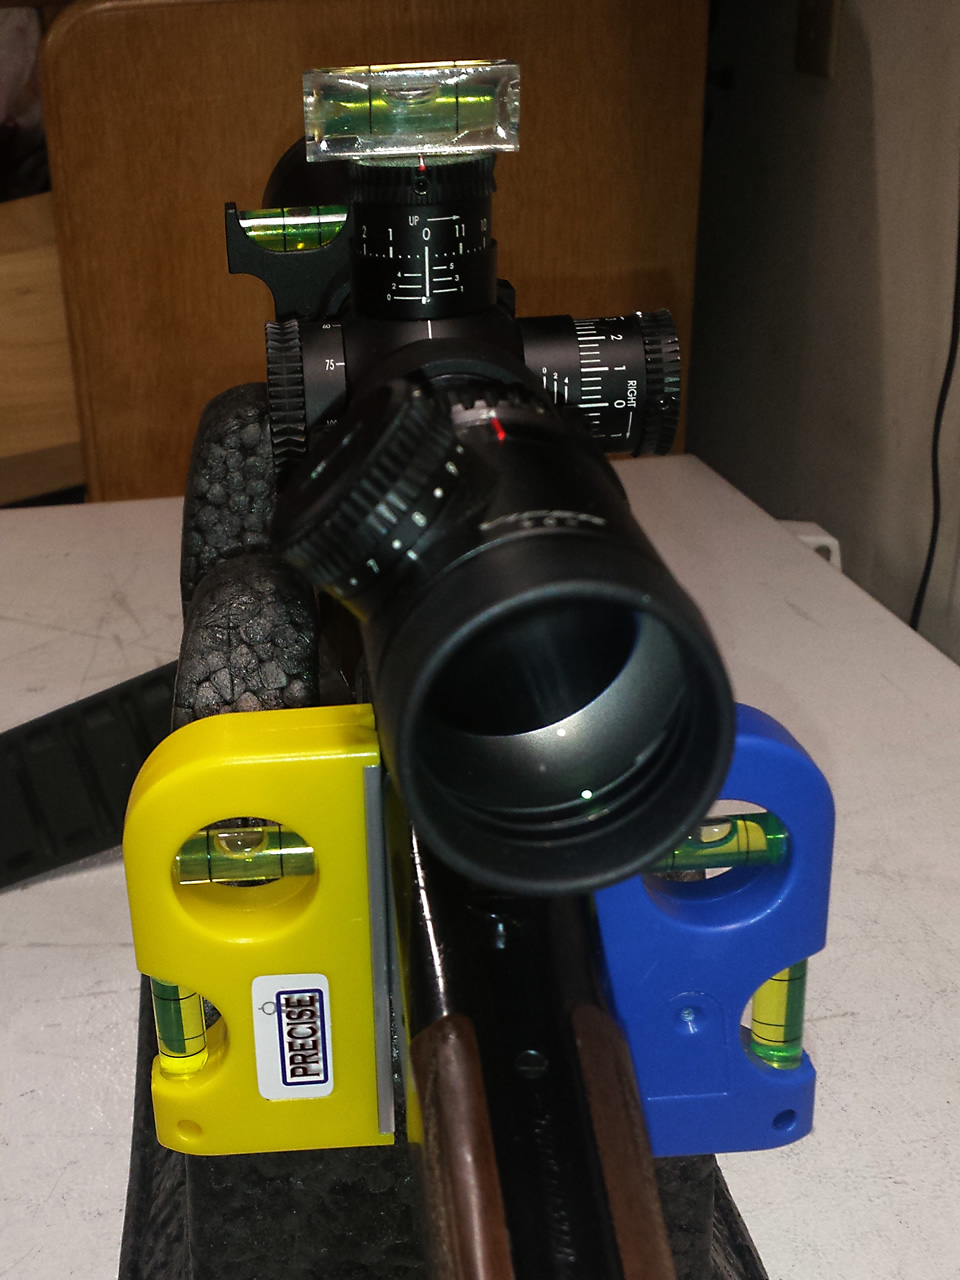
To help with the really long shots I have installed a Vortex bubble level to help me keep from canting the rifle.
To get everything aligned I use a couple of magnetic levels with perpendicular levels and snap them to the side of the receiver. I then place a picture hanging level on top of the scope cap. Once I have it all level I tighten up the rings and lock the Vortex level in place.
I could probably just use one level on the receiver but I like having the two to make extra sure I have it all lined up.
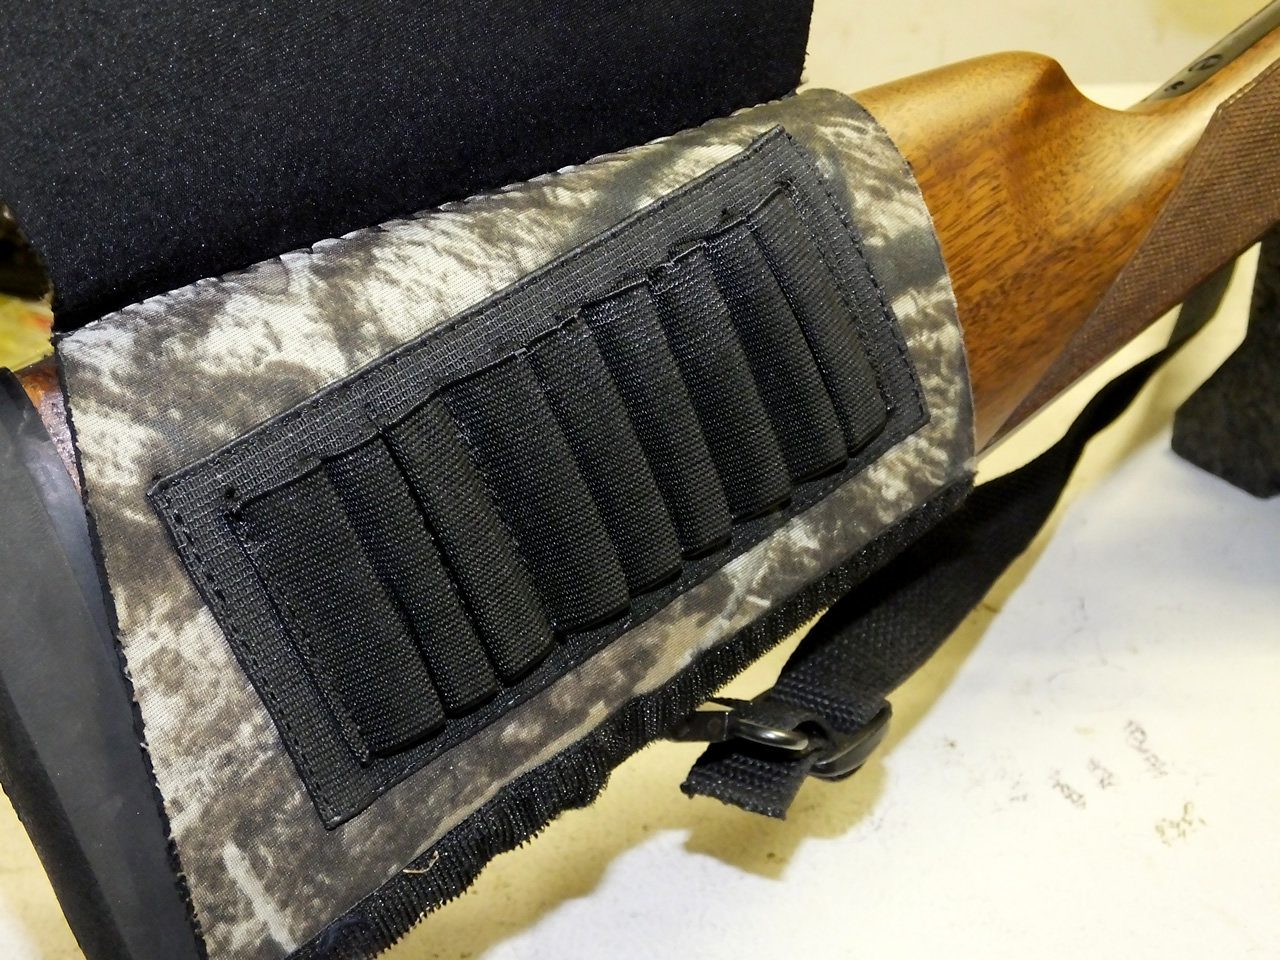
I like having a neoprene shell holder that has a flap that can velcro over the shells protecting them from the elements.
I like having shells right on the stock for a quick follow-up shot if necessary.
I have taken double coyotes with a Model 1885 rifle within seconds by having extra shells handy.
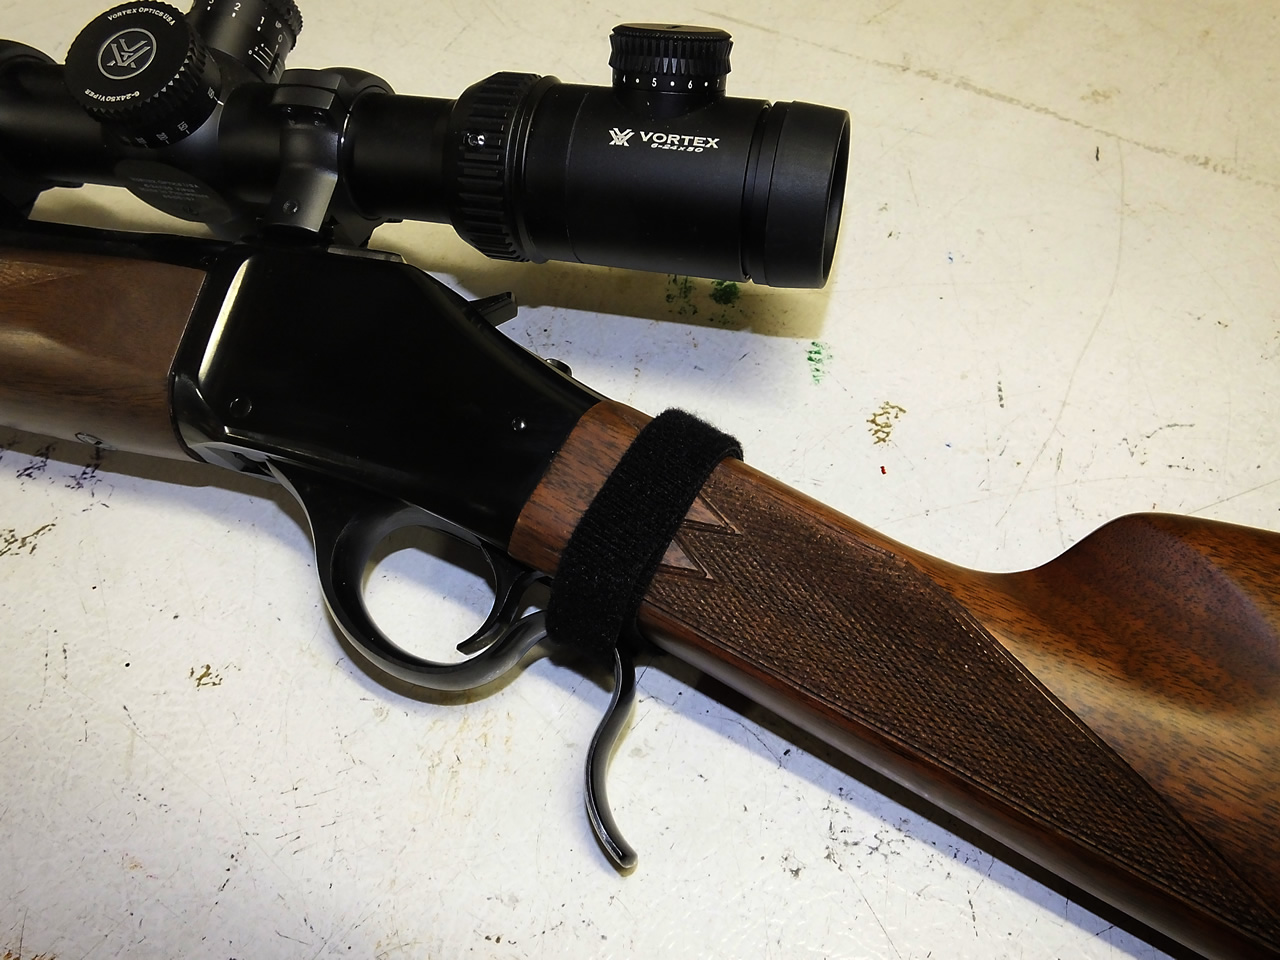
I have a velcro tie around the stock with one loop over the lever. This keeps the lever from catching on my pack straps and opening the action while I'm out hunting. If I need to cycle the action I am just a second or two from pulling the velcro off the lever.
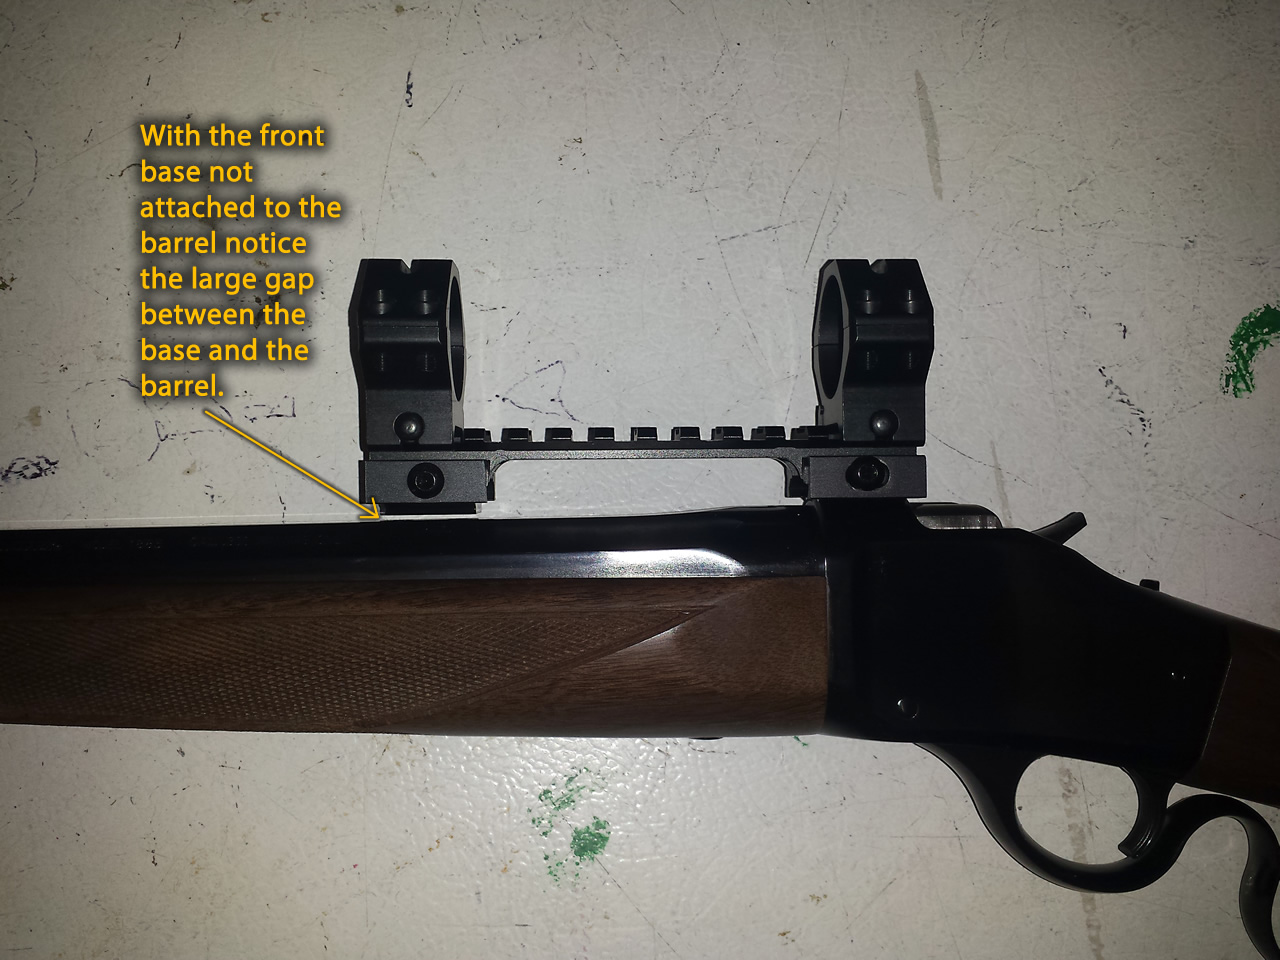
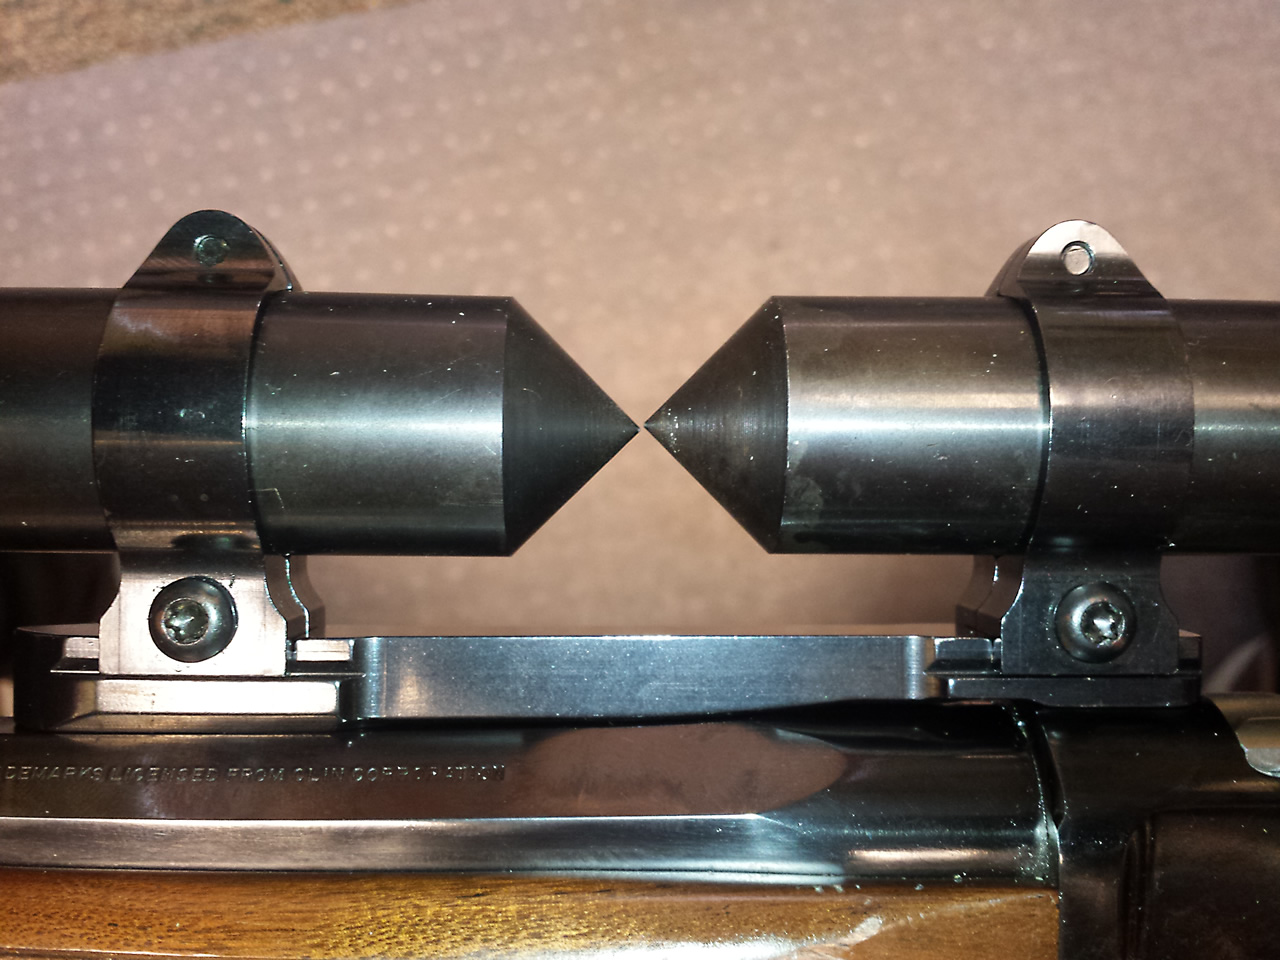
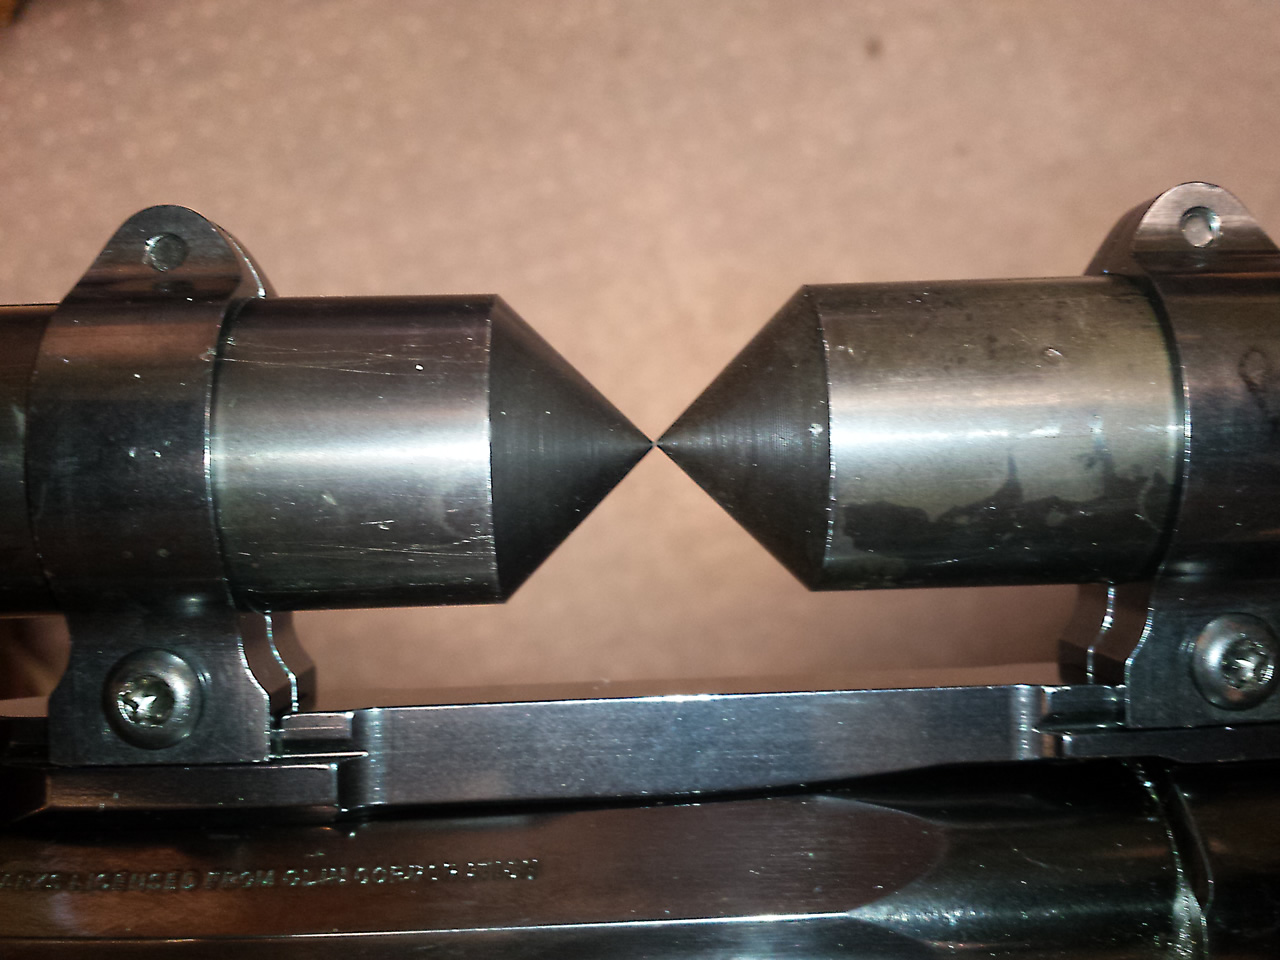
I tried to get a picatinny rail on the Model 1885. The problem I ran into is that, with the Weaver bases, there was a 42 MOA drop from the rear base to the front base. In this photo I only screwed down the rear Weaver base and then just clamped the front Weaver base into the riser rail to show the height difference from the front to rear on this Model 1885.
All looks well with this Lion Gears 12 slot riser rail clamped on the Weaver base but if I tightened this down solid the aluminum rail would flex and put torque on the scope. See the photo above this photo which shows the height difference between the front and rear Weaver bases.
Another issue with this system is that even with low Weaver rings I would be mounting the scope approximately 3/8 inch higher than I would like. I would probably need to add something to the comb to keep my shooting form comfortable.
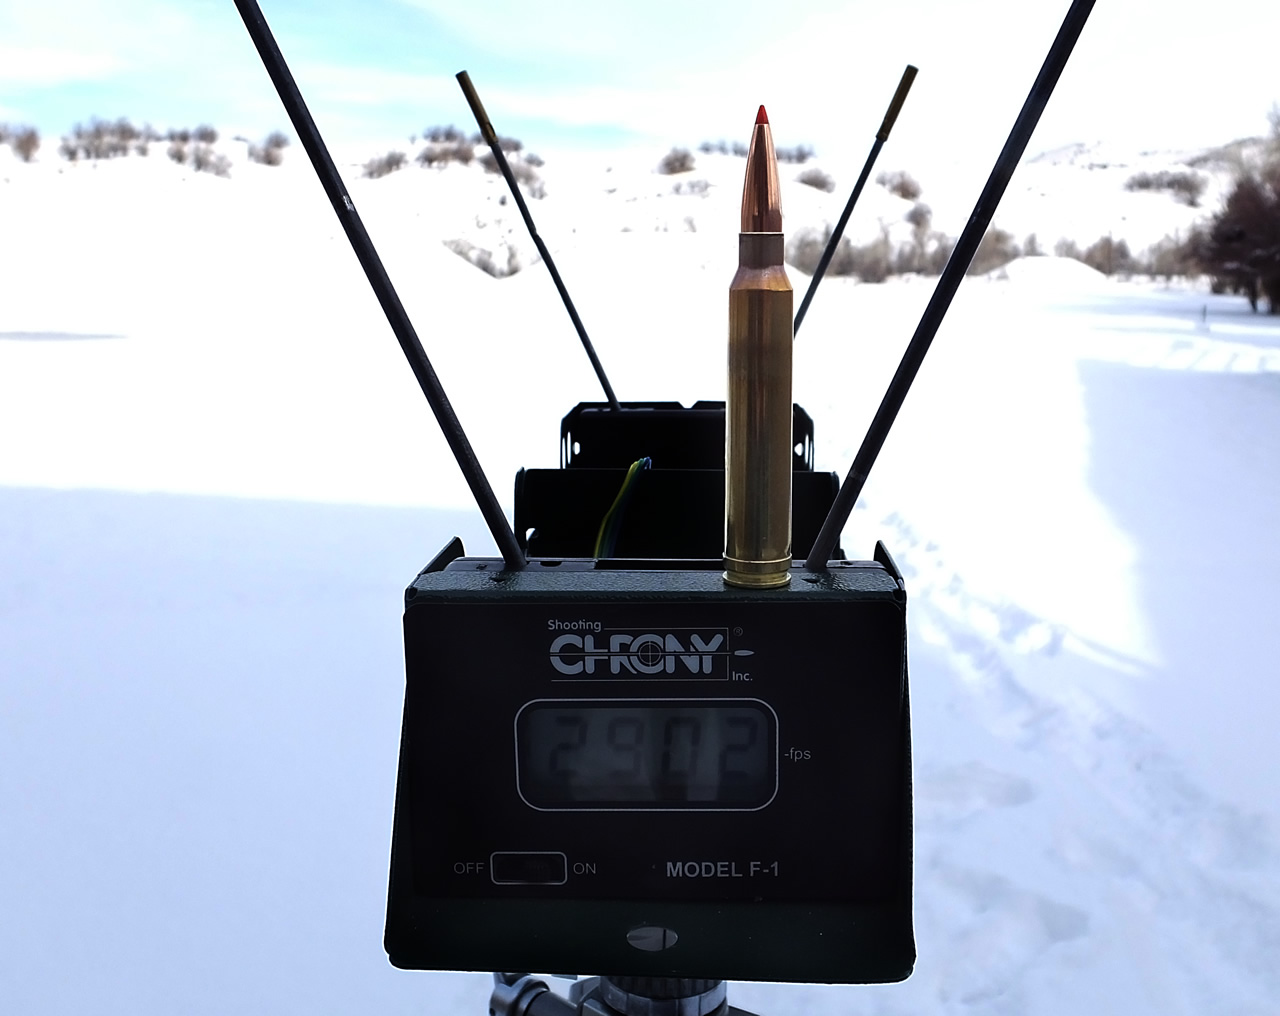
Here is a sample photo of the chronograph of a 208 A-Max hand load I am working on in my 300 Win Mag Model 1885.
I'm still tweaking this load and will post load data when I have it.
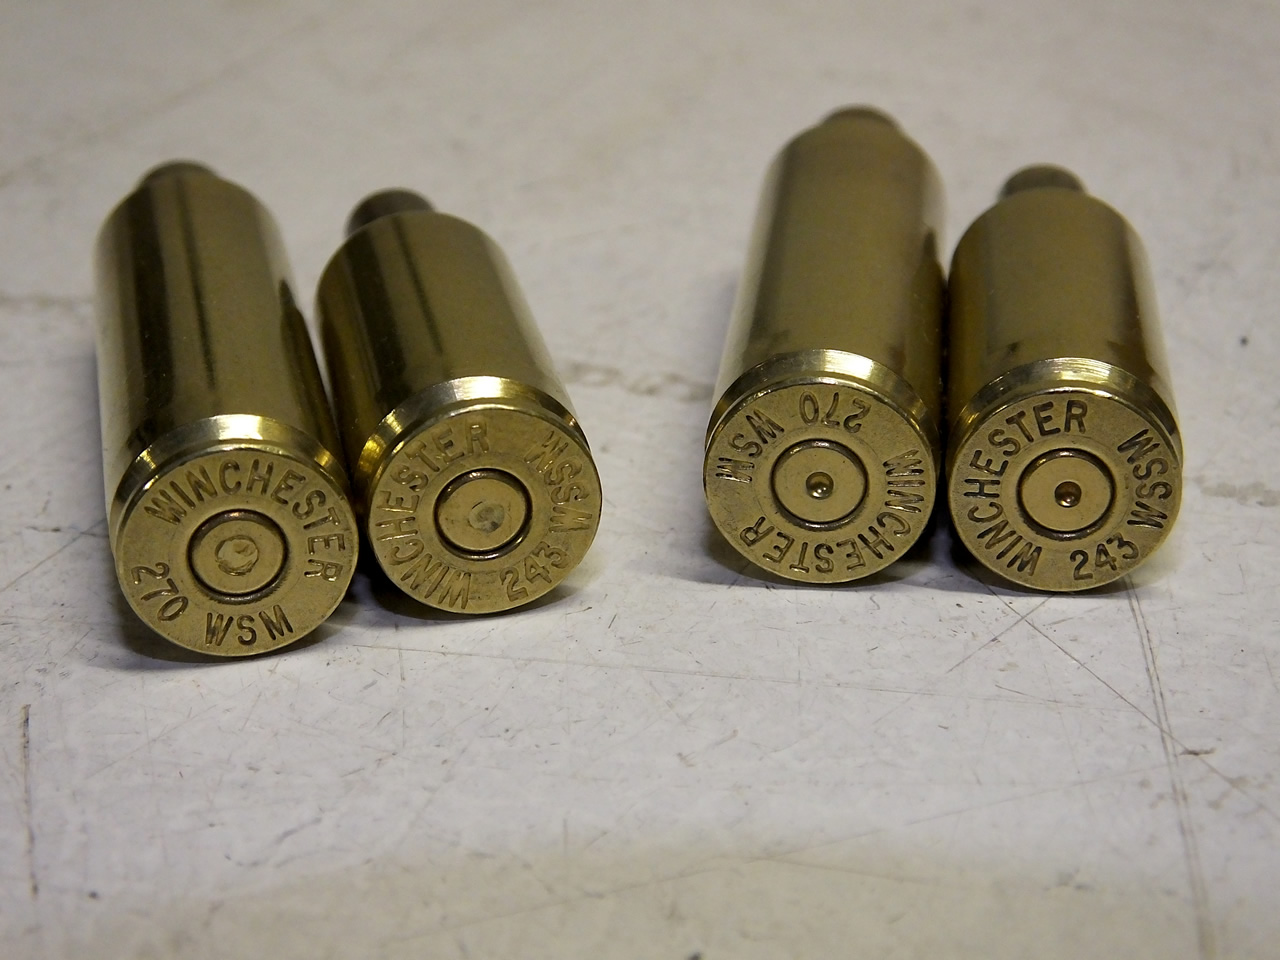
The Model 1885 likes to extrude the primer back into the firing pin hole then the falling block shears it off. The shells on the left are from my Model 1885 rifles showing the sheared primers while the shells on the right are from my X-Bolt and A-Bolt rifles with normal looking primer indents.
With my Model 1885 in 300 Win Mag I have not had any issue with the extruded primer. The primer indention looks perfectly normal.
To prevent the primer from being sheared off and gumming up the firing pin just dry fire the rifle immediately after you fire the rifle and before you open the action. Doing so will indent the primer again and prevent it from being sheared off when you open the action. Remember to practice safe shooting skills with your muzzle control when you dry fire the rifle.
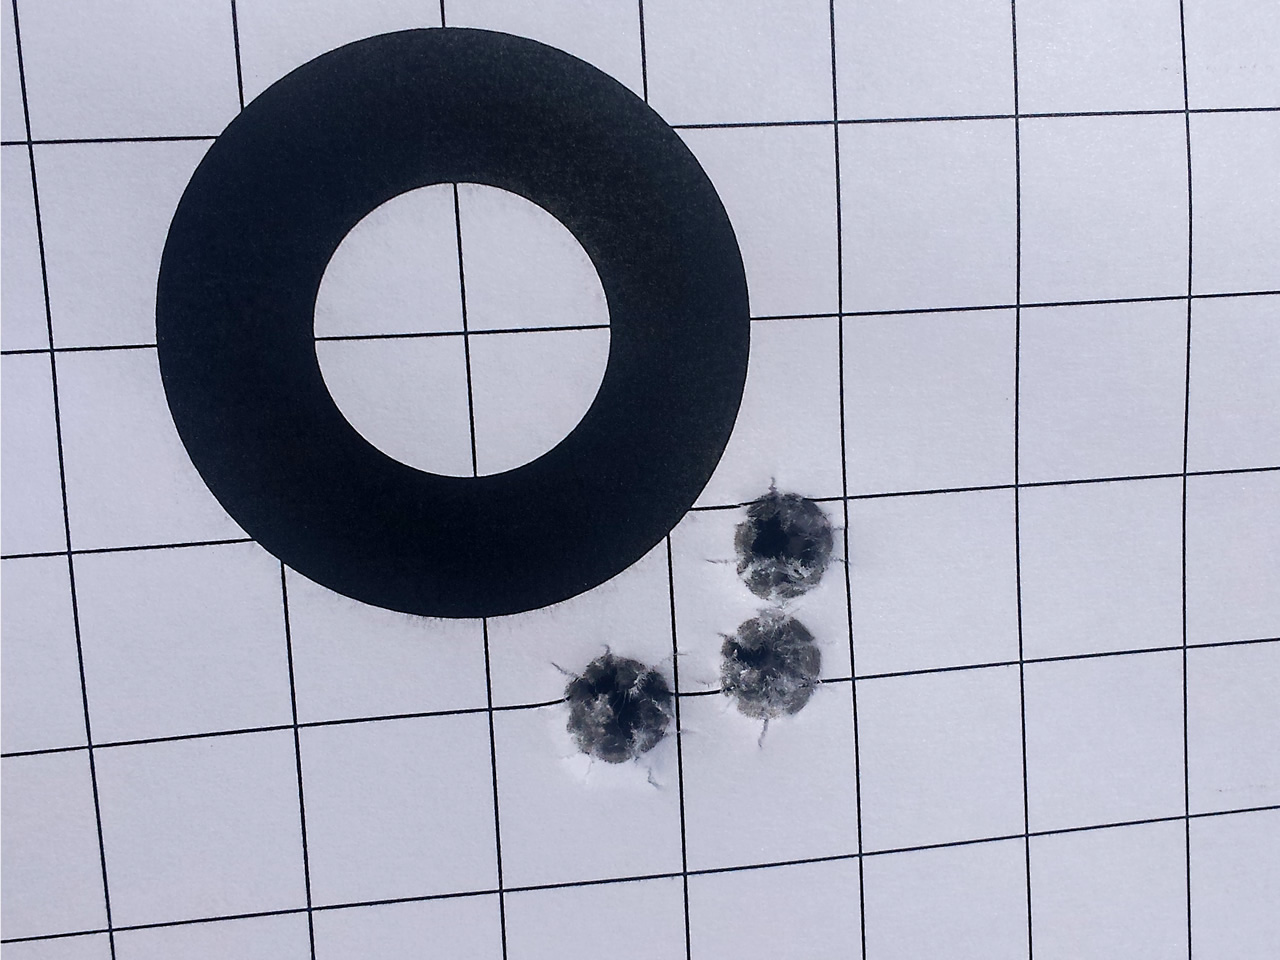
Here's my first 215 Gr Berger load with my 300 Win Mag. At 0.6 inches this isn't too bad at 100 yards for a first load. I love Berger bullets. I shot this group a couple weeks after I took a cow elk with my 300 Win Mag Model 1885 using a 208 A-Max.
I'm thinking this is going to be my favorite bullet for this rifle.
With the Talley base and rings on this Model 1885 the rings are just a little out of alignment.
After about an hour of lapping I was able to get the rings in near perfect alignment.
- Details
- Written by: The DIY Hunter
- Category: Firearms & Shooting
- Hits: 57441
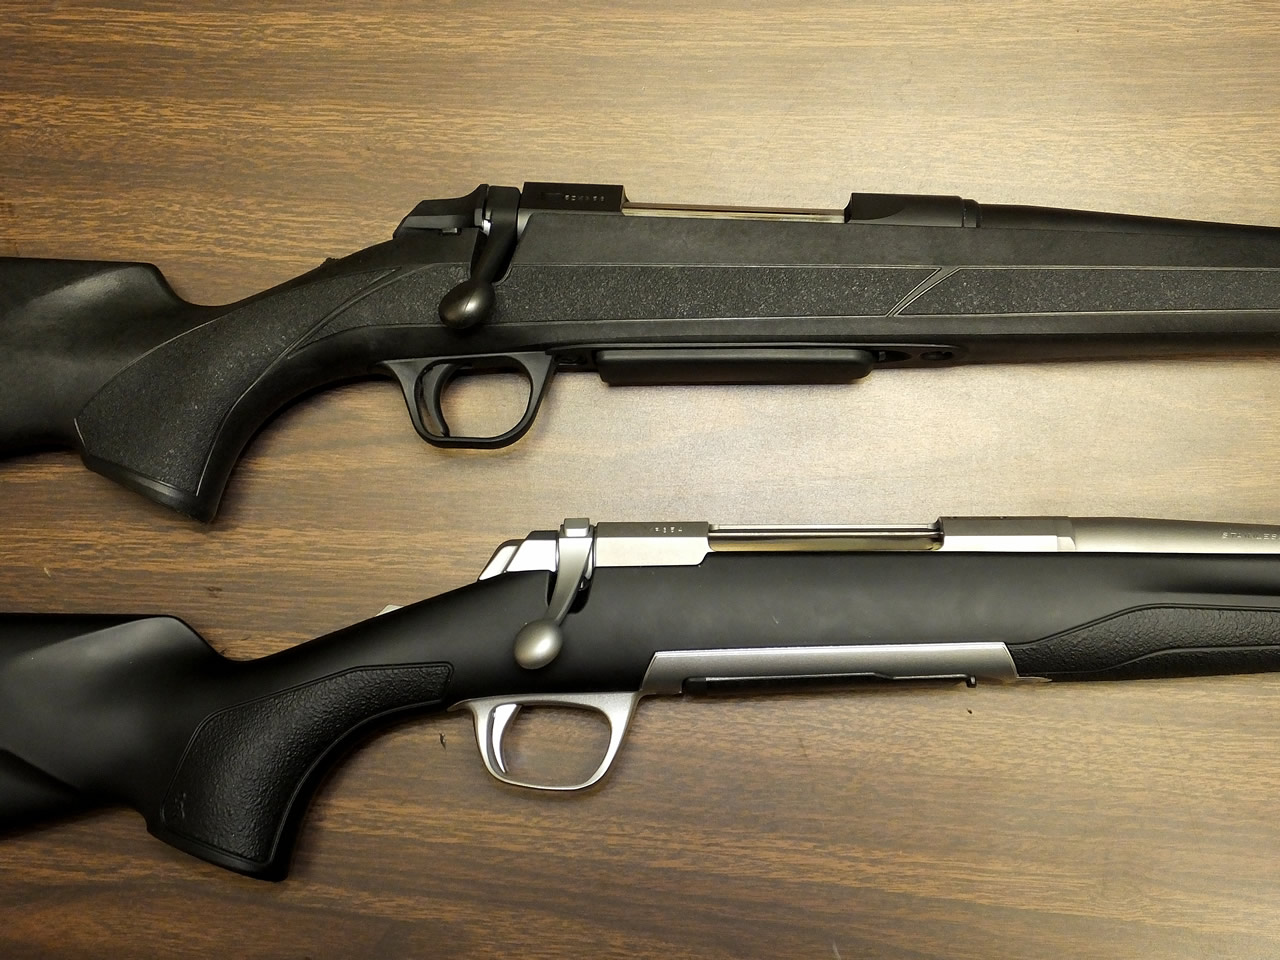
The X-Bolt (bottom) has a sleeker looking profile much of this coming from the magazine being lower than the bottom of the stock on the AB3.
The X-Bolt also has a lower profile receiver. Notice how much higher the top of the receiver is above the bolt showing in the ejection port on the AB3. Then notice how much larger the diameter of the bolt is on the AB3 in an image of the bolts shown lower on this page.

Both rifles have a nice feeling right hand palm swell in the pistol grip area of the stock. You can also notice that the stock of the X-Bolt on the right has a softer looking finish from the Dura-Touch Armor coating (discontinued in 2019).
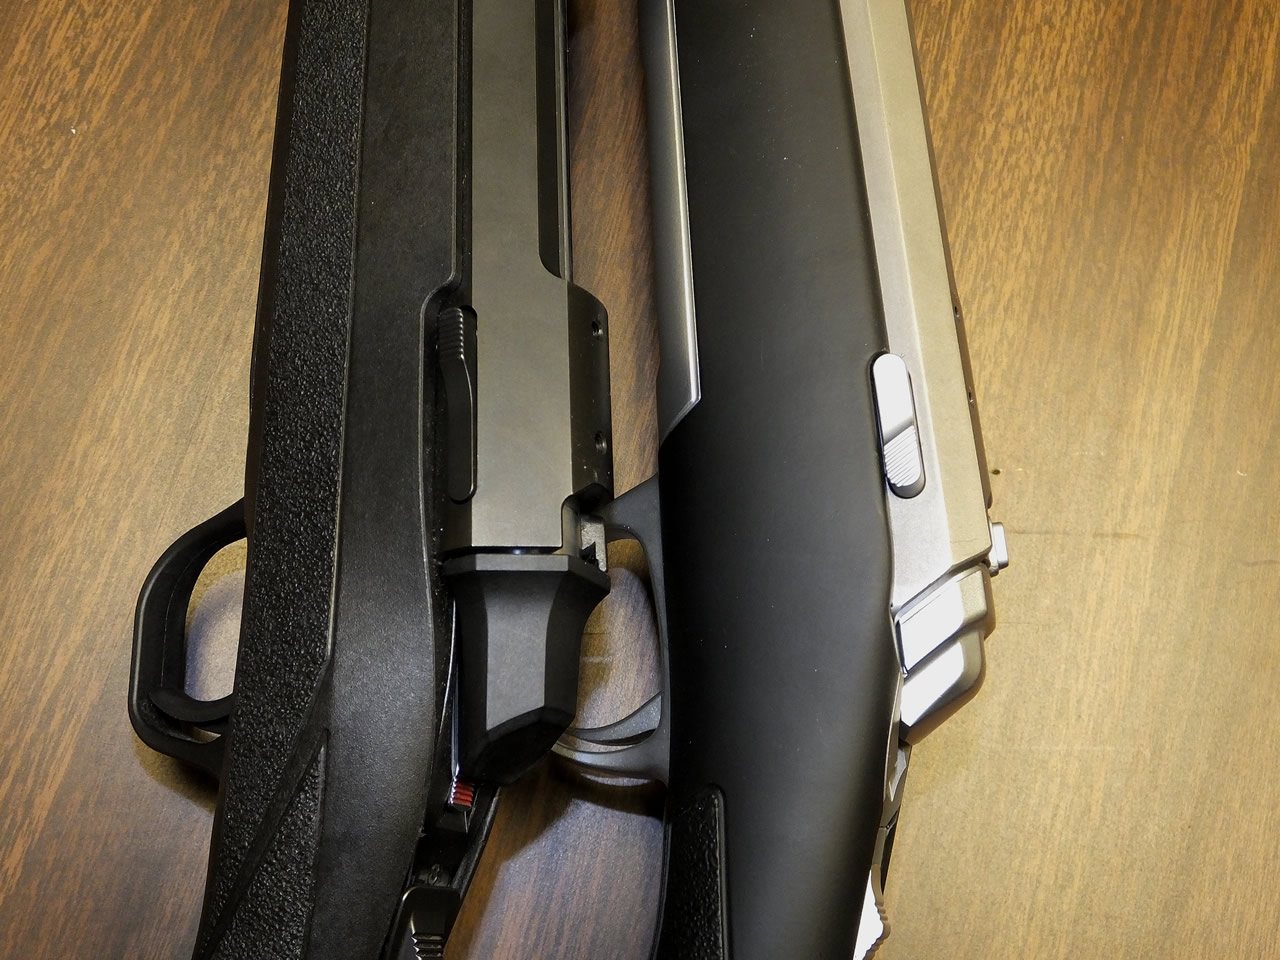
The release button to remove the bolt is located on the left, top rear of the receiver on both rifles.
Lately I have noticed that the traffic to my X-Bolt vs A-Bolt Comparison page on my website has been increasing. I find this interesting because the A-Bolt has actually been discontinued by Browning being replaced by the new AB3. I figure a lot of this traffic is because of confusion that the AB3 is the A-Bolt.
In 1985 Browning introduced the A-Bolt and in 1994 with the introduction of the BOSS system Browning introduced the A-Bolt II. In 2012 Browning introduced the AB3. With the introduction of the AB3 Browning has been fazing out production of the A-Bolt II.
To help deconfusimy the differences and names of the new AB3 I borrowed an AB3 to get some photos to shows the differences between it and the X-Bolt.
Browning's AB3 is stamped with a "A-Bolt" on the barrel. I'm not sure why. All of it's marketing material calls it AB3. AB3 obviously stands for A-Bolt III but the name is clearly AB3. The AB3 is a pretty drastic change from the design over the A-Bolt II which has commonly been referred to as just the "A-Bolt."
I own three A-Bolt II rifles. They have all been great rifles for me. I really like them. A few years ago I picked up my first X-Bolt rifle in 270 WSM. This too has been a great rifle for me. You can read many entries in my blog using my X-Bolt and A-Bolt rifles.
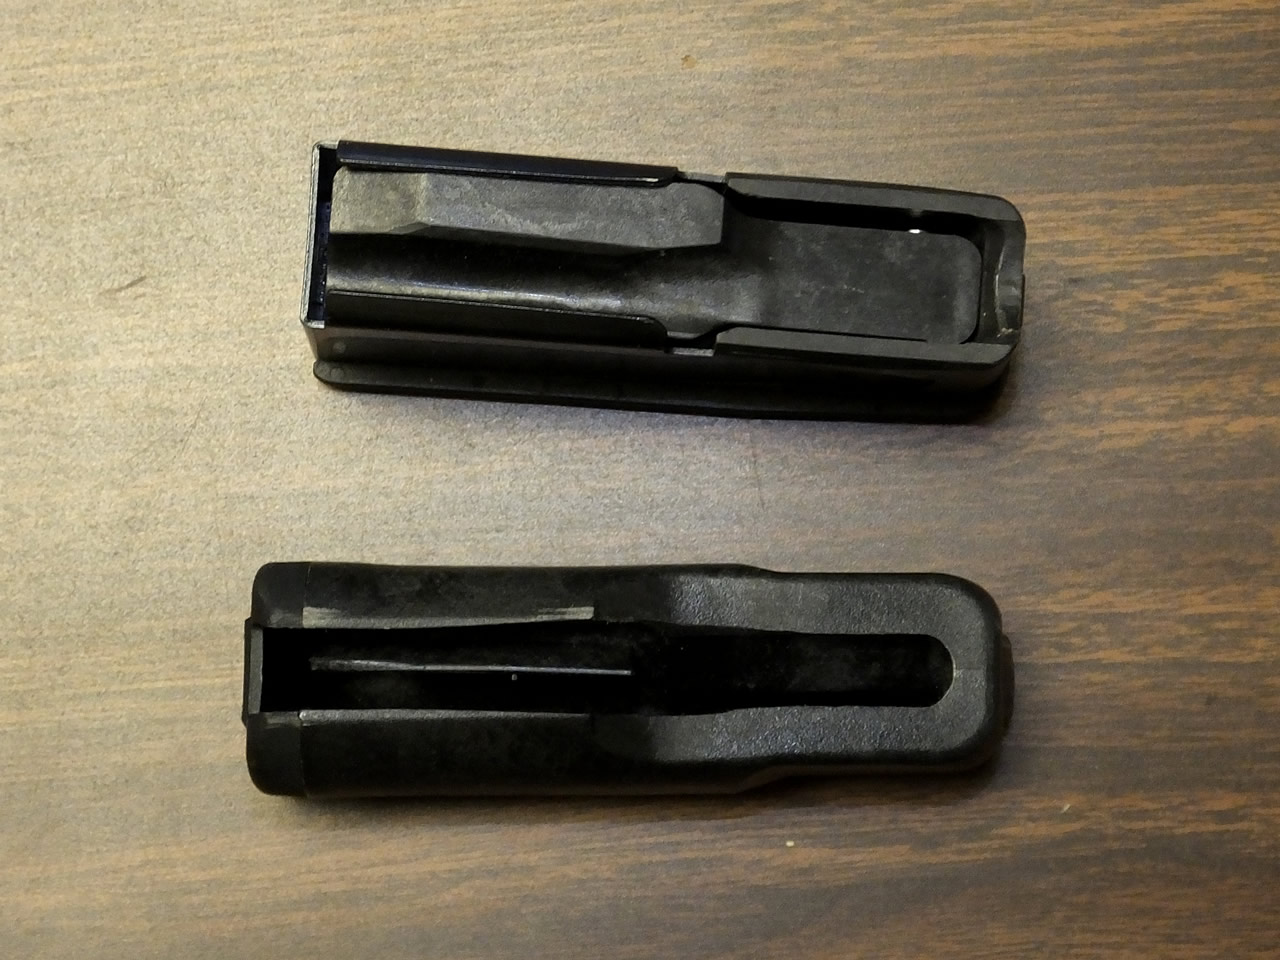
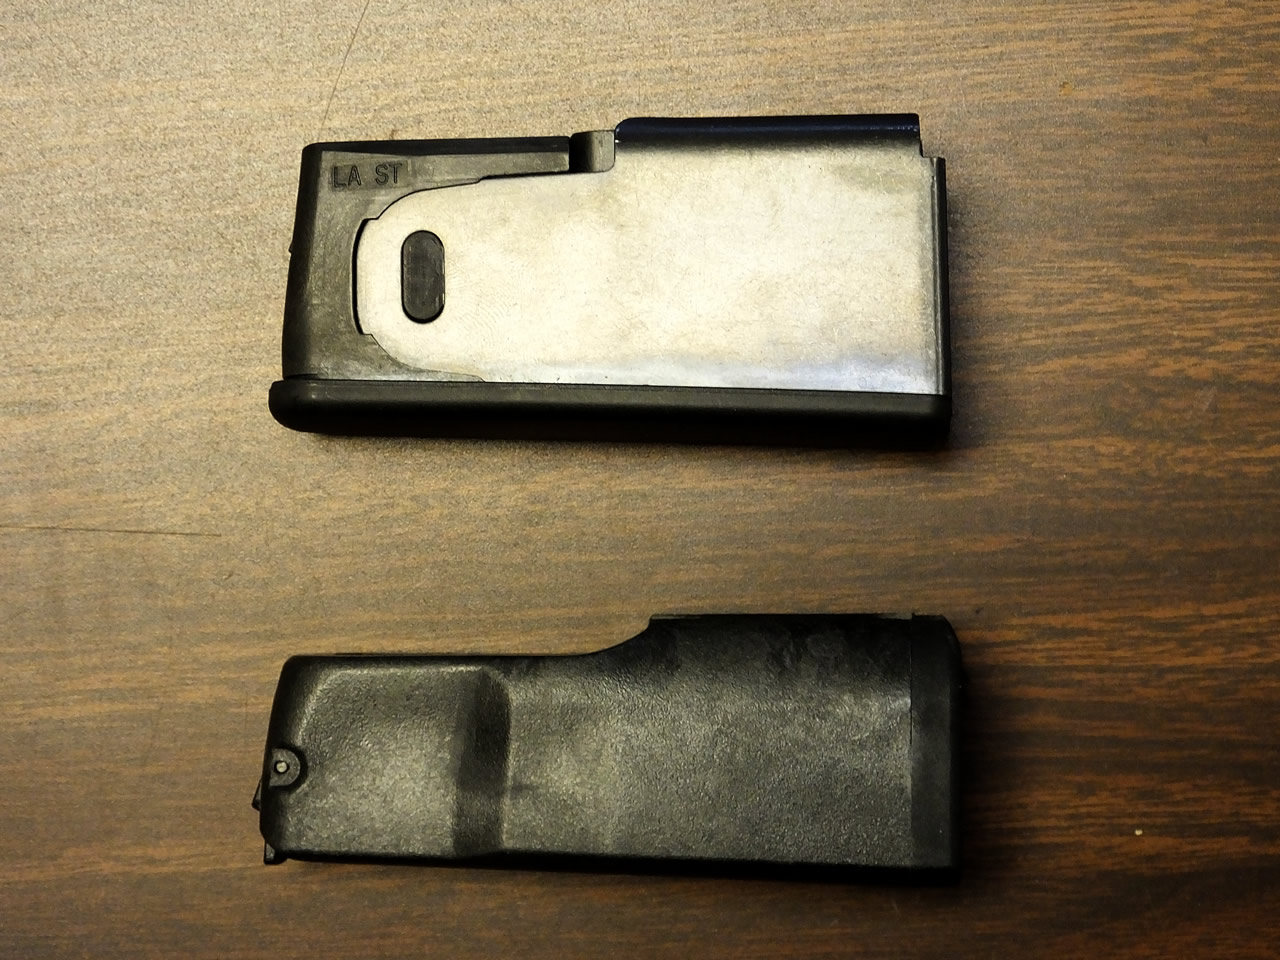
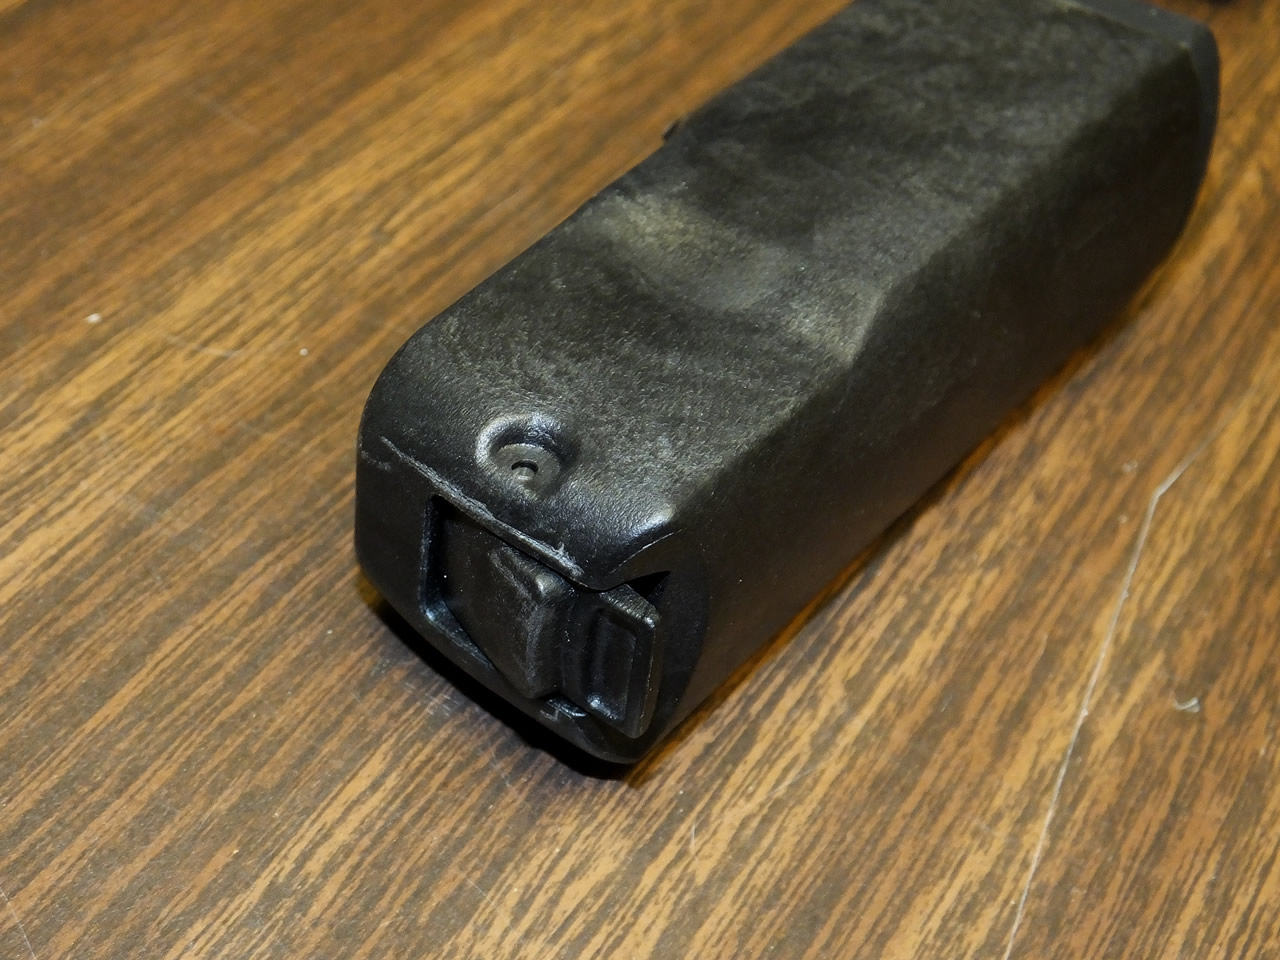
Here's a top view of the detachable AB3 magazine (above) and the detachable X-Bolt magazine (below). The AB3 magazine has a leaf spring and staggers the cartridges alternating side to side. The X-Bolt magazine is a rotary style giving the top cartridge the same position right at the top and center for an easy feed straight into the chamber.
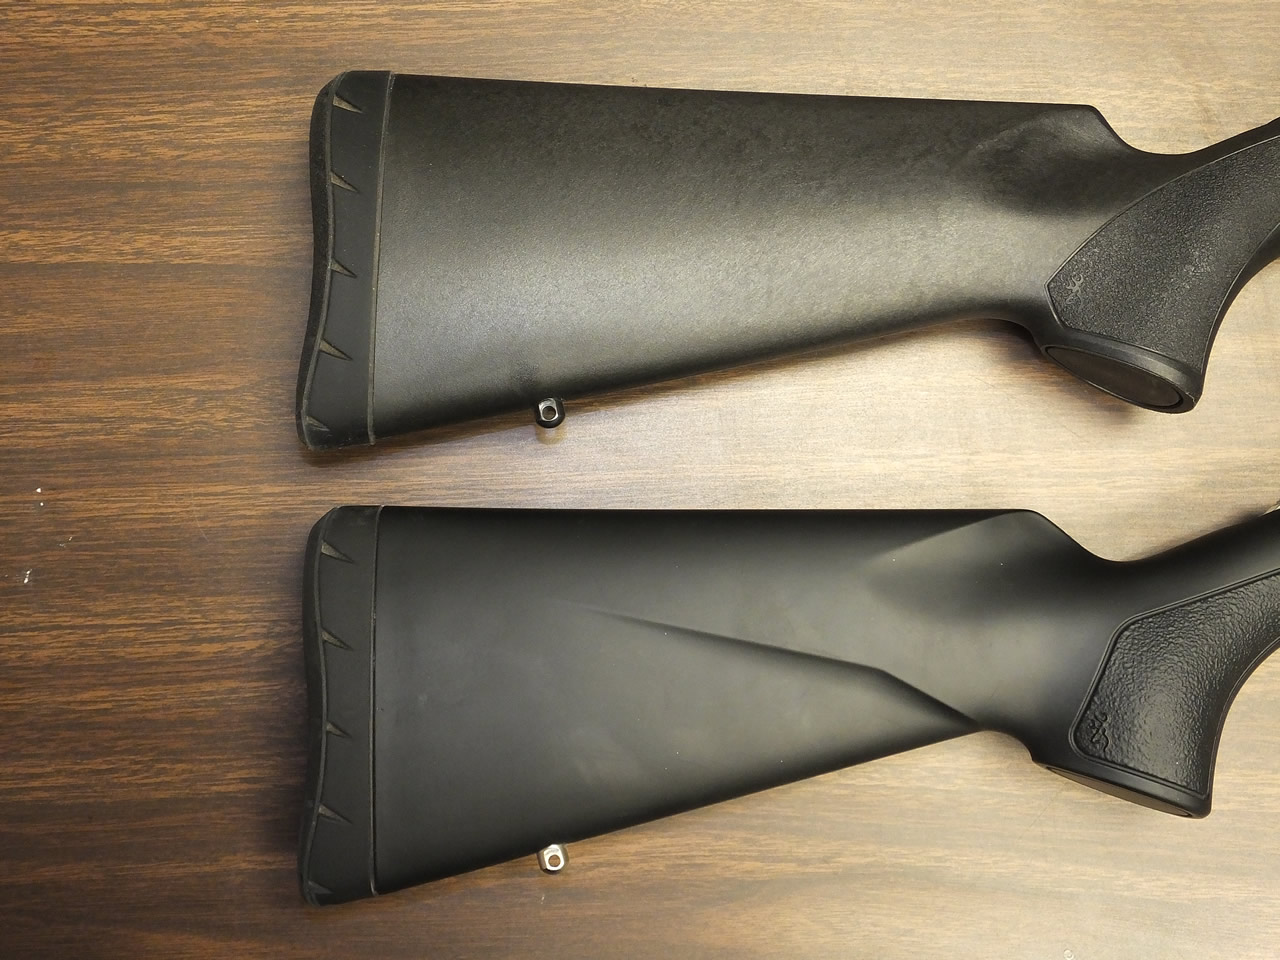
Both rifles have the Inflex recoil pad system. This is a nice recoil pad and if you need to add a little length to the stock it is easy done with Browning shims. (see: Easily Adjust the Length of Pull on a Browning X-Bolt Rifle)
Here's a rundown on what makes the two rifles different and sometimes very similar.
Both have a top tang safety.
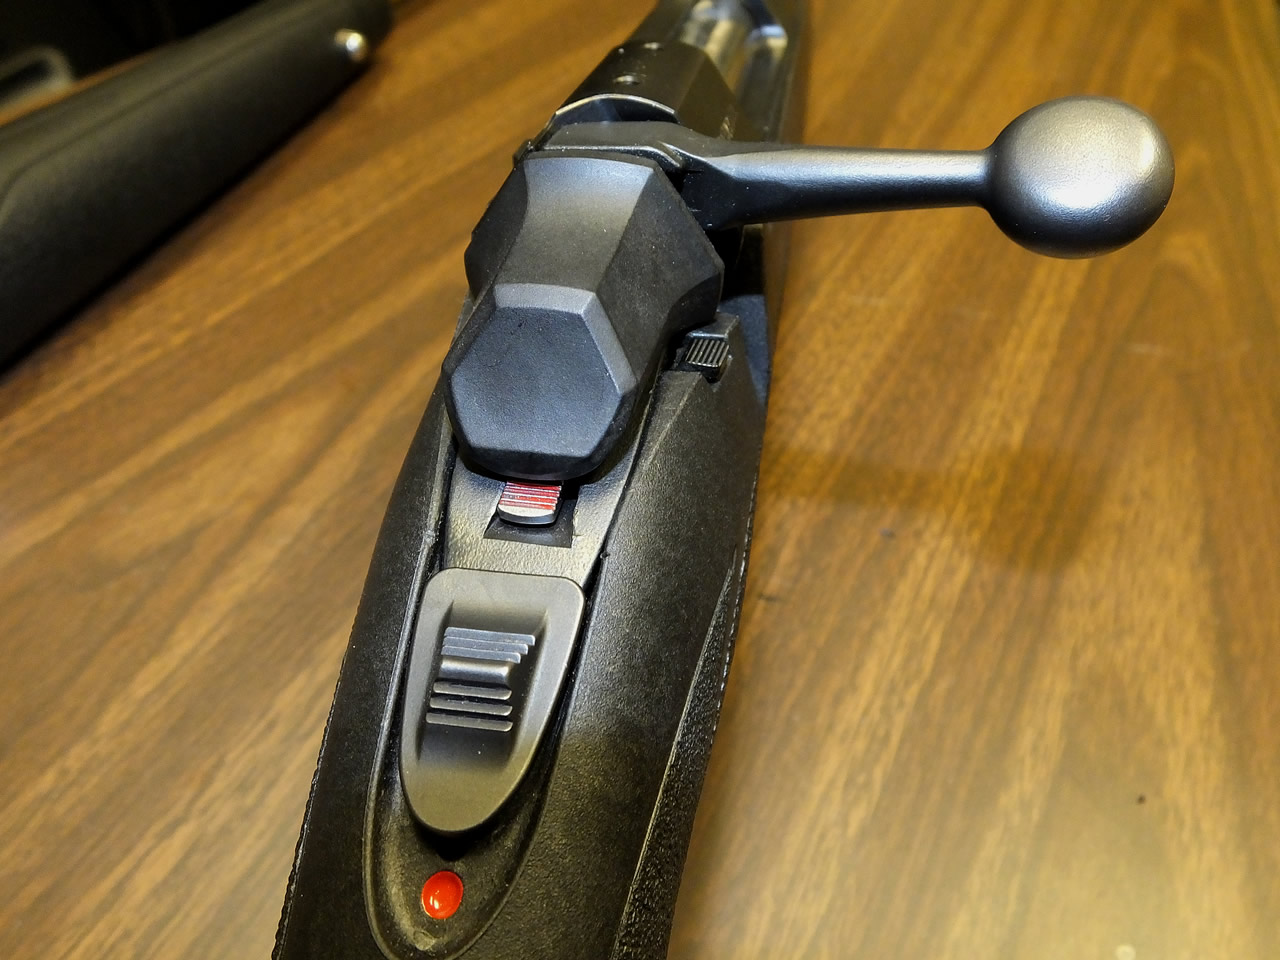
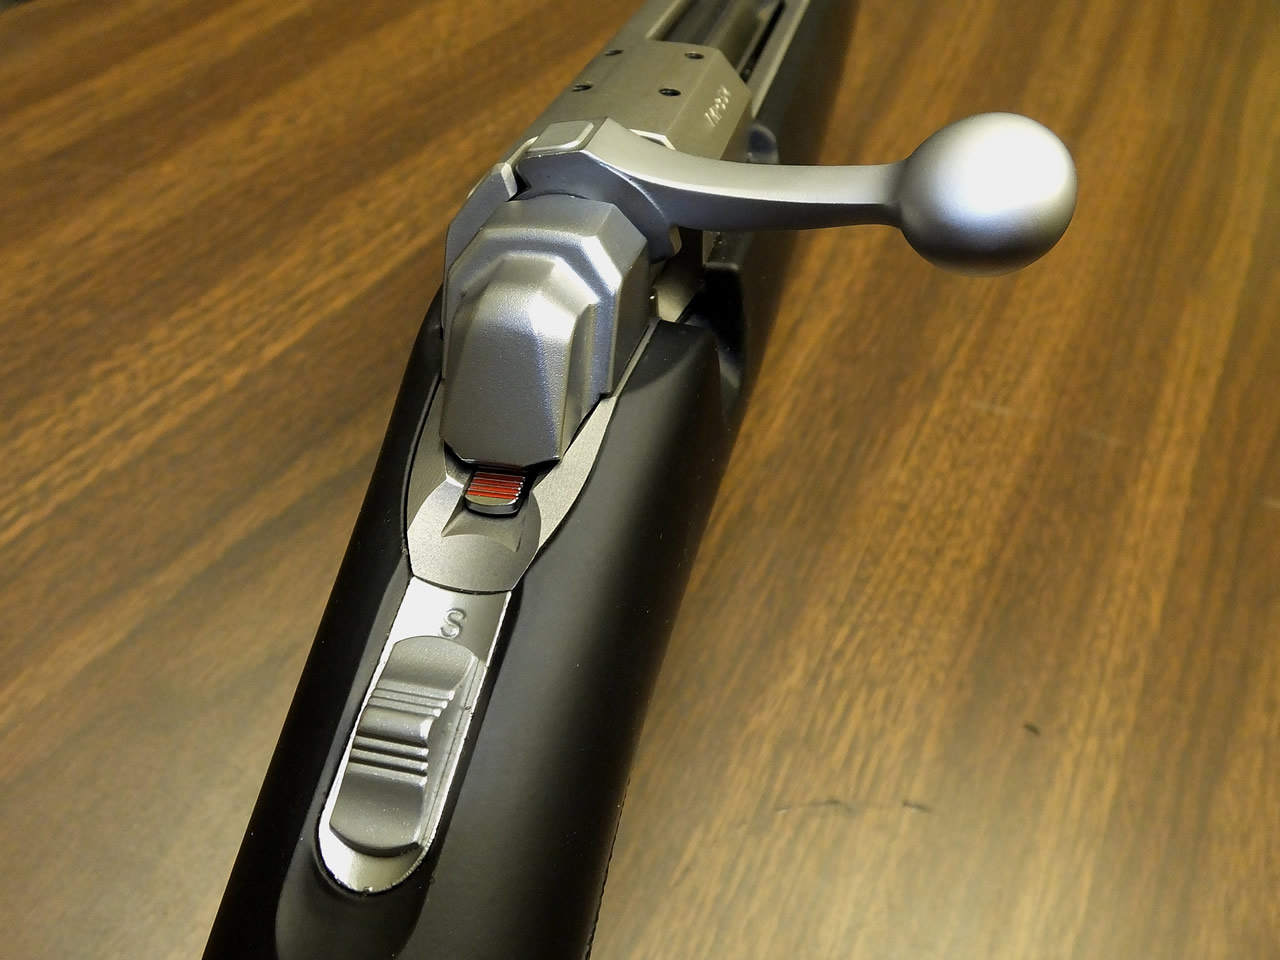
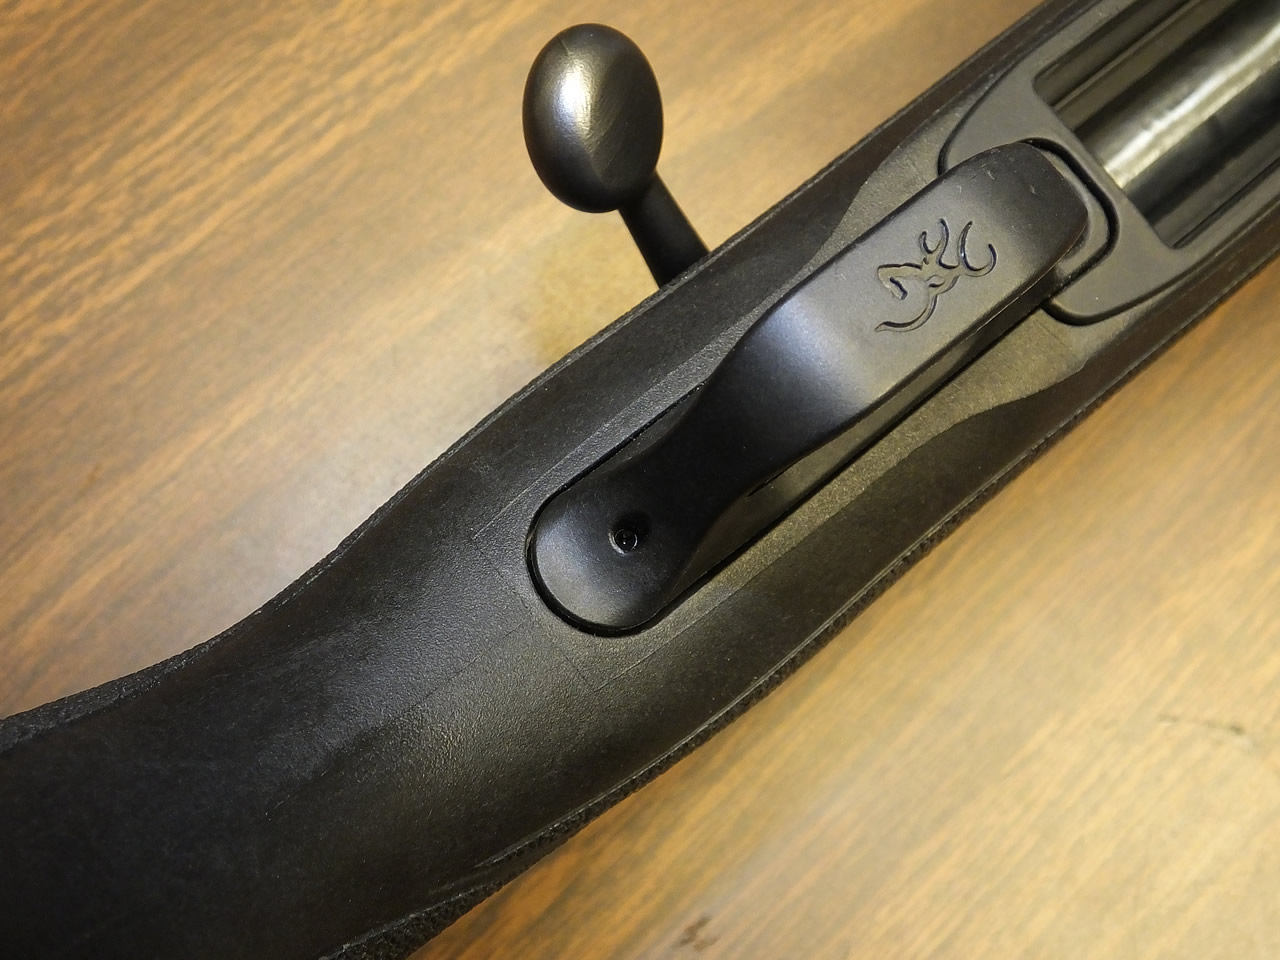
The X-Bolt and AB3 both have a bolt lock override button. This allows you to open the action of the rifle with the rifle on safety.
The X-Bolt composite stock has Dura-Touch Armor coating(Dura-Touch was discontinued in 2018) that feels really nice where the AB3 does not.
The magazine on the AB3 is a leaf spring with alternating cartridges from one side to the other where the X-Bolt is a rotary style with each shell lined straight with the bore. The magazine style of the X-Bolt has really smooth feeding.
The AB3 has a composite trigger and trigger guard assembly. The X-Bolt has a metal trigger and trigger guard assembly.
Both triggers provide a nice crisp break. The trigger on the X-Bolt is adjustable from 3 to 5 pounds and factory set at 3 1/2 pounds. The AB3 is listed as being between 3 1/2 to 4 1/2 pounds... I'm not 100% sure that it is adjustable just yet. I'm still checking on this one.
The bolt diameter is much larger on the AB3.
The safety switch on the AB3 is larger providing lines that are not as clean looking as the X-Bolt.
The drilled and tapped receiver has 4 holes for each base on the X-Bolt and the AB3 has 2 holes each. You will also not want to get confused with using A-Bolt bases on an AB3. The AB3 requires AB3 specific bases.
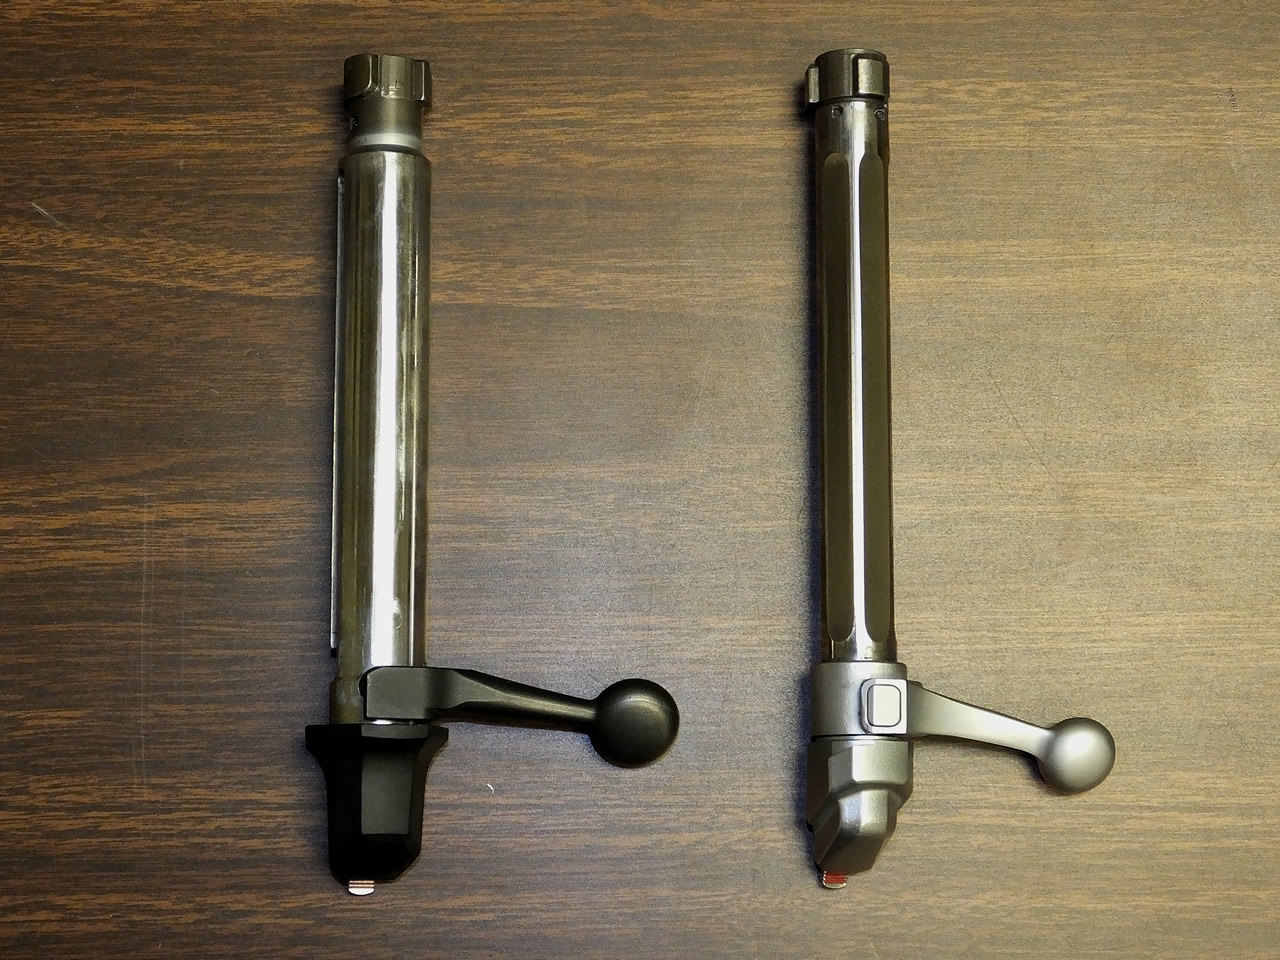
The AB3 bolt (left) is mostly round and larger in diameter than the X-Bolt bolt (right) that has flat surface plains the length of the bolt.
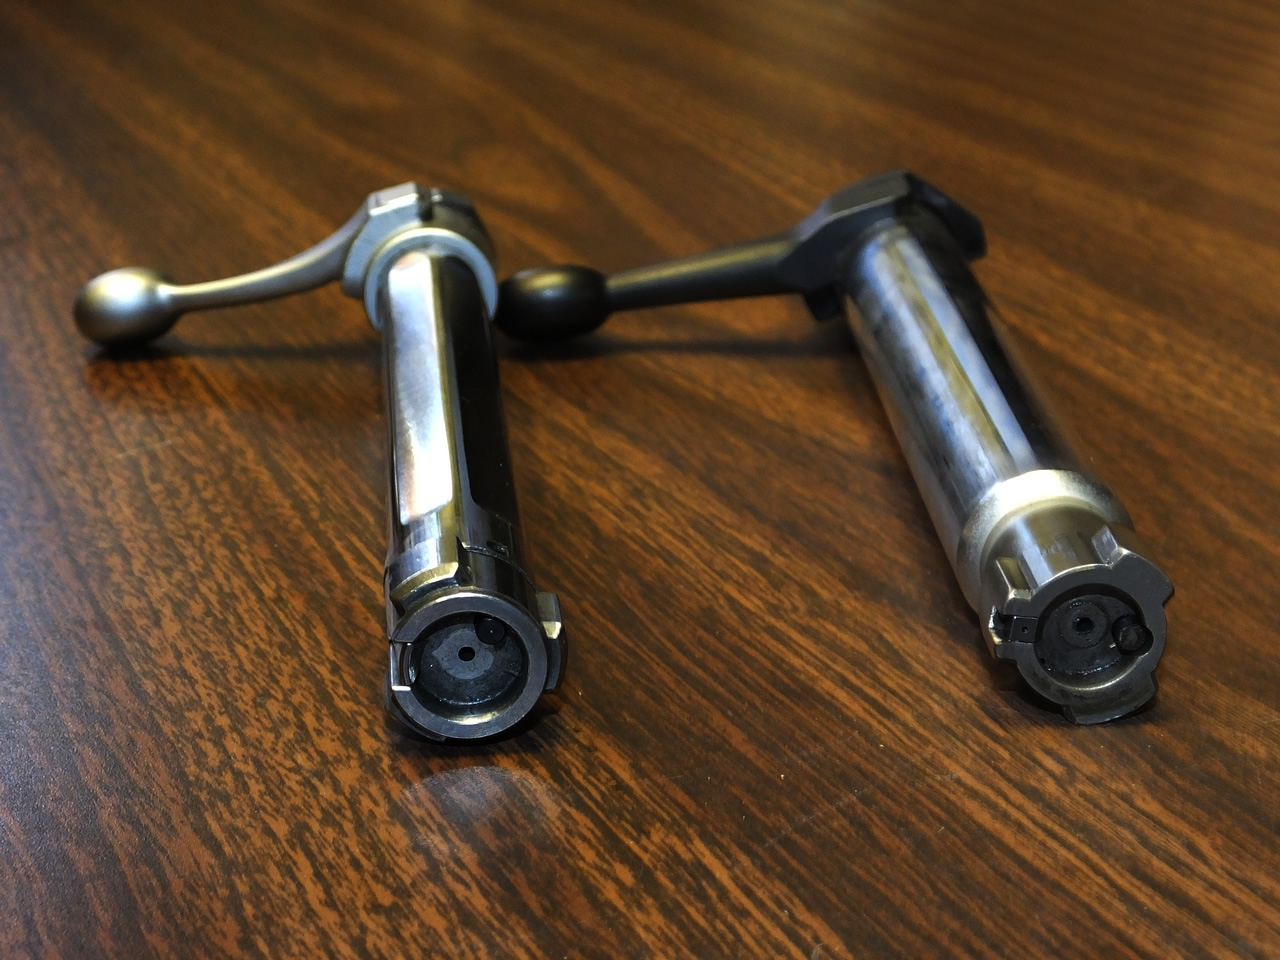
X-Bolt (left), AB3 (Right) Both bolts have three lugs forming a "A" shape.
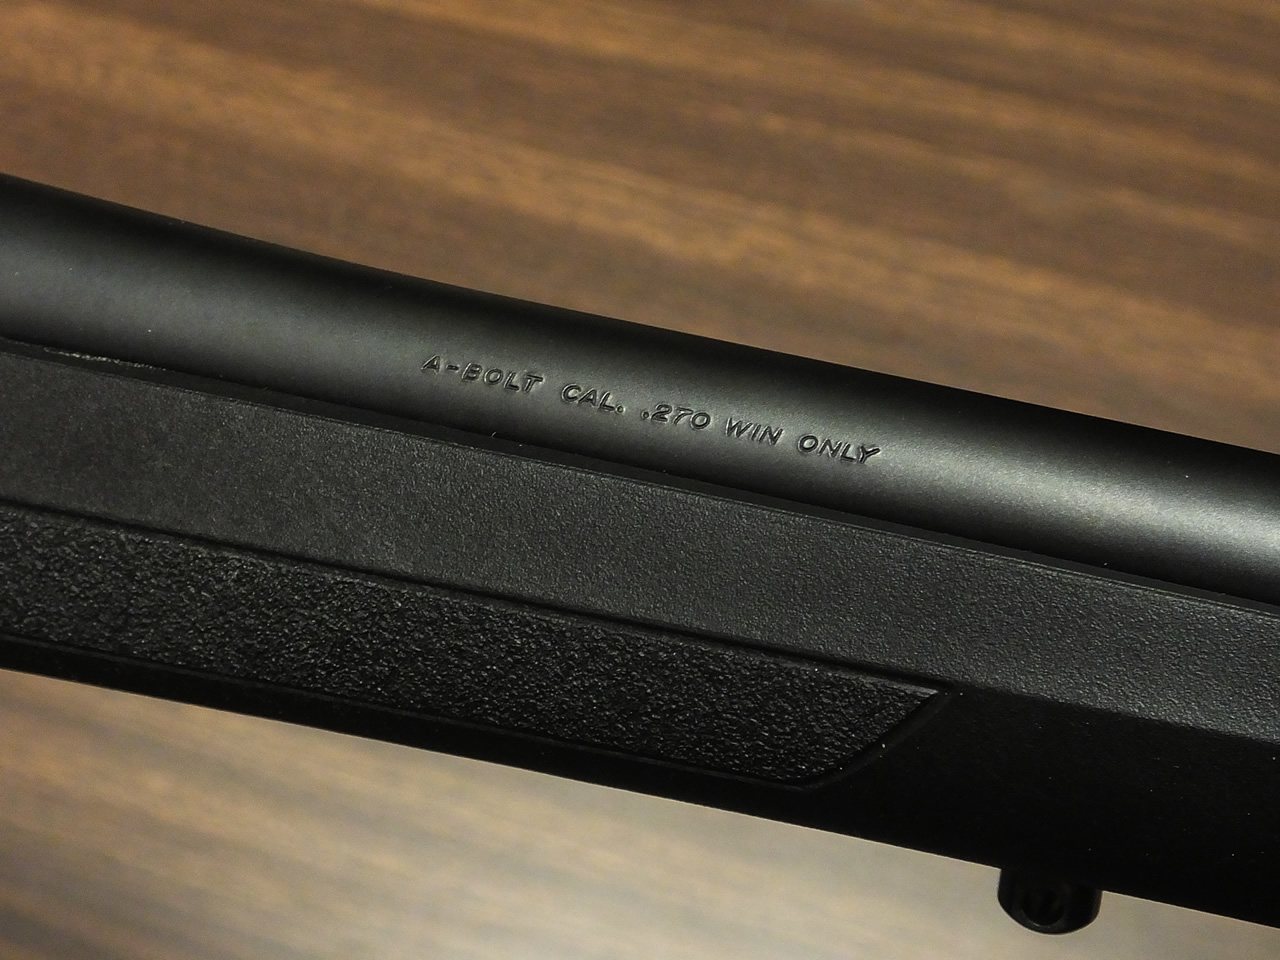
The AB3 is stamped with "A-Bolt" on the barrel. Not sure why but it is.
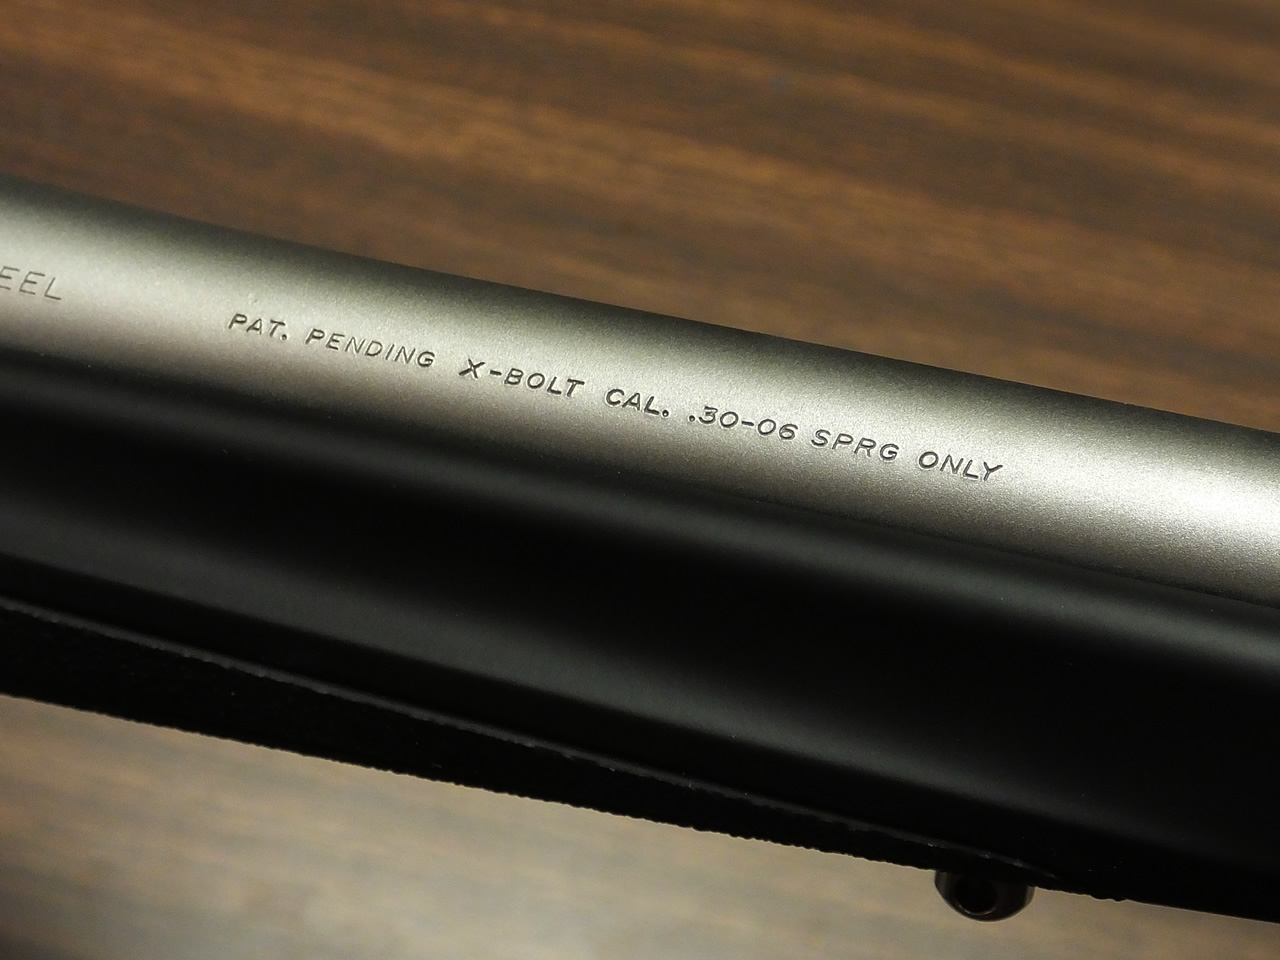
Here's the stamp on the barrel of the X-Bolt.
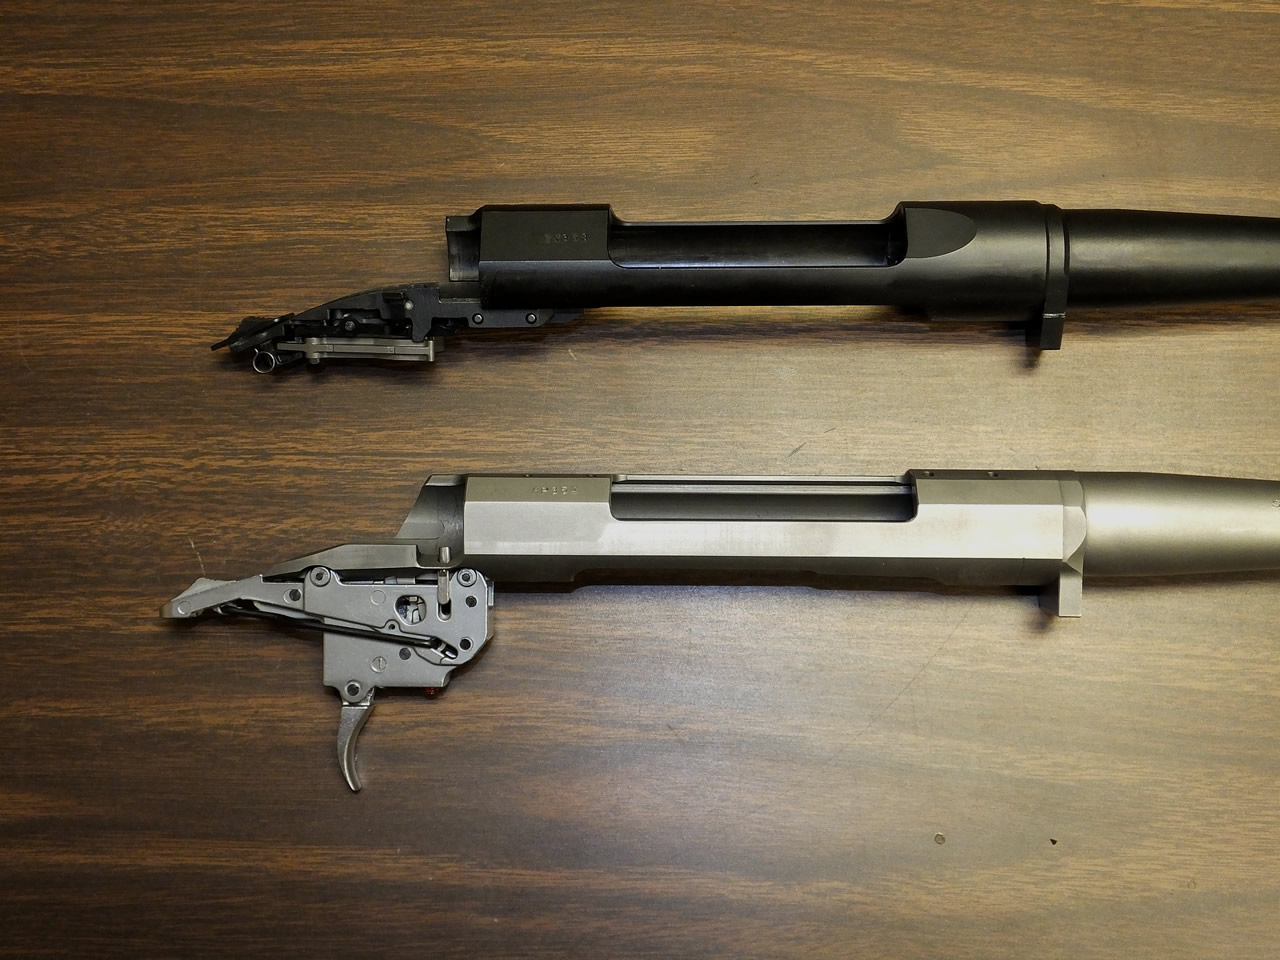
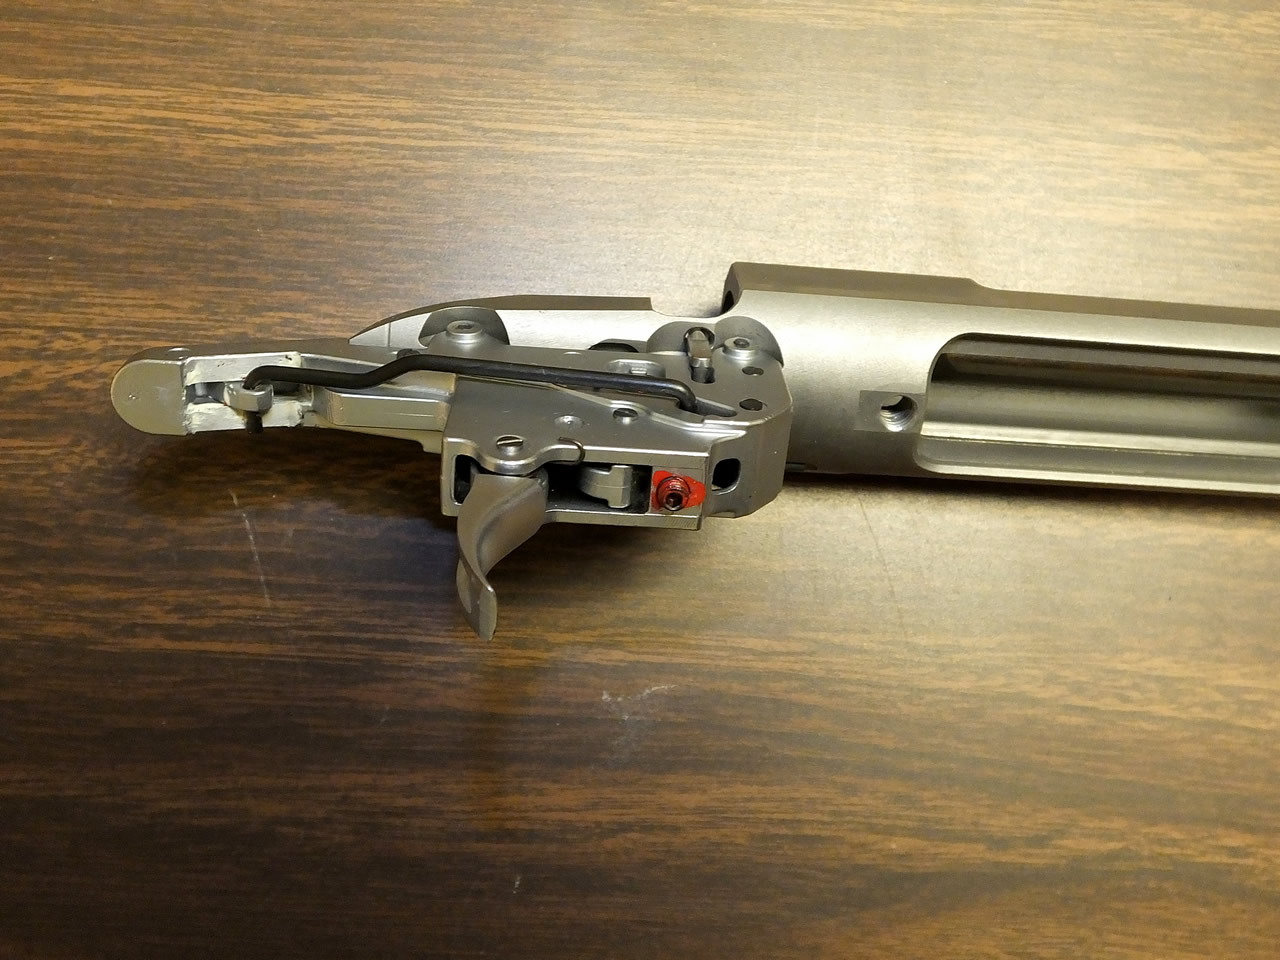
Receiver and trigger groups. AB3 (top) and X-Bolt (bottom).
Here's a side view of the half metal, half composite AB3 magazine (above) and the composite X-Bolt magazine (below).
AB3 bolt lever in top position 60 degrees up. This allows for faster cycling and plenty of clearance from the scope.
X-Bolt bolt lever in top position 60 degrees up.
I know the X-Bolt shoots really well from the experience I have had with my Stainless Stalker in 270 WSM and I'm confident the AB3 should also shoot well. I have no doubt that is does shoot well. Both rifles are made in the Browning Miroku factory in Japan and I know they make great rifles and barrels in that factory.
My favorite rifles of all time the Model 1885 (John M. Browning's First patented firearm) are made in the same factory and they all shoot really well for me.
Obviously the AB3 is a much lower priced rifle than the X-Bolt. Lower price doesn't necessarily mean less accurate but the components and aesthetics just are not quite as nice. Basically more plastic and not as pretty.
I think of the AB3 as a work horse rifle, like a truck that you're not afraid to get scratched, yet a rifle that should provide great accuracy and dependability.
The AB3 is well built and value priced whereas the X-Bolt and A-Bolt are premium built bolt action rifles. As far as I know the AB3 is the first firearm that Browning has ever built value oriented. It's definitely not your typical Browning.
I think if you are in the market for an "entry level Browning" the AB3 is going to be a great rifle for you. If you are expecting the AB3 to be a Cadillac of a bolt action rifle like the A-Bolt 2 is, you are going to be disappointed.
The AB3 stock is bedded at the recoil lug.

The X-Bolt stock is bedded at the recoil lug and between the trigger and magazine. Basically right where both screws hold the action to the stock.
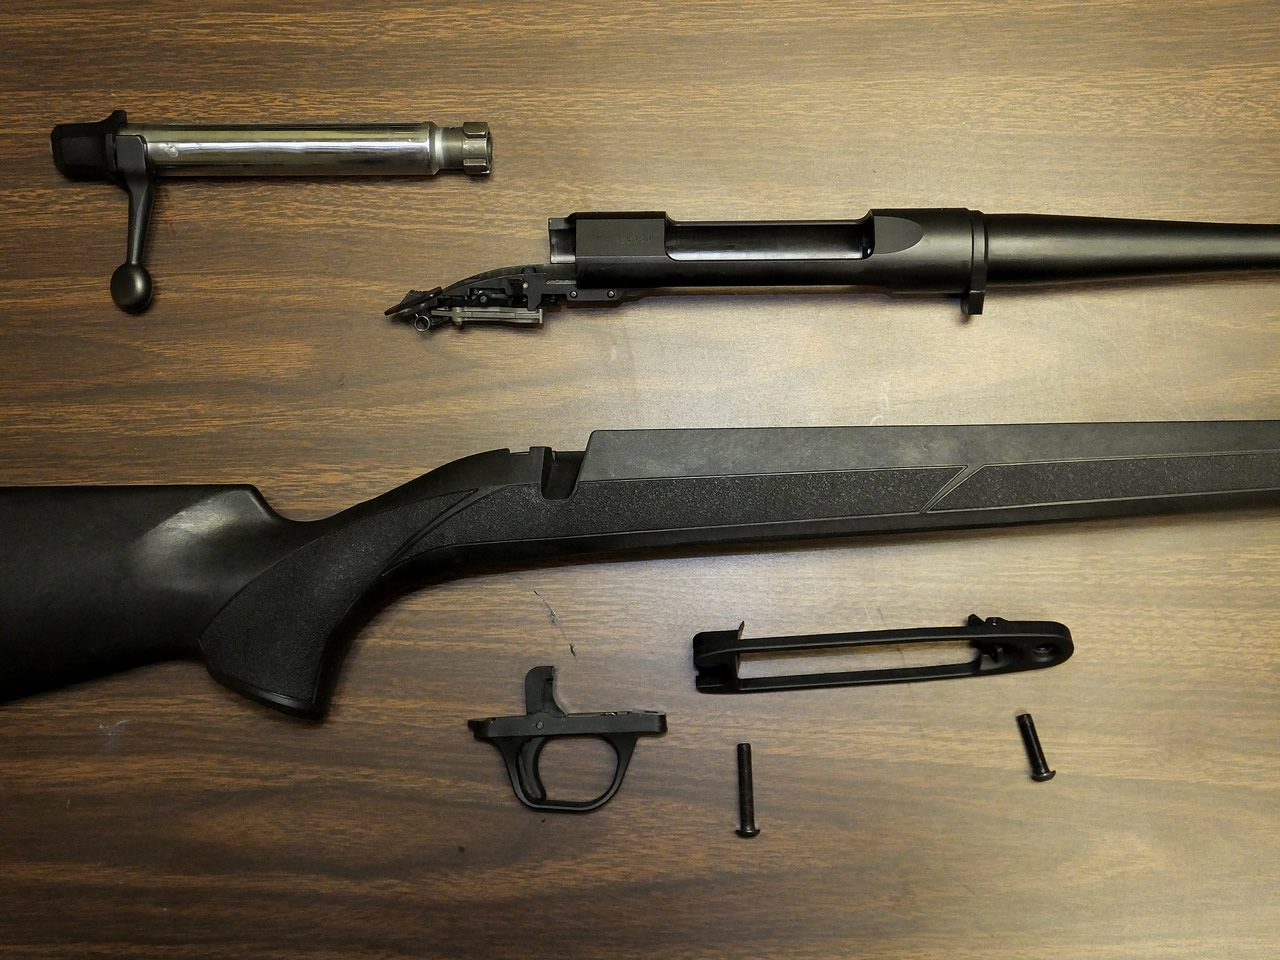
Simple disassembly of the AB3. Remove the two allen wrench bolts on both sides of the magazine well, slide out the bolt and this is what you get.
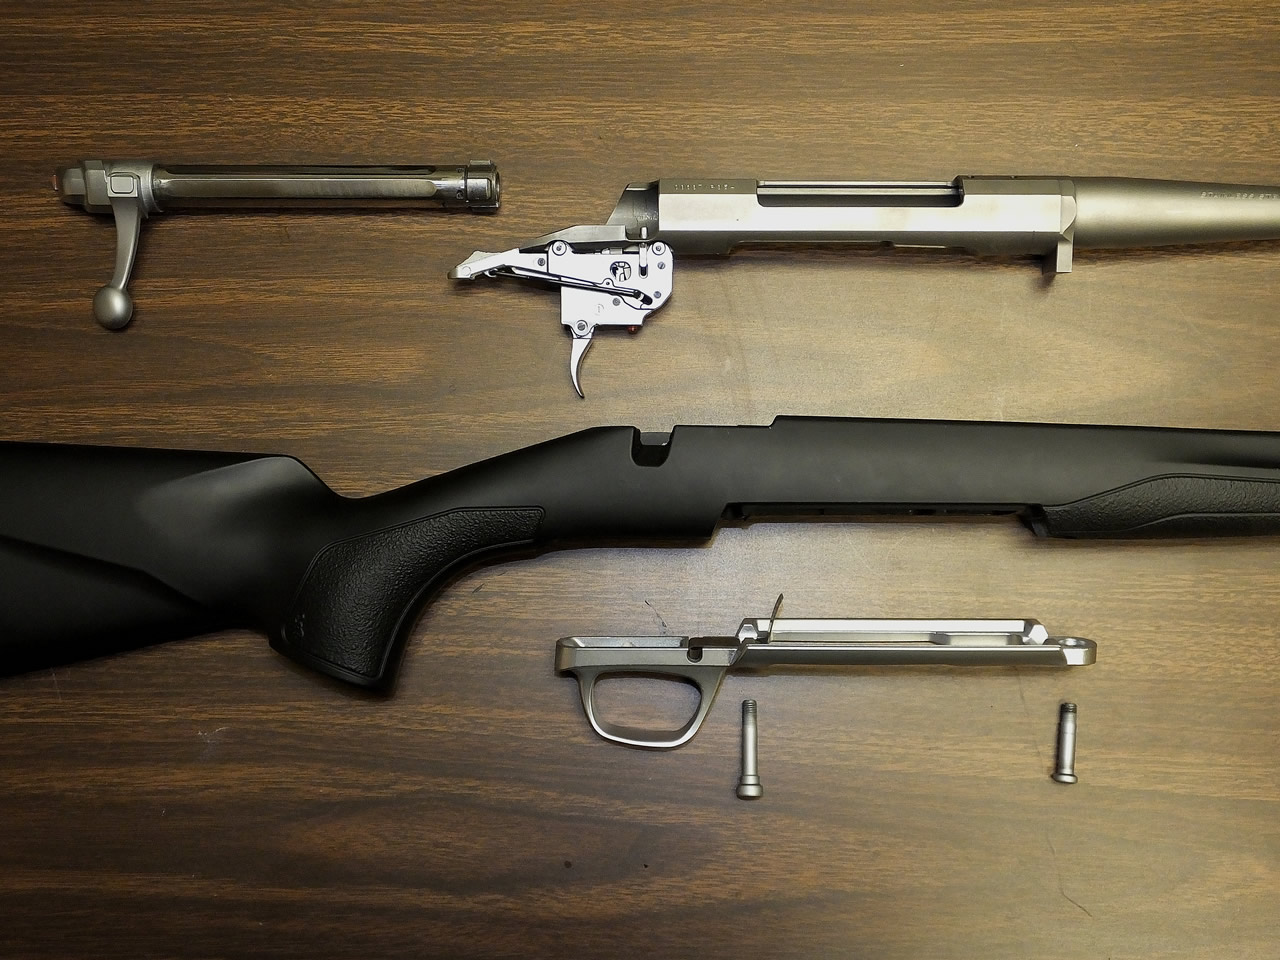
Simple disassembly of the X-Bolt.
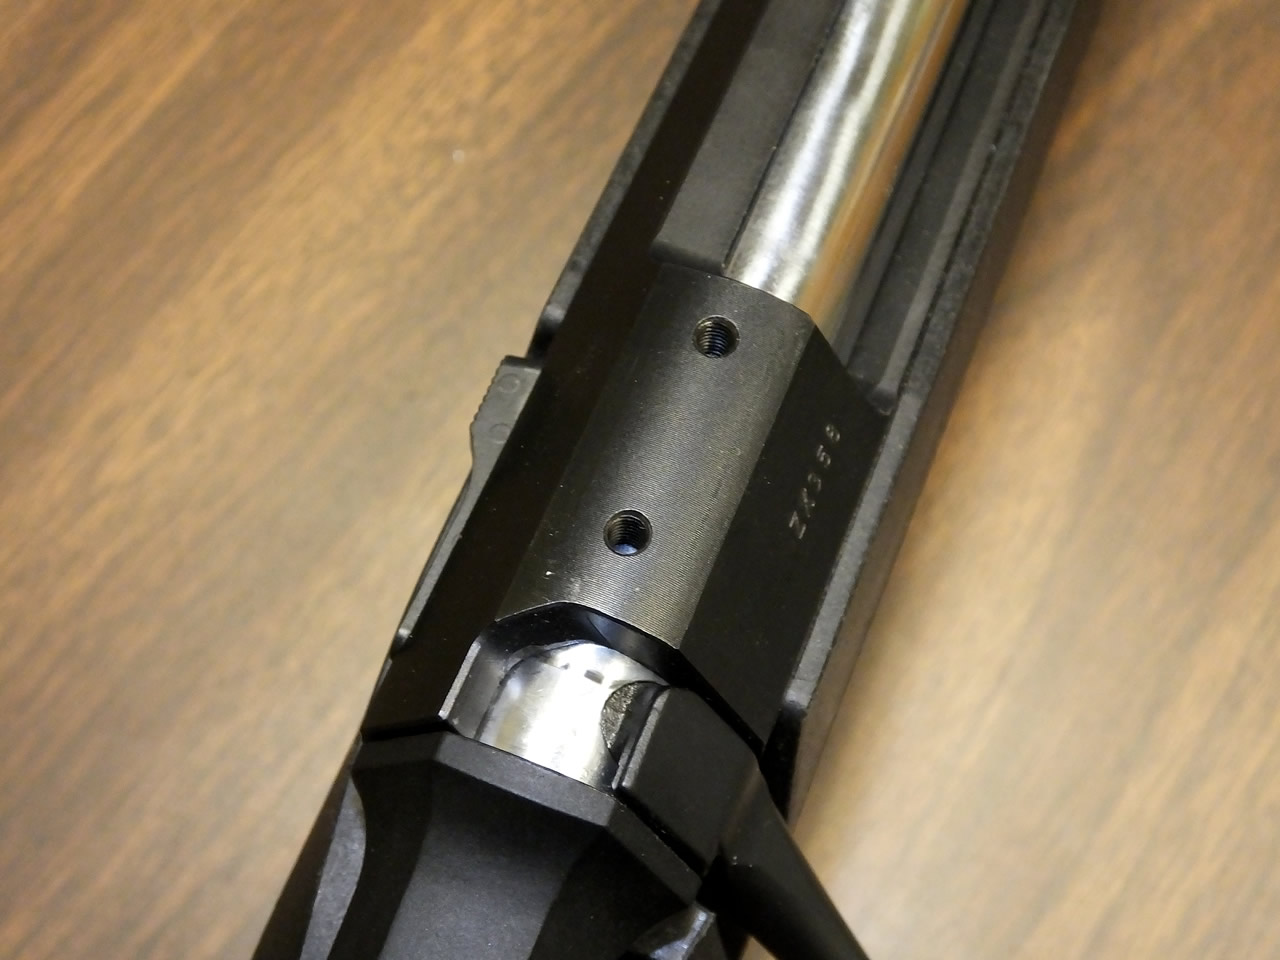
The front and back of the receiver on the AB3 have a two holes drilled and tapped for scope bases.
Note: Make sure you are getting AB3 bases as A-Bolt bases will not work on this rifle.
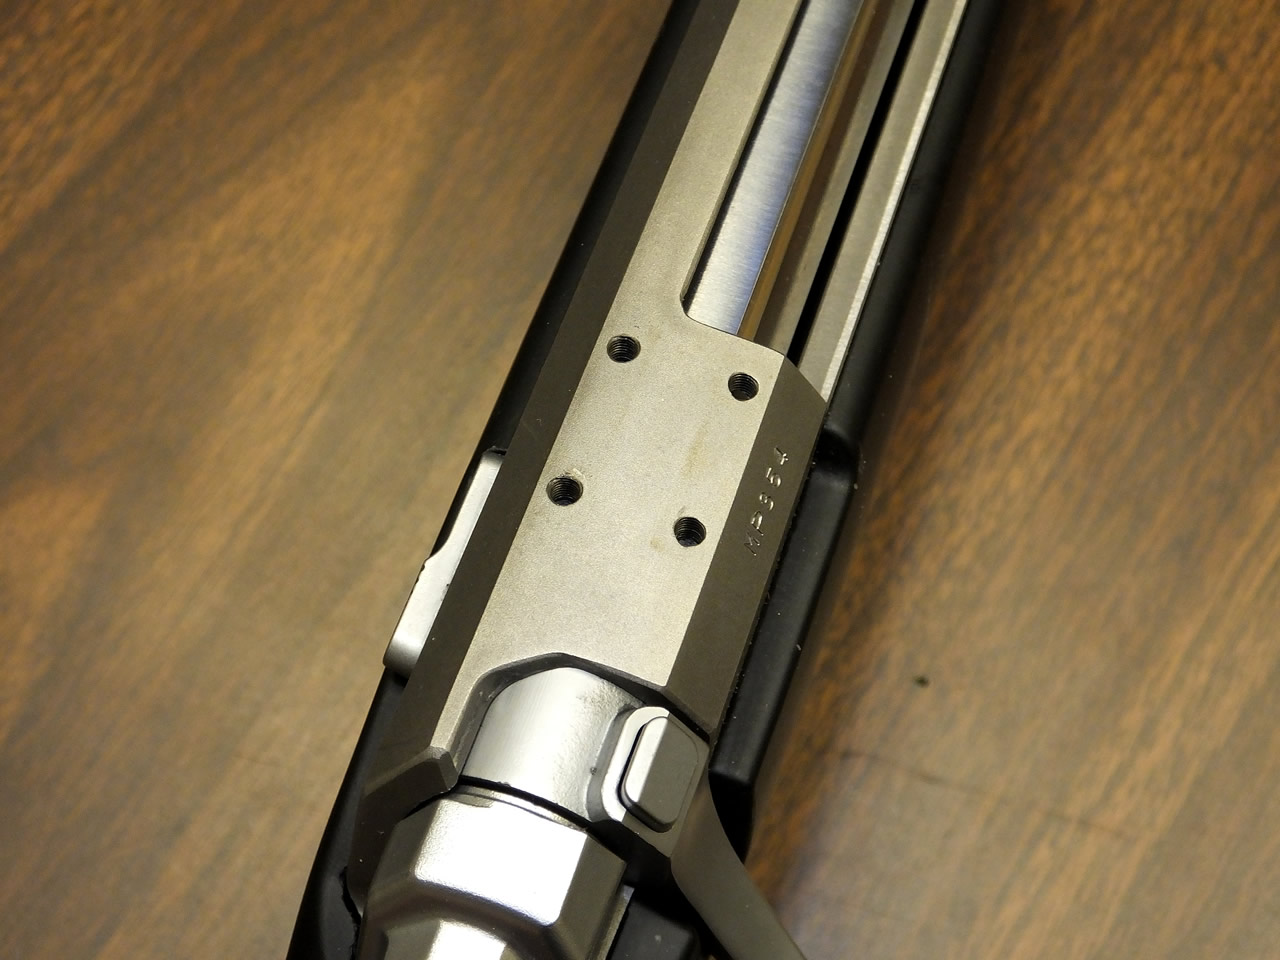
The front and back of the receiver on the X-Bolt have four holes drilled and tapped for scope bases.
The AB3 magazine release latch is found on the front of the magazine port.
The X-Bolt magazine release latch is found on the front of the magazine.
The hole at the back of the composite trigger guard appears to be a port to use an allen wrench to adjust the trigger pull however I have been told that the trigger is not adjustable. The Browning catalog says "The crisp trigger breaks between 3-1/2 to 4-1/2 pounds."
To get to the trigger adjustment screw on the X-Bolt you will need to remove the trigger guard. The adjustment screw is covered in red locktite in front of the trigger. This trigger is adjustable from 3 to 5 pounds and factory set at 3 1/2 pounds.
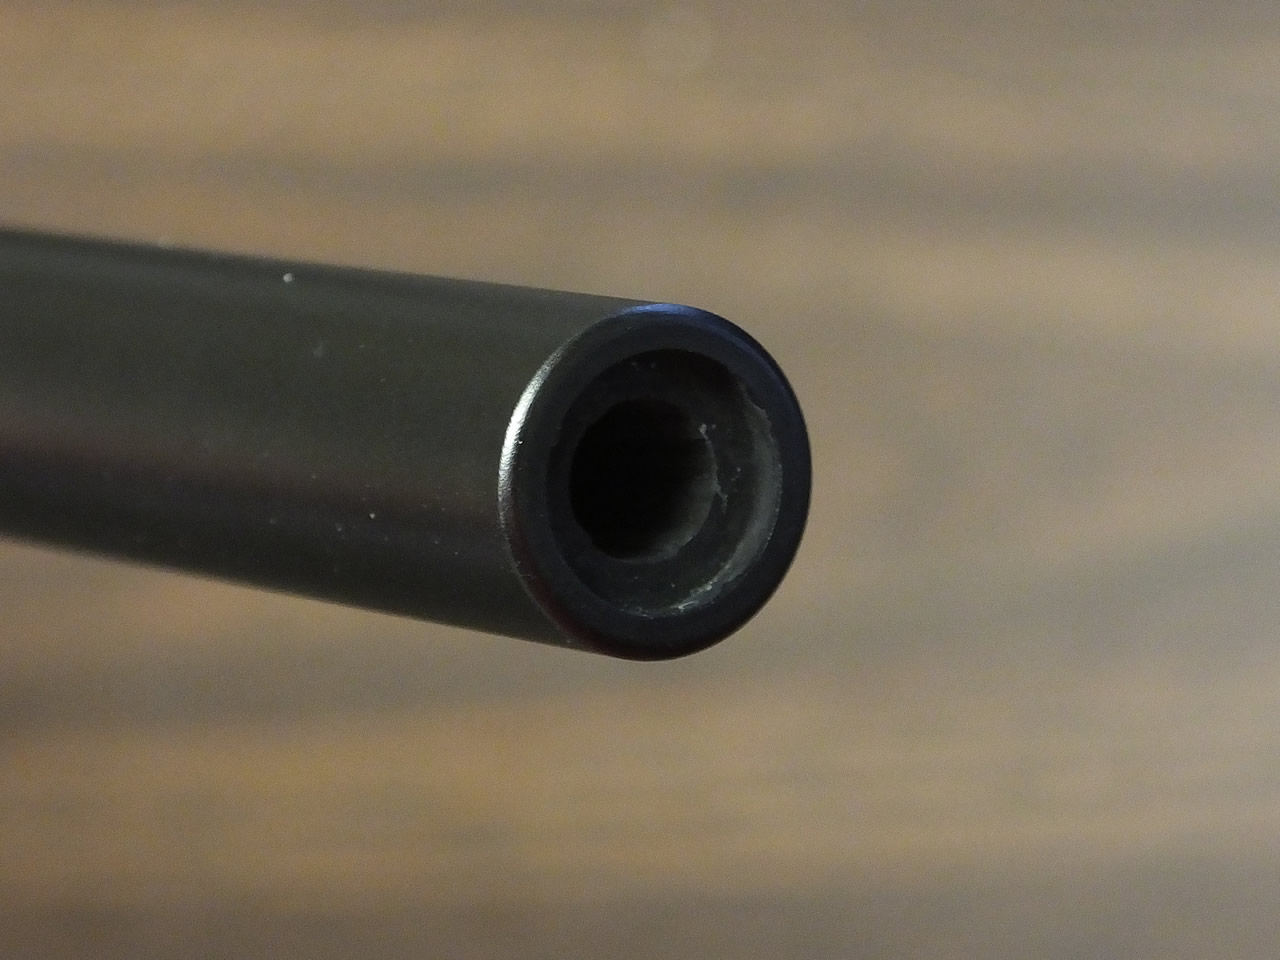
The recessed muzzle crown protecting the riflings on the AB3.
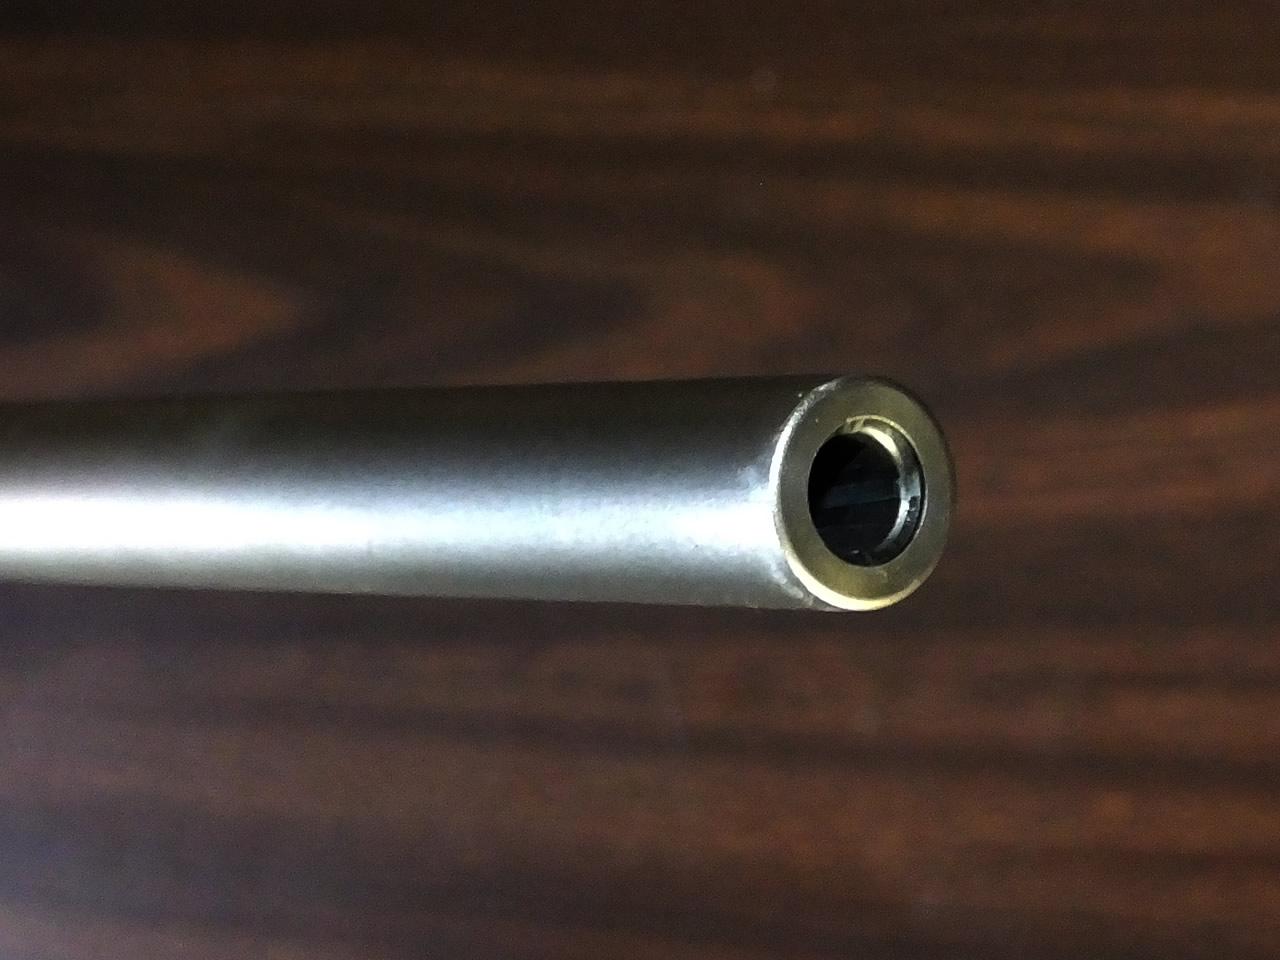
The recessed muzzle crown protecting the riflings on the X-Bolt.
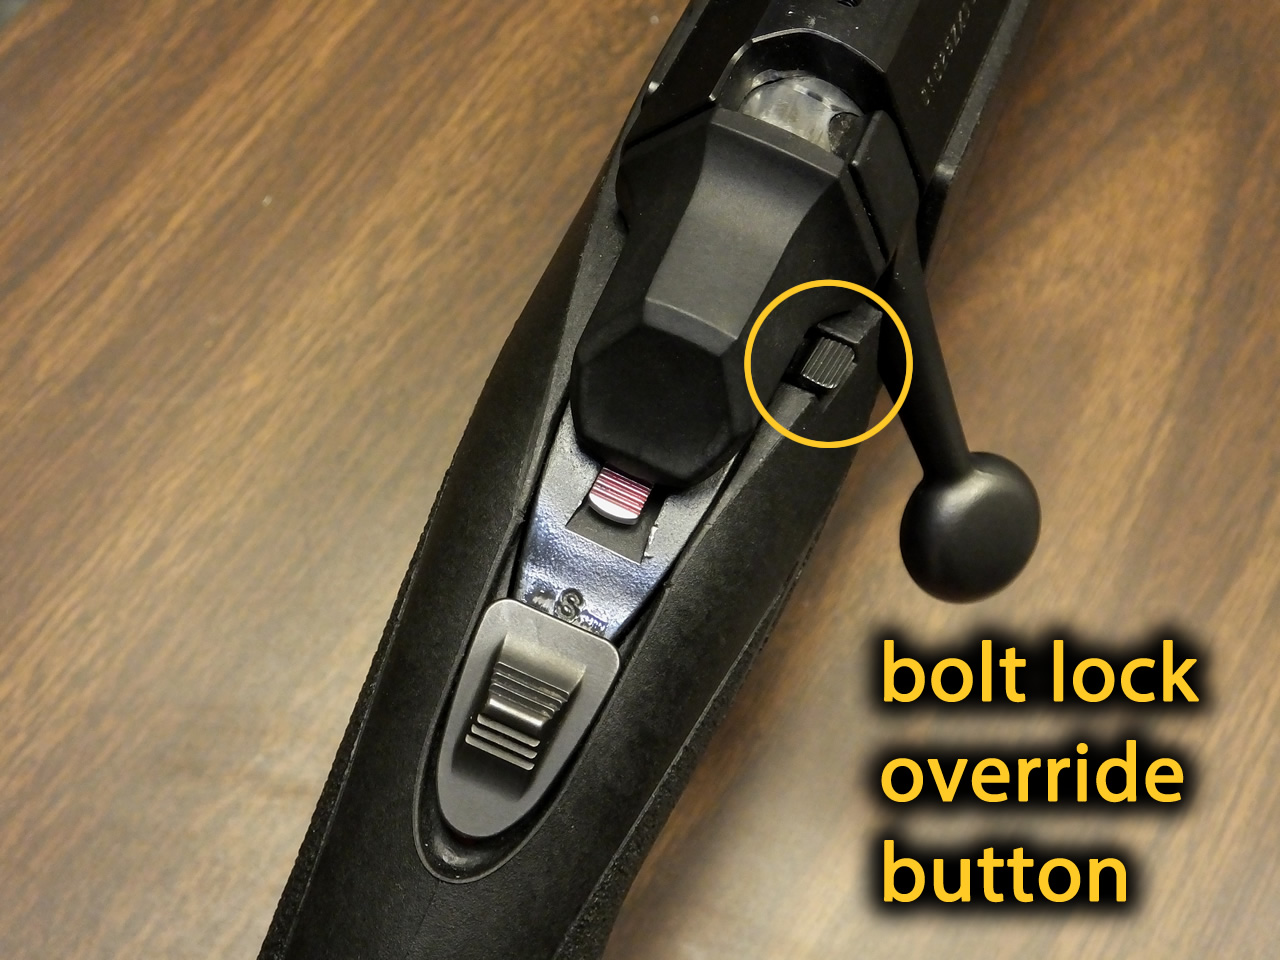
AB3: This shows the top tang safety and the bolt lock override button. The bolt lock override button is on the right side of the stock just behind the bolt lever. Pressing this button allows you to open the action and eject a cartridge when the gun is on safety.
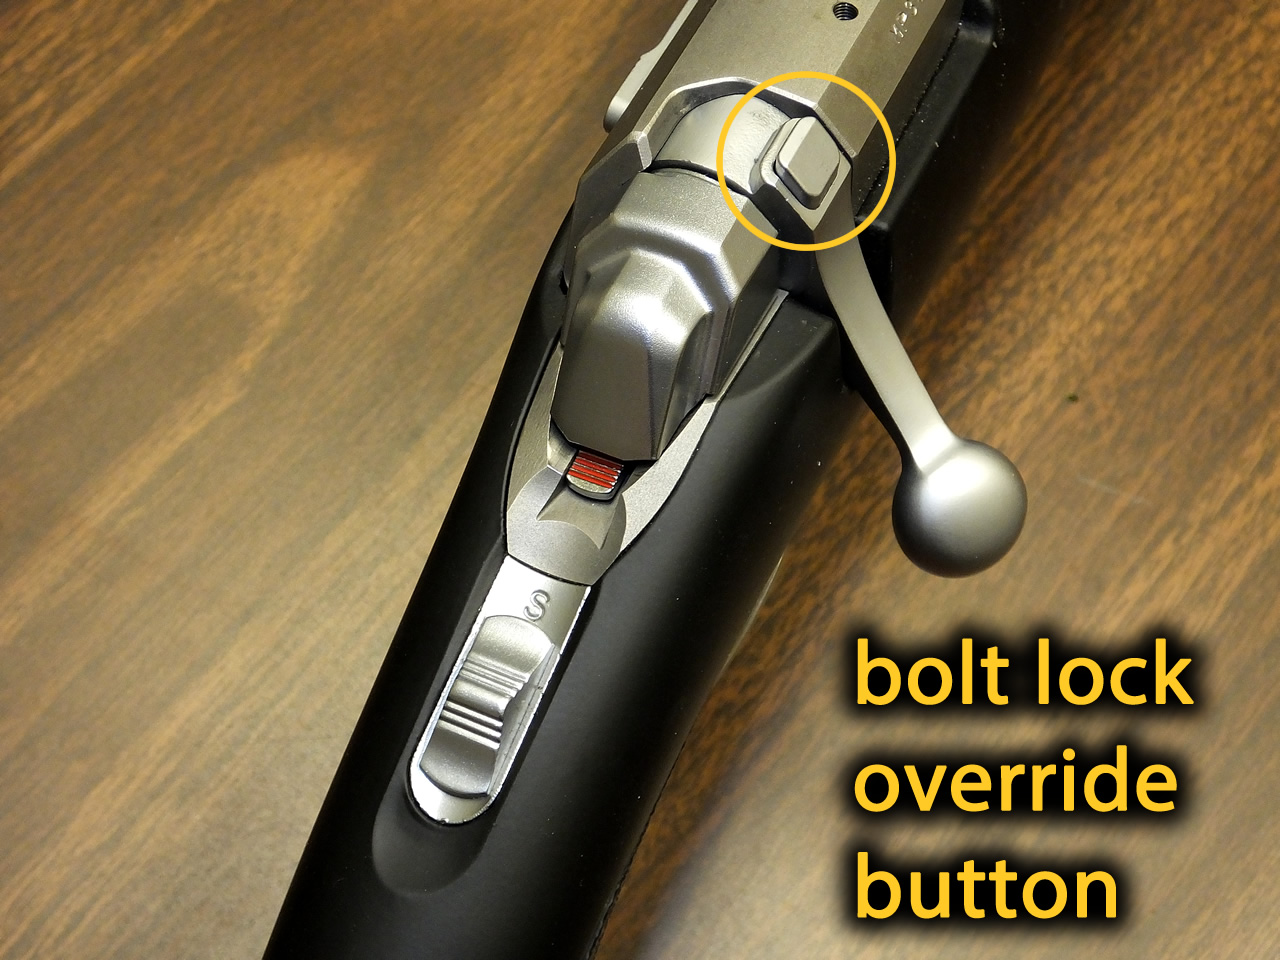
X-Bolt: This shows the top tang safety and the bolt unlock button. The bolt lock override button is at the top of the bolt lever.
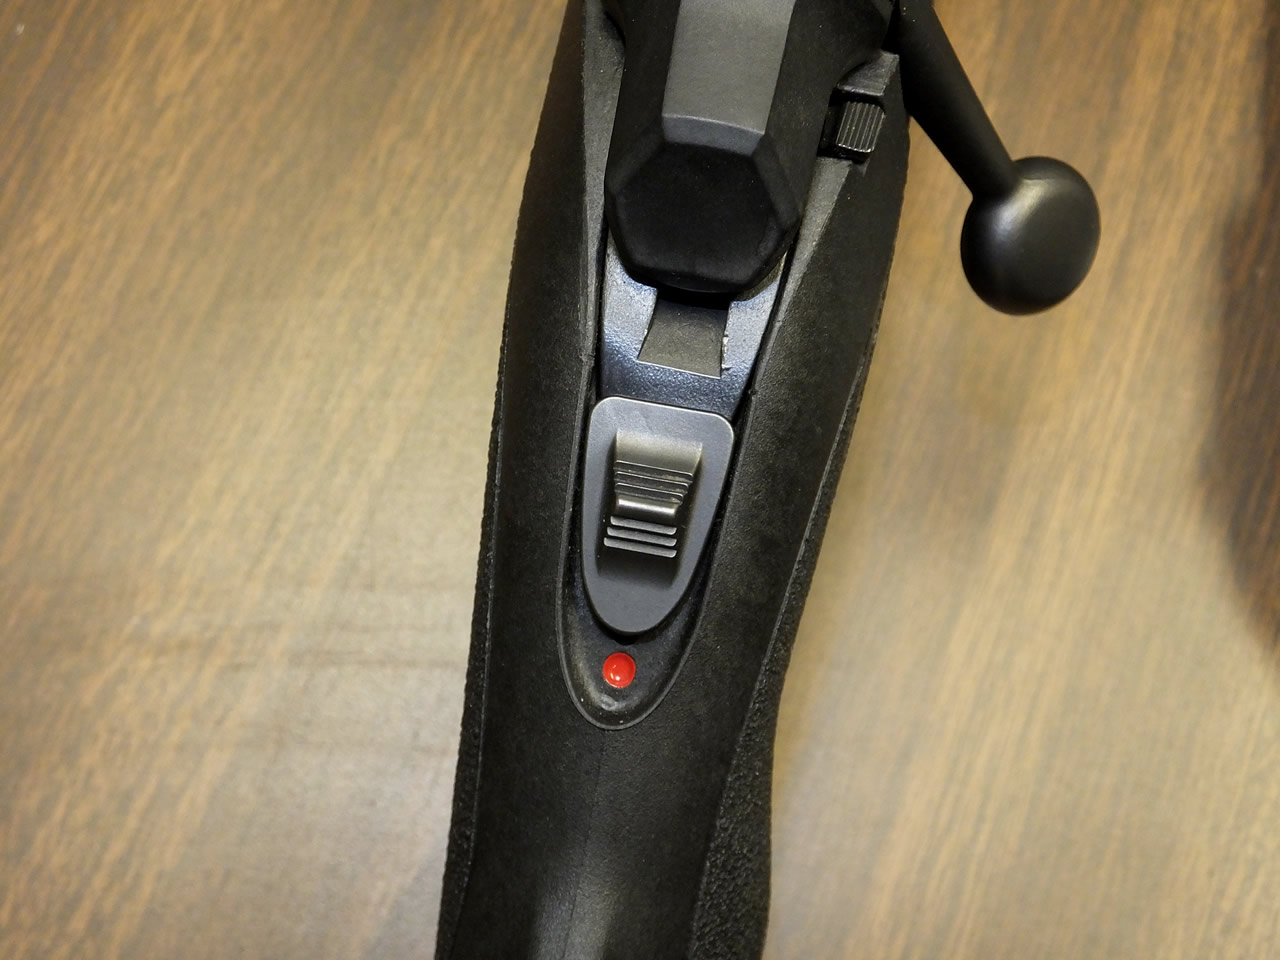
Here's another view of the AB3 safety shown in the fire position.
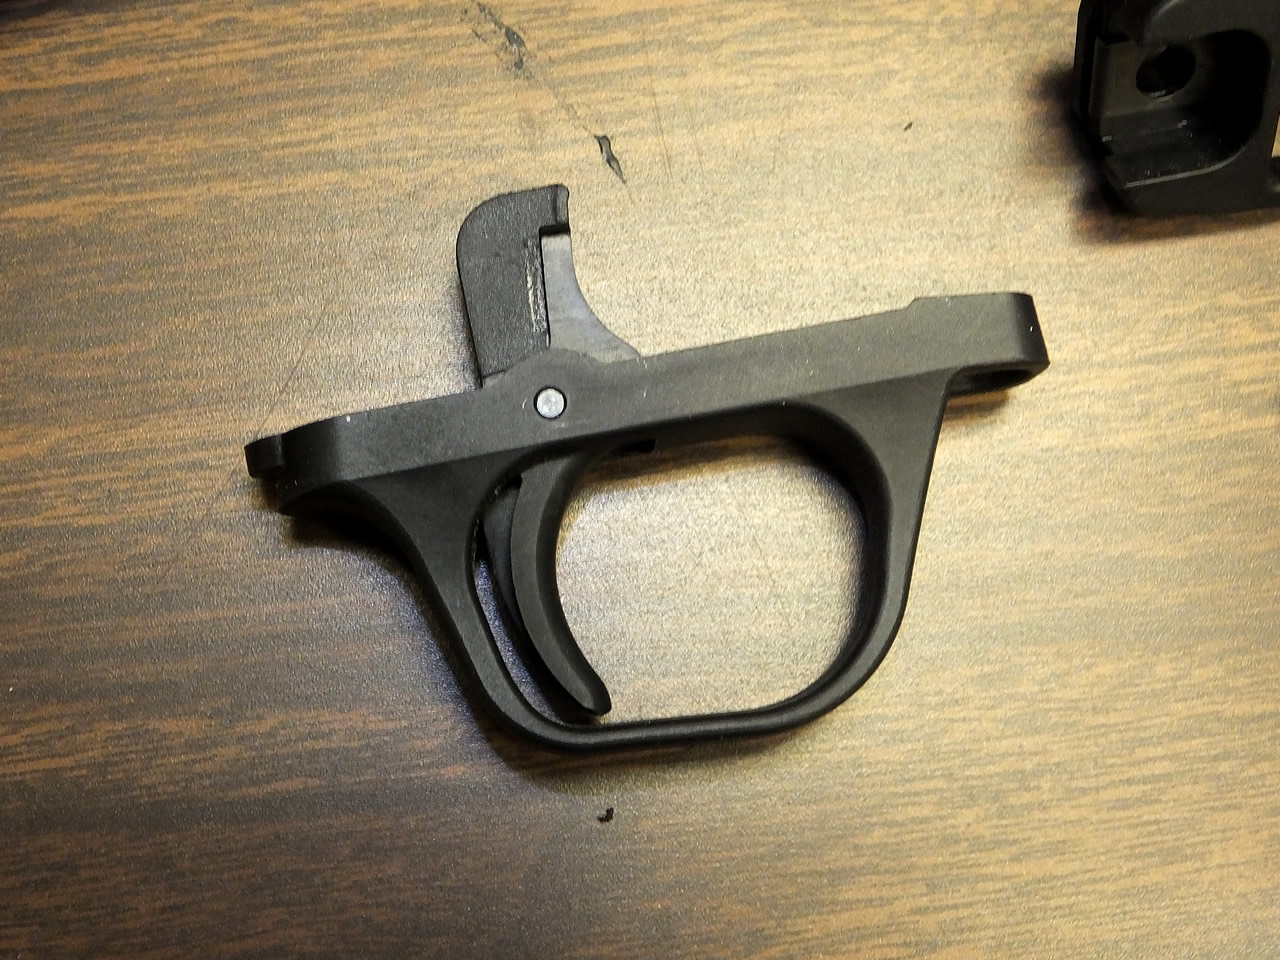
AB3 composite trigger and trigger guard.
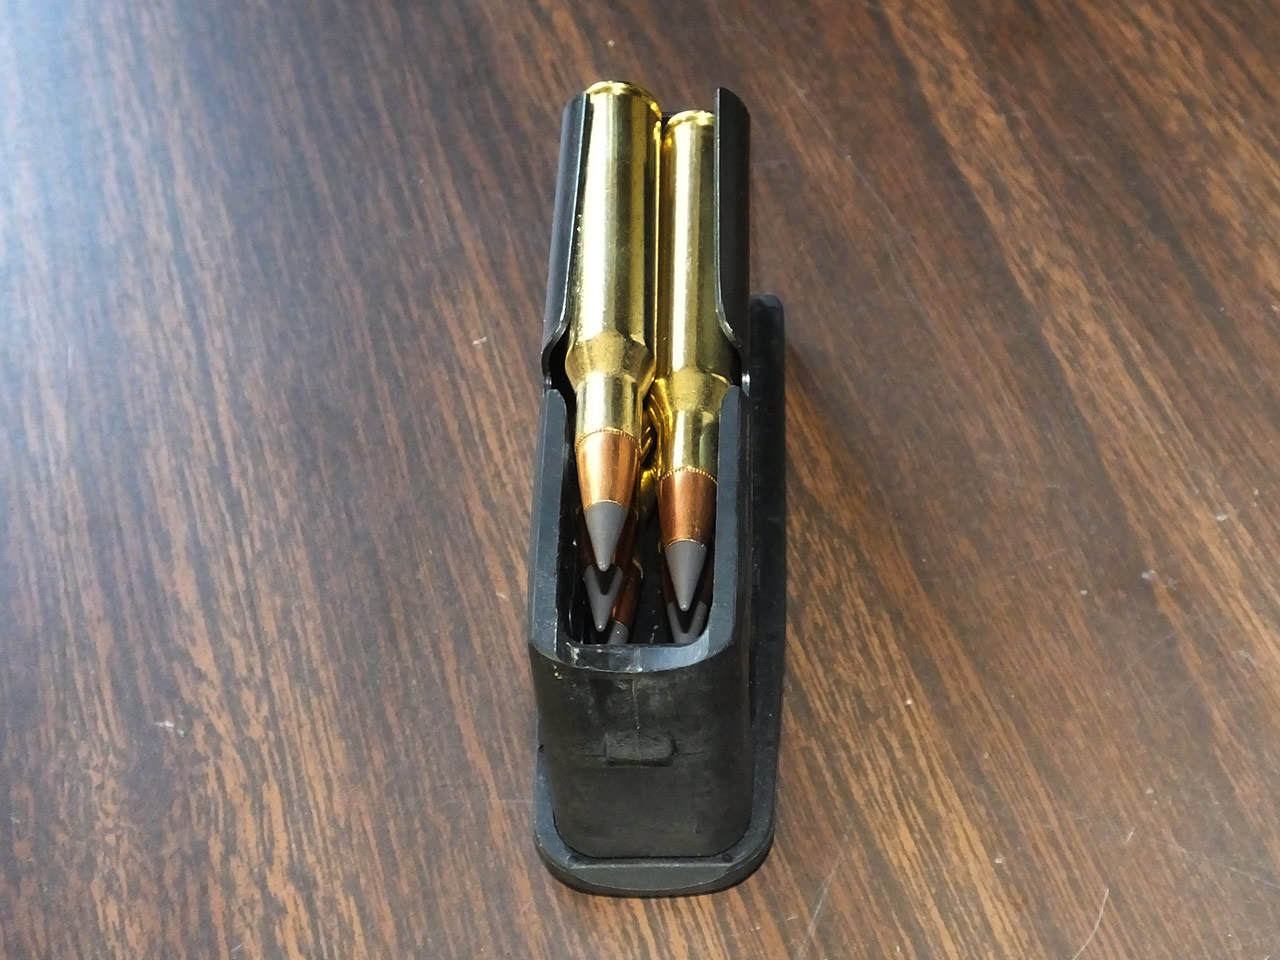
The AB3 magazine holds five 270 Win. shells in a alternating stack.
The X-Bolt magazine holds four 270 Win. shells in a rotary system giving the top shell a position lined up straight with the chamber on every shot.
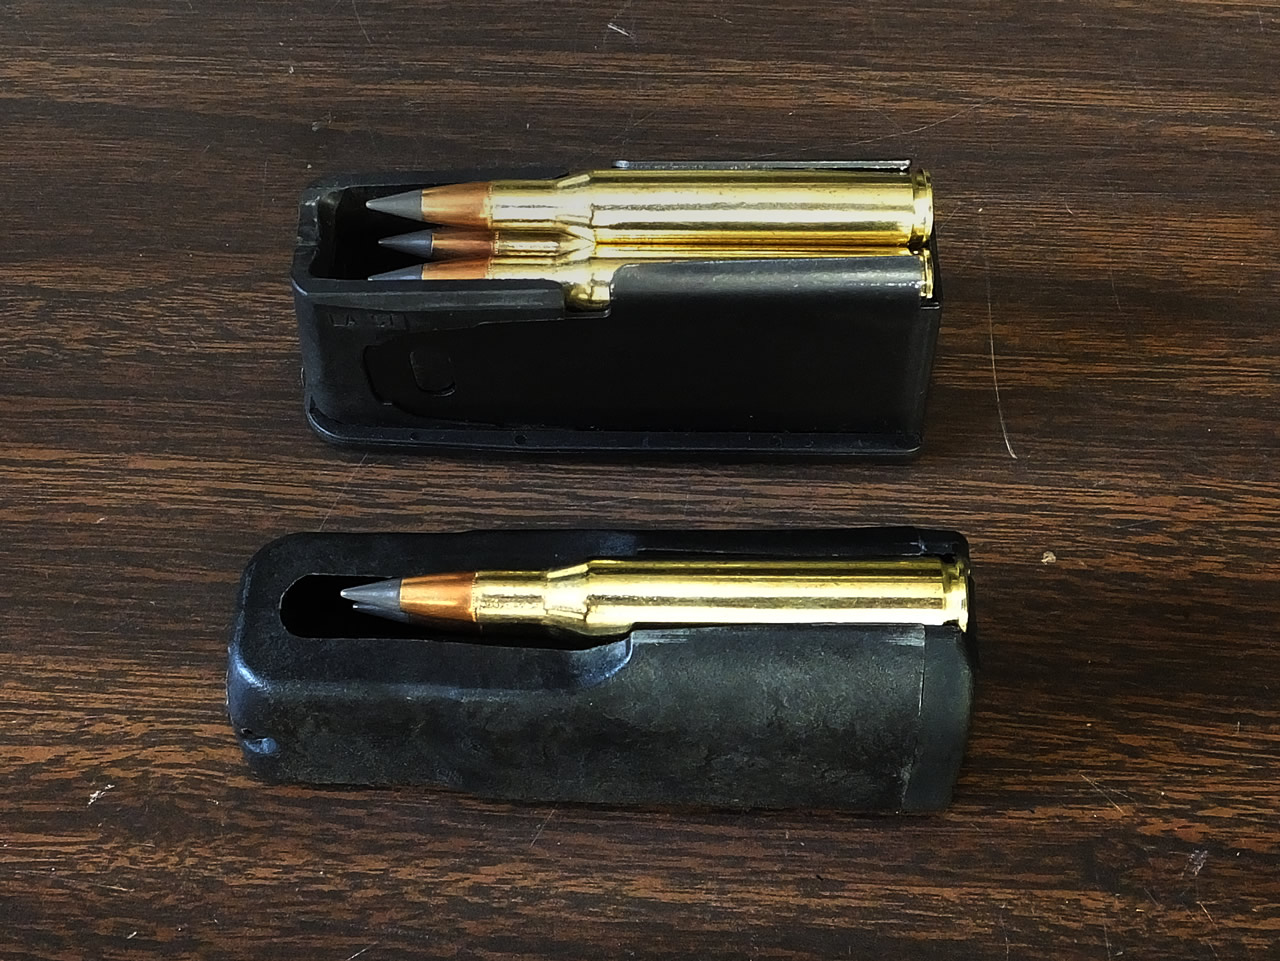
Another view of loaded magazines from the AB3 and X-Bolt rifles.
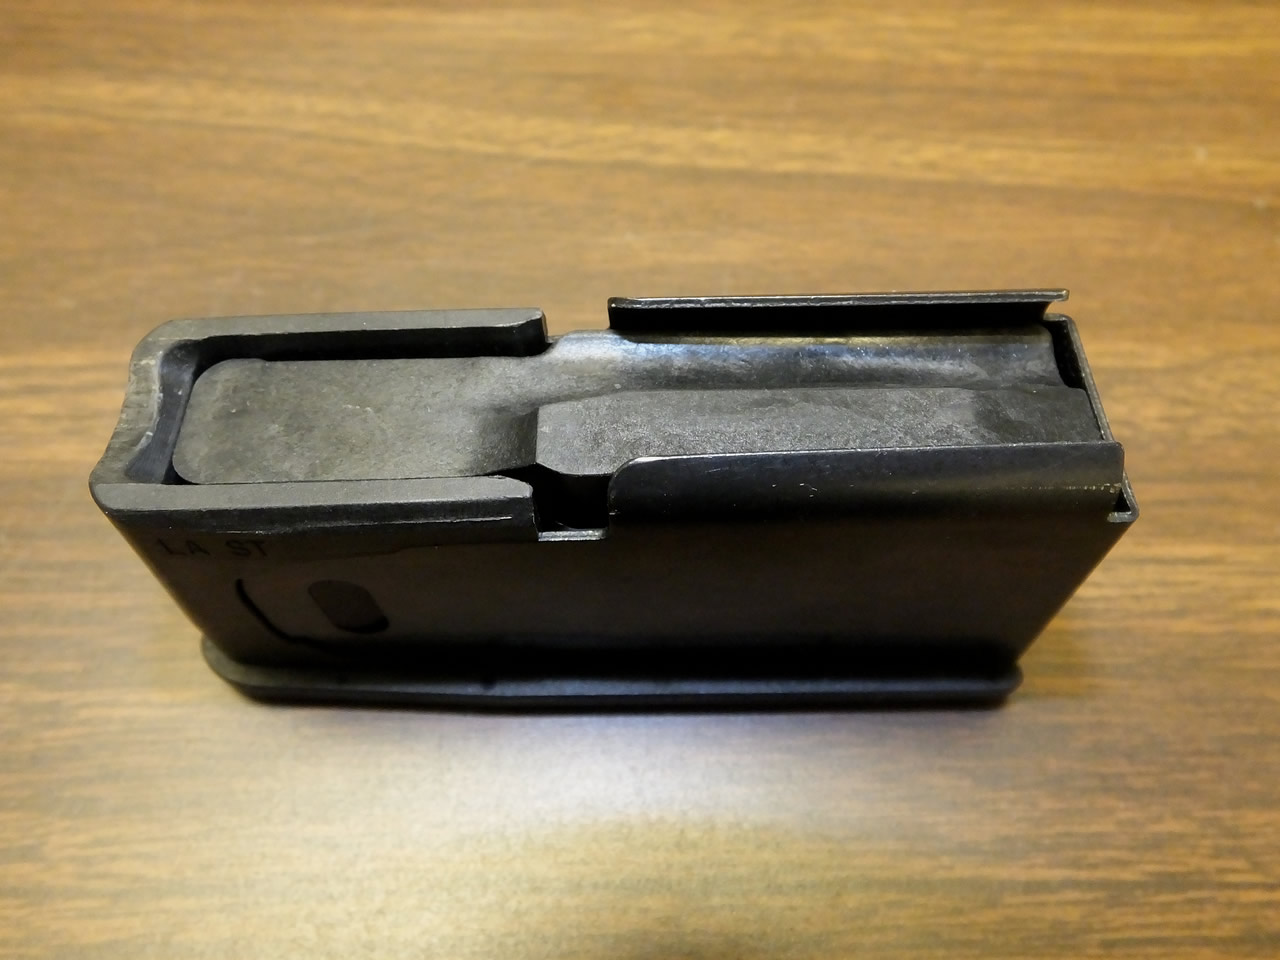
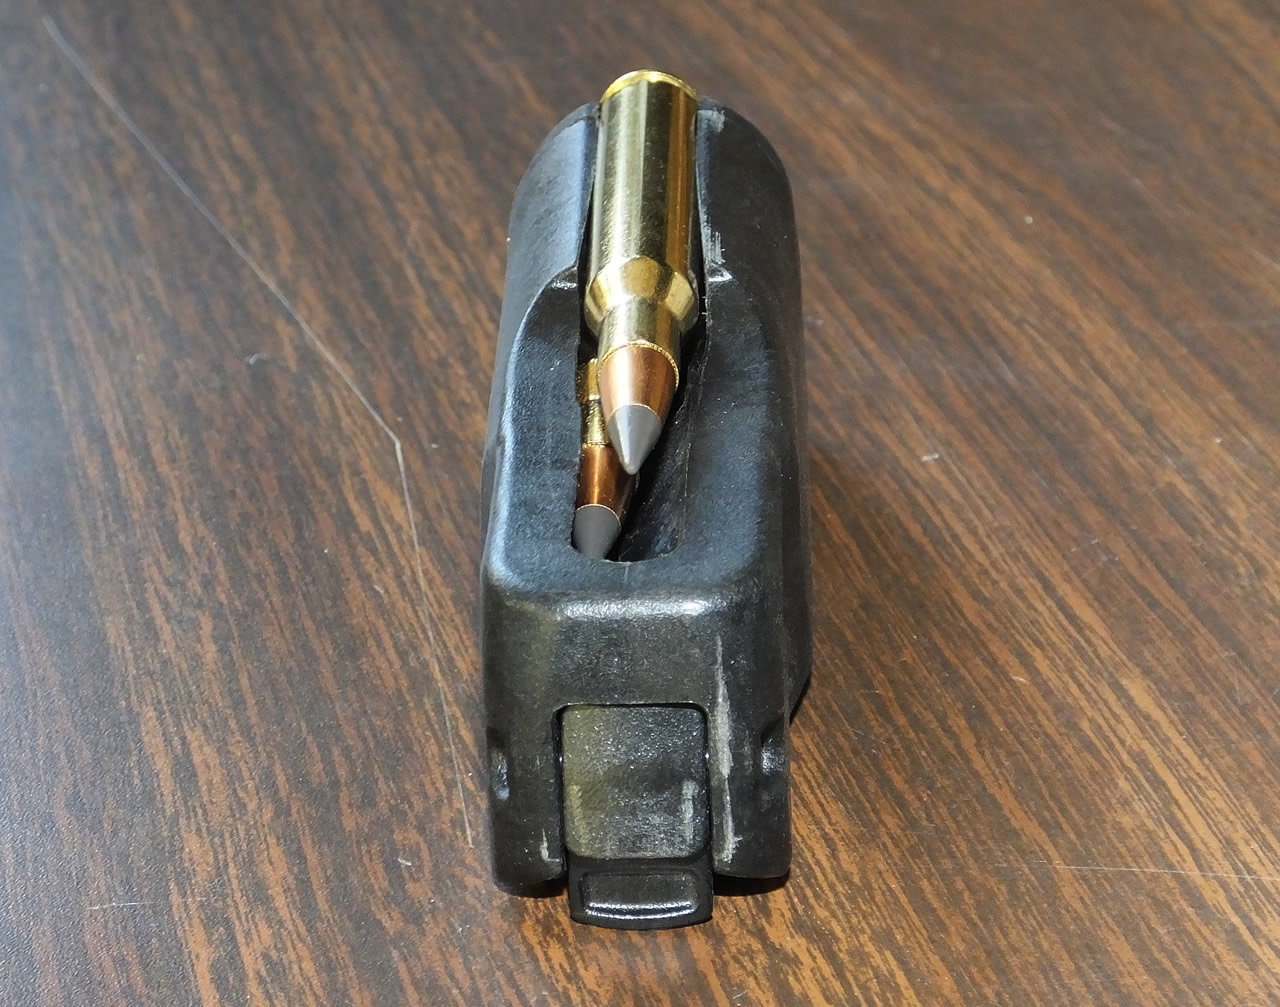
View of empty AB3 magazine.