
- Details
- Written by: The DIY Hunter
- Category: Firearms & Shooting
- Hits: 7566

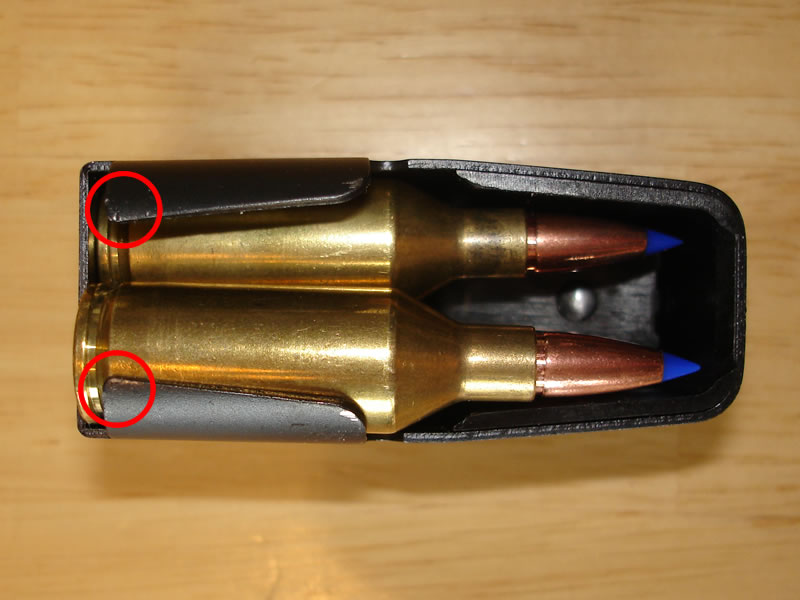
This is the best method I have found to tweak your A-Bolt 243 WSSM magazine so that it feeds reliably.
For my two A-Bolt 243 WSSM rifles I took an old credit card and cut a couple of strips that I then slid between the plastic insert and the outer metal wall of the magazine.
A good friend of mine Rick is an avid long-range target shooter. He has a 243 WSSM and recently had some issues with is Browning A-Bolt feeding a new load with Berger VLDs that he was working up. He tried bending the magazine shell holding lips on the top of the magazine and he still could not get his rifle to feed reliably. Rick found the following simple solution that I have tried and it works really well. Thanks for passing this along Rick.
Here are some of his comments: "...the ENTIRE problem with the feeding in these WSSMs is that “shoulder bump” thing in the magazine. This is what I saw you call it on your site when referring to the X-Bolt's magazine design... Simply shim the plastic shoulder bump portion away from the side metal and closer to the front portion of the follower with something as simple as folded paper. The plastic insert in the magazine for the WSSM’s that is the “shoulder bump” portion does not ‘hug’ the front portion of the follower. It needs to so that the shoulder is actually bumped, forcing the case upward and toward the center of the chamber for a perfect feed."
This is my old method. It works well until you switch to a different load then it might not feed well and require tweaking again.
I had to ever so slightly bend, probably only 1/32nd of an inch (originally I bent them slightly down which worked. I have now found that bending them slightly upward feeds even smoother), the top shell holding arms (see red circled areas in the photo above) on my A-Bolt's magazines to get shells to feed smoothly. This tips the cartridge tips upward slightly and I have never had a feeding problem since.
I have also heard that a gunsmith can polishing areas of the magazine and action that can help shells feed reliably.
Using the methods I describe on my 243 WSSM vs 243 Win. page I have noticed that different bullets that I have shot have required slightly different angles on the shell holding arms on the top of the magazine to get the cartridge to feed reliably. Rick's solution is easier and I believe offers a better overall solution that should work with any load/bullet. Another thing I also like with this solution is that the "Shoulder Bumpers" now hold the cartridges better assuring that the tips of the bullet do not get damaged from recoil.
- Details
- Written by: The DIY Hunter
- Category: Firearms & Shooting
- Hits: 11906
I love my X-Bolt Stainless Stalker in 270 WSM however recently I found an issue with shells not being ejected due to the long windage turret on the Nikon Monarch scope that deflects the shells right back into the rifle. It happens so quickly that it is difficult to even see that the shell has left the ejection port and has hit the turret. I had to use my camera in slow motion to see what was happening. After checking around I found that the problem apparently is most common with WSM calibers and is also common with other companies' bolt action rifles.
The Browning X-Bolt rifle has been designed with a wonderful sleek low profile. Unfortunately with a low profile comes difficulty having enough room for the short, fat WSM shells to clear the bottom of the receiver and a long windage turret right above the ejection port.
I found that the ejecting shells hit directly into the teeth on the bottom of the turret. To solve the problem I filed off the teeth on the turret. Shells still hit the turret however now they are deflected out of the rifle.
Shown in the video here is what I did to allow my 270 WSM to eject shells with a Nikon Monarch 4-16x42SF BDC rifle scope on my Browning X-Bolt Stainless Stalker.
Other ways to solve the problem are higher bases and rings or choosing a rifle scope that has a shorter windage turret. I've had my eye on a Vortex Viper scope for sometime now. Maybe this is my excuse to get one. Hmm...
Here is my X-Bolt setup with the Nikon Monarch 4-16x42SF BDC rifle scope.
In 2013 I changed my X-Bolt rifle scope setup and am now using a Vortex Viper HS LR with a 20 MOA picatinny rail on my X-Bolt and love it. This setup has the scope higher and ejected shells do not contact the turret during ejection.
X-Bolt Loaded Ammo Malfunction? I know there is a popular YouTube video with a shirtless X-Bolt owner stating that the X-Bolt malfunctions ejecting loaded ammunition. I have reviewed the videos and read the guys blog about it. Apparently if you like to eject loaded Federal Premium Vital Shok ammo, in a 300 WSM as fast as you can possibly work the action, the first shell may not eject if you have two other shells in the magazine.
There has never been a time in my life where I have wanted to eject a LOADED round and have it fly out hitting the ground potentially damaging the bullet and or seating the bullet deeper into the case. I always take special care of my loaded ammunition to make sure it shoots accurately when I need to use it. I like to eject loaded rounds really slow and block the ejection with my off hand so that I can then tip the rifle and drop the shell into my hand or grab it with my fingers. If my rifle were to have this "malfunction" it would be a non-issue for me. I never want my loaded ammo flying out. Other than this guy and his YouTube videos I have never heard any of the guys I know that have X-Bolts ever complaining about loaded ammo ejection problems.
The only time where I might want to have a loaded round eject is after a misfire. In the thousands of rounds I have put through my Browning A-Bolt's and X-Bolt I have only had one misfire in one of my A-Bolt rifles. Incidentally if you are having "misfires" in a X-Bolt or A-Bolt most likely the bolt is not fully closed. I believe it is a safety feature preventing the firing pin from traveling far enough to discharge the rifle if the bolt isn't fully closed. Always make sure you close and drop the bolt handle all the way down. I learned about this type of "misfire" when helping some novice shooters that weren't closing the bolt.
I love my X-Bolt especially now that I have it setup with the Vortex Viper HS LR and a 20 MOA picatinny rail.
- Details
- Written by: The DIY Hunter
- Category: Firearms & Shooting
- Hits: 4936
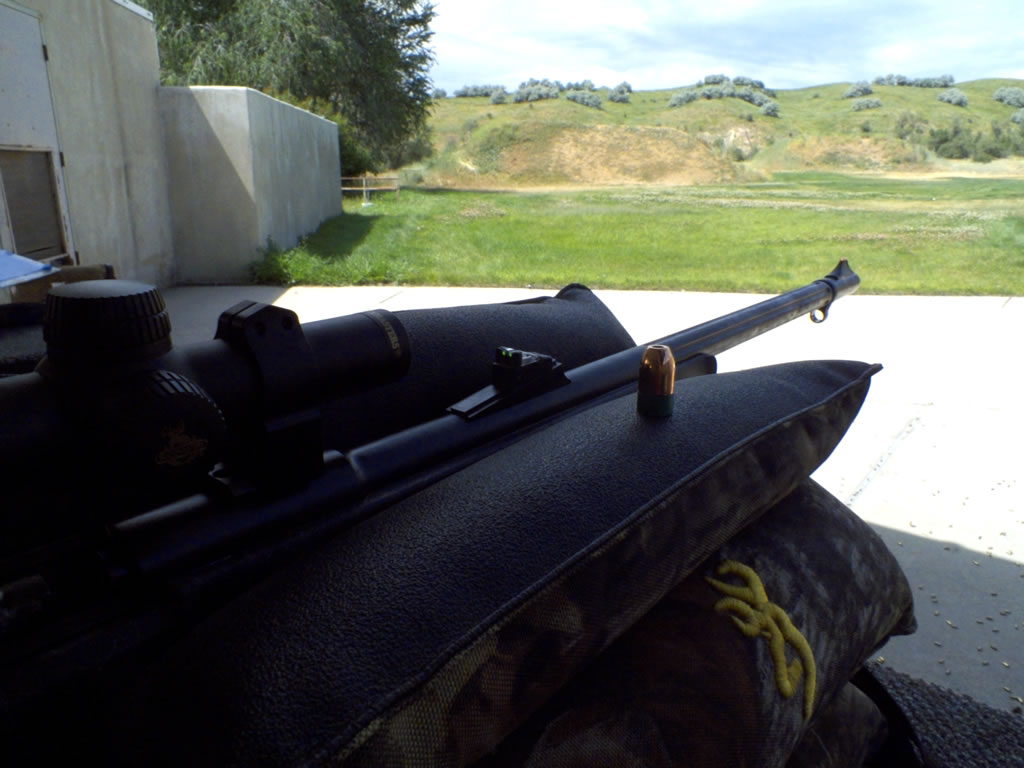
This is the 295g Powerbelt bullet that I am going to be hunting with for the 2011 Utah mule deer season. You can also see my Nikon Buckmaster 1x20 muzzleloader scope. I really like having this scope as compared to open sights, mainly because with open sights the target is completely covered from view by the rifle at targets much past 50 yards, whereas with the scope I can have a clear view all around the deer when shooting.
For the 2011 deer season, I have a muzzleloader tag in my pocket so I wanted to break out the muzzleloader early and make sure what bullet I was going to use.
When I first started muzzleloader deer hunting back in the 80's I used a round ball and patch. Sometime during the 90's I switched over to a plastic sabot with a 44 caliber pistol bullet. I used this sabot bullet combo to take my last muzzleloader deer in 2007, my largest to date, a 31" wide mule deer.
A trip down the muzzleloader isle at Sportsmans Warehouse I found that there are many different options for bullets now days as compared to my early muzzleloading hunting days of the past. I decided to go with the mid-weight Powerbelt 50 caliber 295 Grain Hollow Point bullet. I have read online of great accuracy and I have also heard that the bullet can come apart in deer at high velocities. With the mid-weight bullet (this bullet is offered in 245, 295 and 348 grains with or without an Aerotip) and only 100 grains of Hodgdon's Pyrodex pellets I am hopeful the bullet will have just the right weight and speed to offer good expansion but not completely disintegrate when hitting a deer. And also have enough speed for a decent trajectory and energy.
My muzzleloading rifle is a CVA Firebolt in 50 caliber. It is the same muzzleloader I used to take my 31" mule deer in 2007 with the exception that this year I now have a Nikon Buckmaster 1x20 scope on top. I really like the scope compared to iron sights.
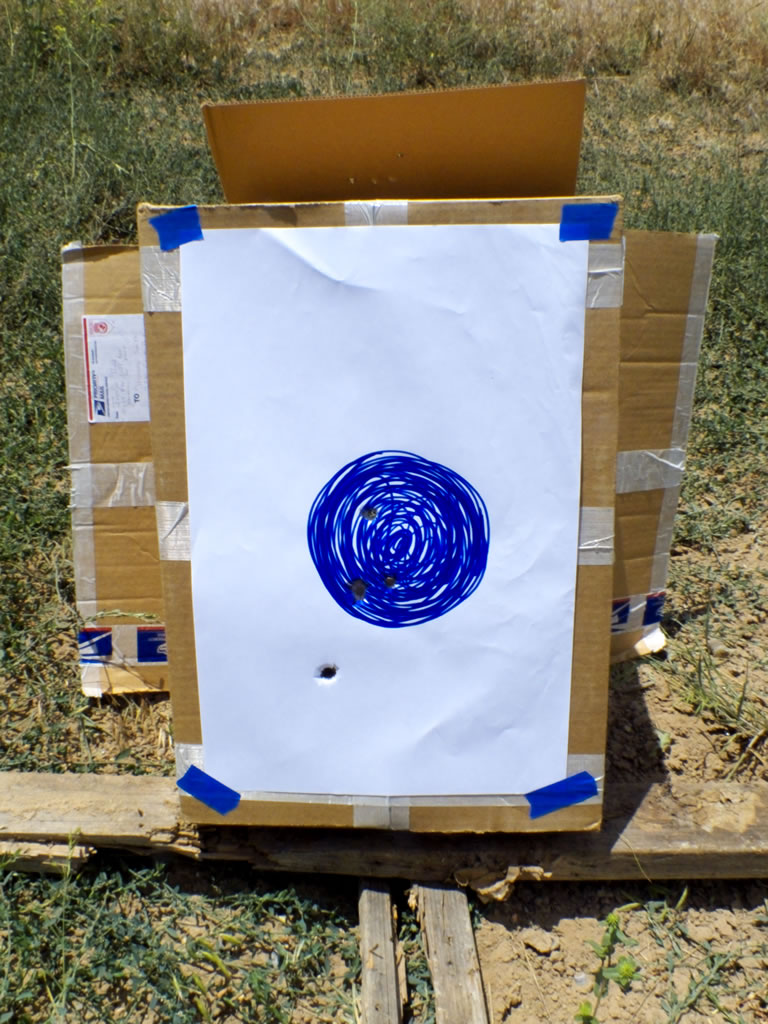
Here is my 2 1/2 inch three-shot group at 100 yards with my CVA Firebolt with Nikon Buckmaster 1x20 muzzleloader scope shooting 295g Powerbelt bullets. The shot low is my first shot, a fouling shot where I had a bunch of Bore Butter left in the barrel from storing the muzzleloader. The next three shots are my 2 1/2 inch three shot group all inside the blue circle.
I was very pleased with how well it shot. I got a two and a half-inch three-shot group at 100 yards with a one power scope. The best I have ever been able to produce. Not bad for no optical power with the scope and a very moderately priced muzzleloader (ok, an inexpensive muzzleloader). It has been over a year ago since I last shot my muzzleloader and when I put the muzzleloader in the safe I placed heavy amounts of bore butter inside the barrel. Understandably my first shot was a little low compared to the rest of my shots. I'm clearly calling that a fouling shot.
After I made this group at 100 yards I took the target out to 200 yards and shot a couple of shots that went into the dirt to see how far the drop was. Then I held for this drop and placed a bullet right through the six-inch circle I had drawn on the paper. For a 200 yard shot, the hold is in the middle of the fine portion of the wire between the center of the crosshairs (the +) and where the duplex wire transitions from fine to heavy.
For fun and also just in case I ever had to take a shot at a wounded animal I placed the target out at 300 yards. It took me using my HS20exr camera to video the shots and then I would review the video on the lcd screen to see where I was hitting. After four or five shots I figured out the hold and placed two shots within a six-inch circle. If I had a variable power or just any magnification 300 yards probably could be a lot more possible. For now, I am only comfortable with this far of a shot if I had a wounded animal I needed to put down.
In the future I might look into setting and marking the scope elevation adjustment dial for various ranges. Then I could just range the shot adjust the scope and hold dead-on, but for now I'm plenty comfortable out to 200 yards with just holding over.
Related Articles