- Details
- Written by: The DIY Hunter
- Category: Outdoor
- Hits: 12243
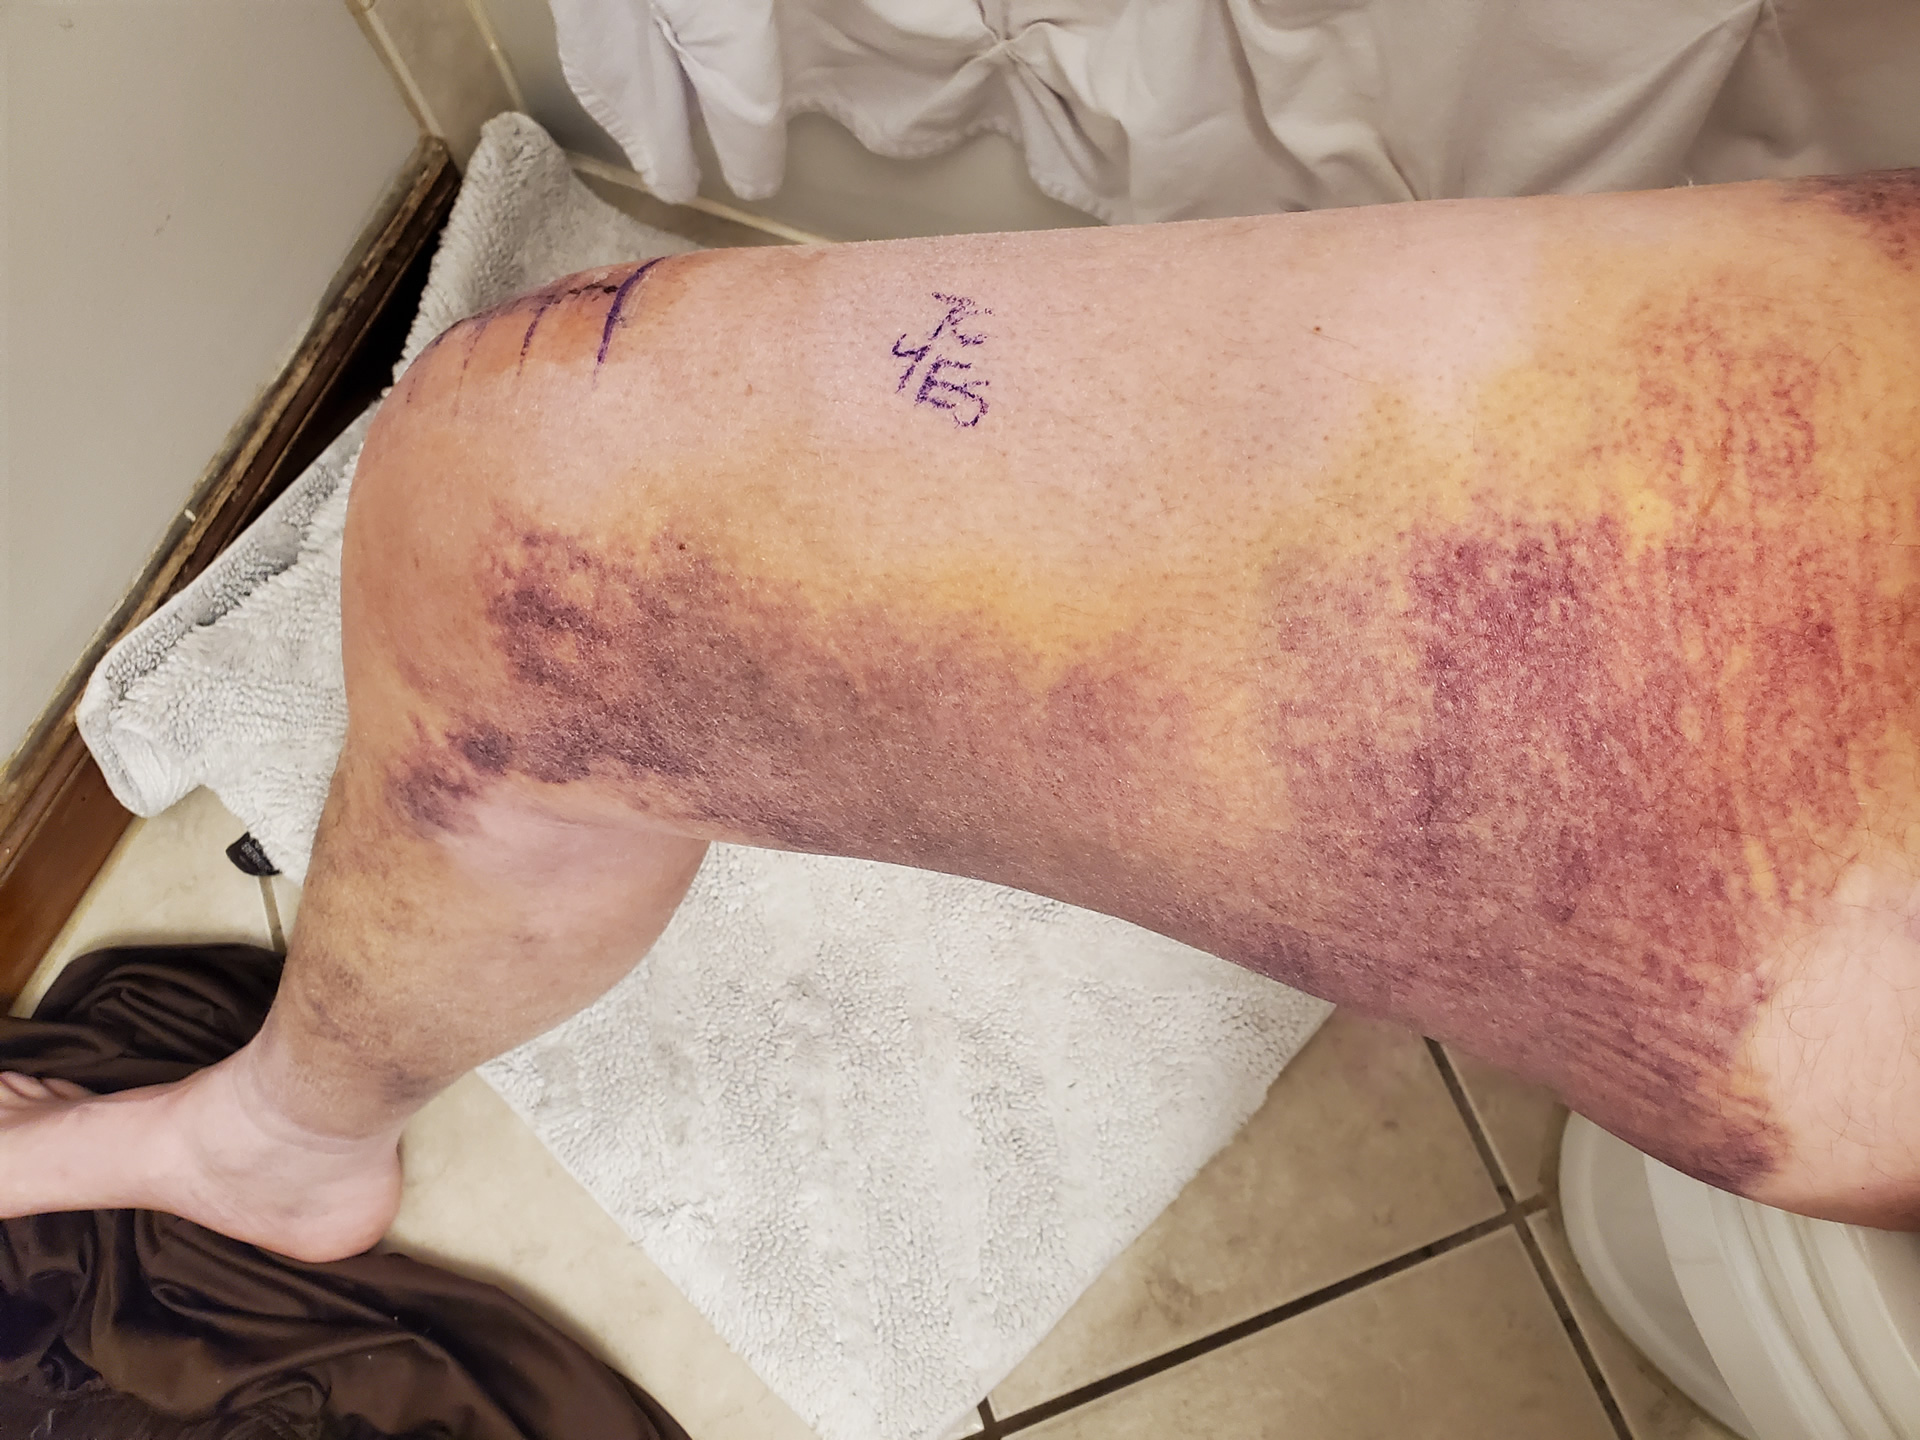
Right leg a week after knee replacement in May off 2022.
If you know me or have followed me for any time you know that my knees have taken a beating over the years. It all started that fateful day jumping that XR500 and destroying my knee and taking out the ACL when I was 22 years old. This started me down a path of many knee surgeries. I have dreaded the day Dr. Harrison would say he can't carve out any more arthritis and a metal replacement was my only option. That day happened in the fall of 2021 but I resisted. The thought of a metal knee made me afraid that I wouldn't be able to do the things I love.
After muzzleloader elk hunting in November of 2021 I tried and tried to ride my mountain bike as much as possible to strengthen my knee enough to make it another year. Sadly it just wasn't recovering from that last long hike in November. I had to make the call to Dr. Grunander and after meeting with him on May 3rd, reviewing my x-rays from the summer of 2021 and him flexing my knee maxing out at only 108° it was an easy call to get it replaced. A cancellation that day on his surgery schedule and I was scheduled to get my knee replaced two days later on May 5, 2022.
The surgery went well and I was walking not long after I woke from surgery. I didn't use crutches from day one. The pain of walking on it was no different than the constant pain I always had. The pain was quite intense, to say the least. I mean quite intense. I had a horrible time sleeping at night for several months after the surgery. At one point a couple of weeks out from surgery I broke down at took a narcotic pill to help with the pain... that was a mistake. I was still in horrible pain and now very nauseous.
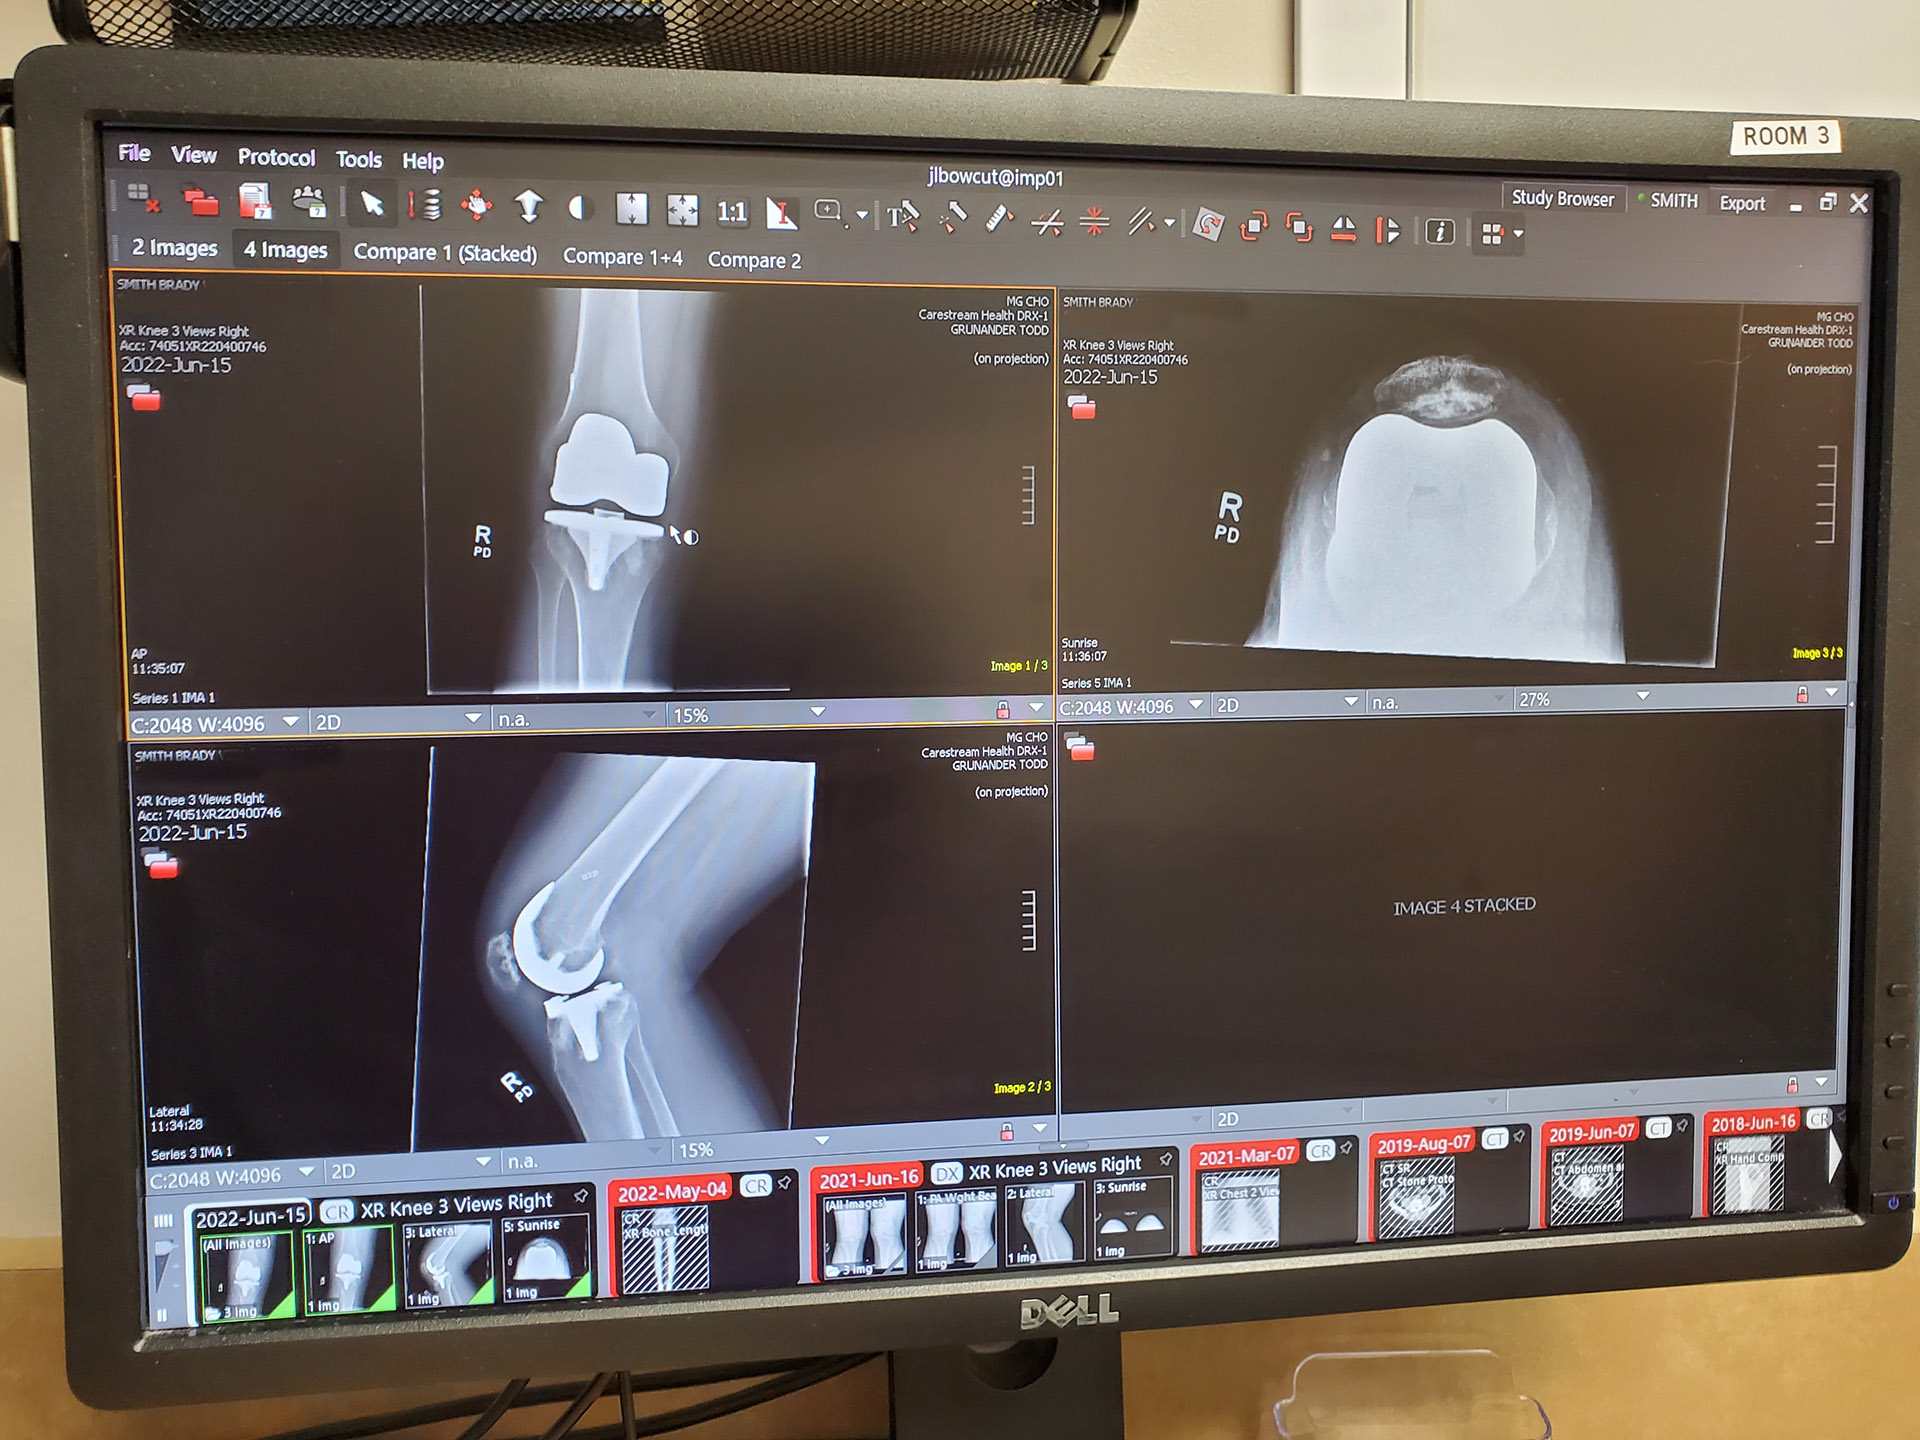
X-ray of my right knee after replacement.
I have had 18 surgeries and after the first couple of surgeries I learned that the narcotics the doctors prescribe for pain just make things worse for me and I stopped taking them many years ago.
For the first week and a half, I had a home health care physical therapist working with me and then I started with Alan Kerbs and his team of physical therapists three times a week. I quickly became a "special" patient for them. My knee wasn't bending well at all. I was around 10° off from being able to straighten my knee and flexion at around 90°. At first, I was made to feel that I was doing something wrong. Maybe I was overdoing it or something... Over time the PT team came to understand I was just not able to bend my knee. It just wouldn't bend.
In August I had a manipulation surgery to help get it bending. A manipulation surgery is basically putting you under and then bending your knee breaking up the scar tissue. After this surgery, the lower half of my quad was bruised a bunch. It would appear not only was scar tissue preventing my knee from bending but also my quad muscles as my quad muscles were stretched further than they had been in many years.
This manipulation surgery helped greatly improve my flexion but after a few months, I still could not bend my knee enough to ride a bike or go down stairs. I met back with Dr. Grunander a number of times and we discussed our options. He felt that the insert size was the correct insert for my knee but that all of the surgeries and the associated scar tissue were to blame and that it was just going to take some time. We decided to do one more manipulation surgery in December of 2022. If after another 6 months my knee wasn't bending enough we would look at going in and placing a thinner insert in the middle of my knee.

My message to bend my knee to 115 degrees for Dr. Grunander when I had my second knee manipulation surgery in December of 2022.
This second manipulation didn't bruise my leg any and my flexion improved even more. I can now go down stairs and peddle a bike with only a little pain at first before my knee warms up.
We will see but I do not think I will need a thinner insert installed.
-----------
March 2023
At 10 months out from my replacement I still have some near-constant pain in my knee, especially when I lay down at night. Before I get out of bed each morning I lift my knee up and let my lower leg dangle. My knee usually will bend to a little over 90° and then slowly over the next couple minutes bend to around 120°. Once i get my knee bent to as far as I feel it is going to go I then lift my lower leg up and down bending my knee up and down through 70 to 120° over and over several times. This motion is smooth with no additional pain. I also try to bend my knee a couple of times throughout the day in much the same fashion. Hopefully, the day will come when my knee will just bend right to 115°+ without any warmup. That's my goal. I need to be able to ride a bike to stay in hunting shape so my knee needs to bend.
-----------
May 29, 2023
I'm now 13 months out from surgery and am mountain biking four to five times per week. The knee is working but I am still seeing considerable stiffness, especially on the days I mountain bike. My knee is a lot better than it was the last couple of years before I finally gave in to getting the replacement. Looking back I probably should have had the replacement a few years sooner.
Because of an ablation surgery on my heart in March of 2023, I need to work on getting my heart back into shape along with my knee. I've gained far too much weight the last few years in part thanks to my knee failing on me and now my heart. I'm not giving up yet. I still have some good hunting years left in me.
-----------
I was able to hunt some in 2022 with my sons even with a knee that didn't bend so well. Even with it not bending very well it was nice to hike all day and not have my knee getting inflamed at all. I'm confident that if I just keep working on bending it my knee will eventually come around to bending naturally.
One thing I will say about total knee replacement. The recovery hurts like Hell! And it keeps hurting and hurting for months. This is far worse than ACL surgery or any of the 20 other surgeries I have had in the past.
Here are my first hunts in 2022 after my total knee replacement.
October 2024
I thought I would touch back on the progress of my knee. My knee is doing amazing and I can bend it to 130 degrees! (my "good" knee bends to 130 degrees that is how I know how far I can bend my metal knee) I am exercising by hiking or mountain biking daily and have lost 30 pounds over the summer of 2024.
Here is my take on why it was so hard for me post TKR operation. I'm relatively young for having a knee replacement and I am very active. With this being the case I believe the plastic shim in the middle of my knee that Dr Grunander used was thicker and tighter than what would be placed in a less active 70-year-old. This tighter thicker shim would last longer given my activity level and provide a more stable knee given there is no longer an ACL or MCL. The tight shim and the fact that I could only bend this knee to 108 degrees going into the surgery led to a perfect storm for me to have a lot of trouble getting it to bend. It's working great now and I am more active than I have been in 10 or more years.
My youngest son Kaden and I went on an amazing six-day backpacking trip to the Wind Rivers this summer and my knee did awesome. Check out the article about this adventure in the link below.
2024 Golden Trout Wind River Backpacking Fishing Trip
December 2024
I had a great hunting season in 2024. I hiked more than I have in many years.
Here's something recently learned about my knee. Under no circumstances should you try jogging with a metal knee. I do a 2-mile hike every morning with my dog and on the steep uphill section, I would do what I would consider a tiptoe jog. Basically, really short, quick strides but a "jog" nonetheless, with very little pounding on my knees as I was climbing. I did this to get my heart rate up to strengthen my post-ablation surgery heart. Well, on two occasions, roughly 10 minutes after a short uphill tiptoe jog my knee just started hurting like crazy, especially when I would lift my leg to take a step. Surprisingly, it never happened right after or during my tiptoe jog but roughly 5-10 minutes after when I was hiking on flat ground. The mile back to my Jeep my knee was killing me as I would do my best to fight through the pain to walk. Both times the pain would greatly subside a couple of hours later and within a day be completely gone. It took me some time to connect the dots as to what was causing the pain. Now I just hike as fast as I possibly can uphill while always keeping at least one foot on the ground and I have zero problems. No tiptoe jogging for me anymore, sadly.
In October, I did a one-trip pack out with 125 pounds on my back going uphill the whole way and my knee did amazing. I was stupid for not taking more trips. Just plain stupid but my knee did awesome and didn't have any issues afterwards. You can learn more about this pack out in this article.
2024 Rifle Deer Hunt - X-Bolt II 300 WSM
July 2025
My knee did amazing on our 6-day backpacking trip into the Wind Rivers this summer. I've lost some weight and am down to 240 and my pack weighed in around 60 lbs for the trip. You can learn more about the trip here: I Hate Golden Trout! - 2025 Wind River Backpacking Trip
December 2025
My knee is doing awesome! I hiked more than I believe I ever have this past fall on all my hunts, including packing out another buck on my back on my 2025 Henry Mountain Muzzleloader Deer Hunt.
- Details
- Written by: The DIY Hunter
- Category: Outdoor
- Hits: 7672
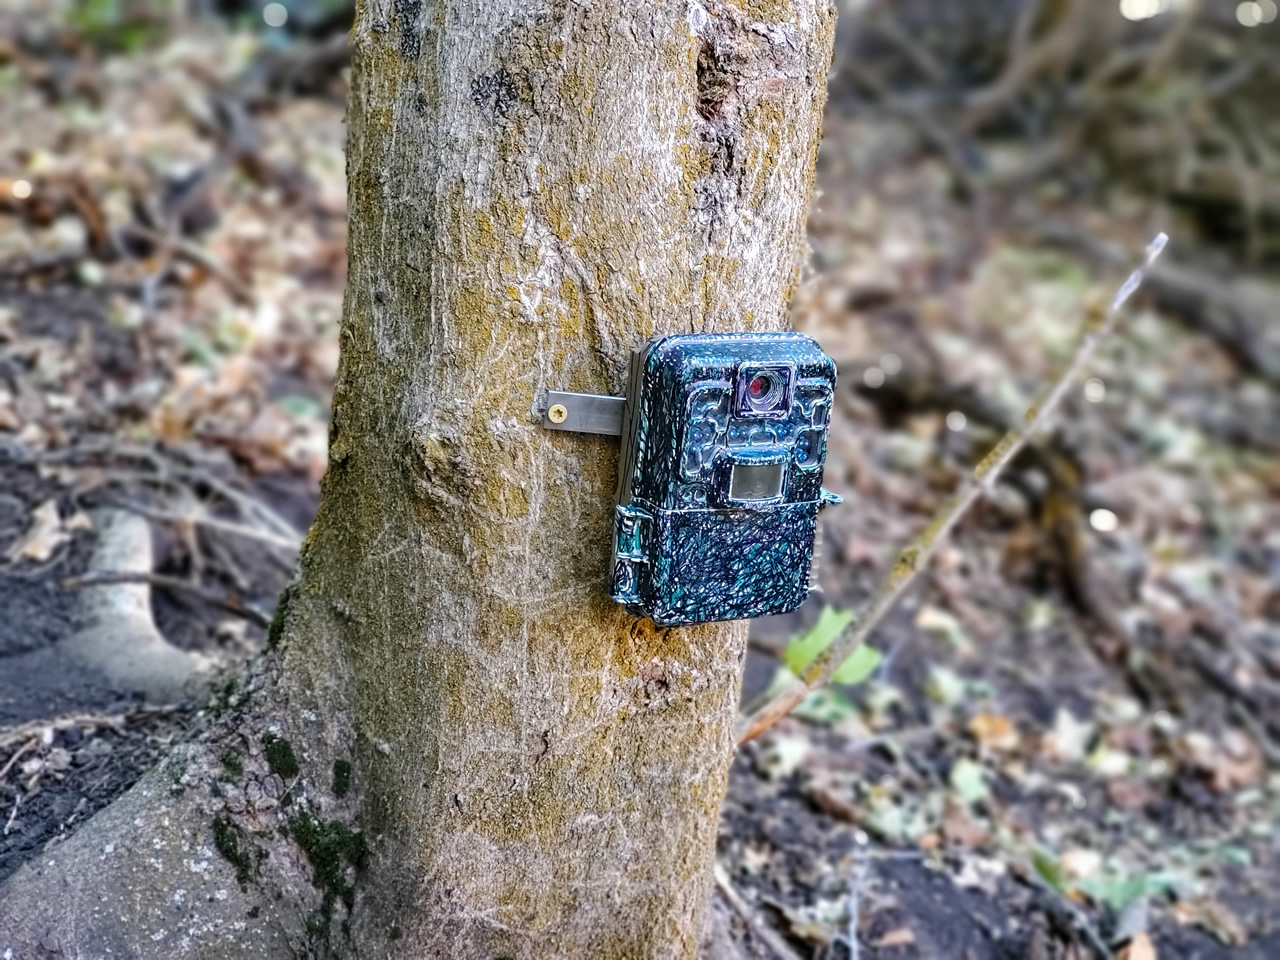
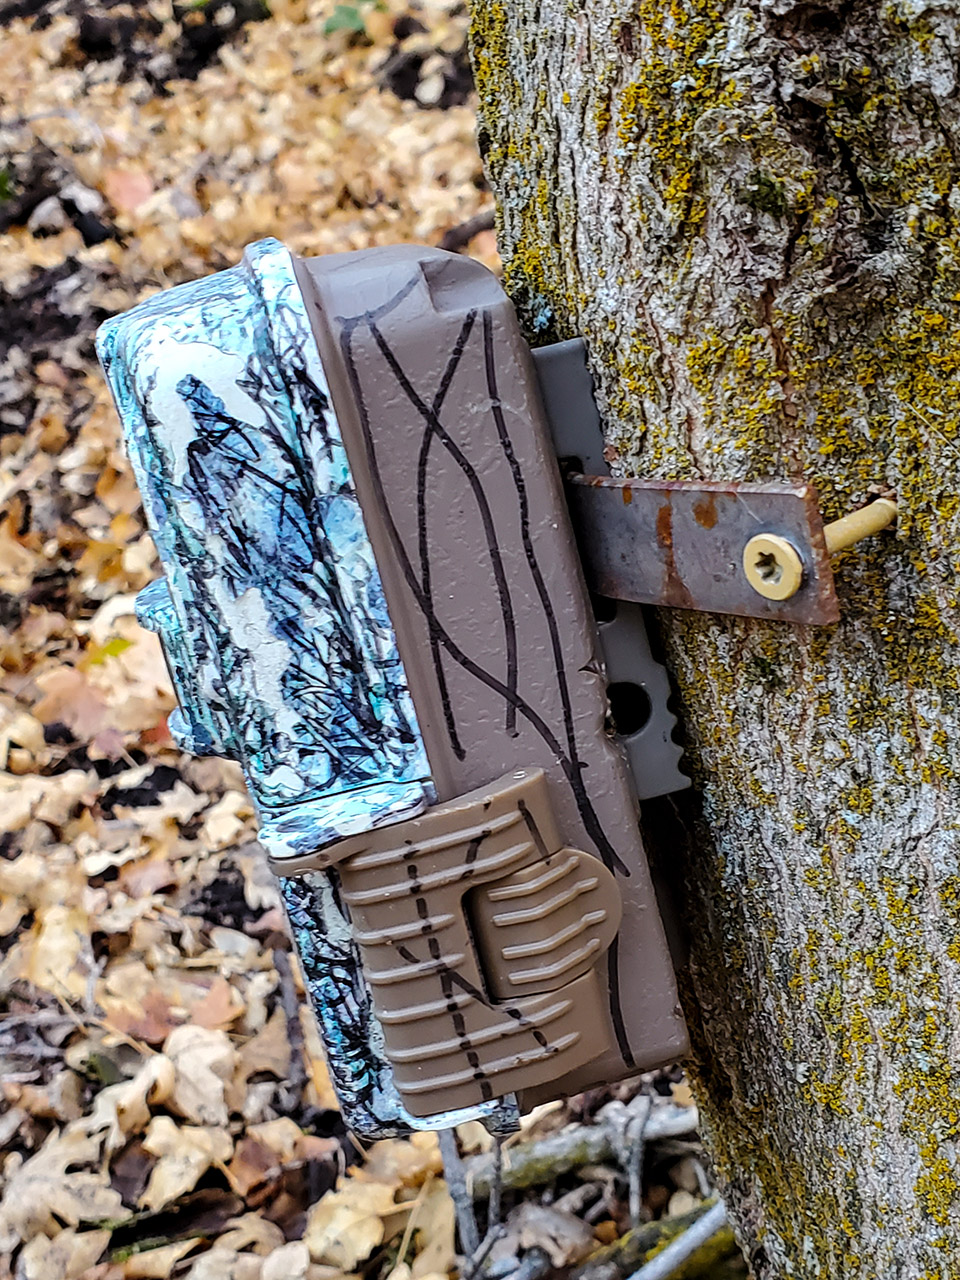
This shows my preferred way to mount a trail camera to a tree using a metal strap. Yes, you are right this camera does have an odd color. This old Browning Recon Force Trail camera has faded in the sun so I have used sharpie markers to color it.
I often get asked about how I set up my cameras. In this article and the images attached, you can learn my preference in mounting trail cameras on trees.
I like to use a short piece of 3/4" by 1/8" steel with drilled holes in it for my camera "strap." You can find pieces of this metal at a hardware store that are a couple of feet long. I cut the metal from 6 to 10 inches long and drill holes on the ends. I have been preferring to drill multiple holes so that I have options on which hole to anchor the screw through to the tree and I have various lengths of the straps in my pack so I have options for the length I may need.
I anchor the strap to the tree with Torx bit decking screws. Yes, this does require that I take a small cordless drill and Torx bits with me but the extra weight of the drill is worth it.
I use this metal strap mounting method with Browning Recon Force trail cameras that have a solid metal mounting bracket on the back that I run my metal strap through. With the metal strap going through the metal bracket and then screwed to the tree the cameras are locked on solid... they aren't moving unless you break the camera.
If you look at the photo below you can also see a zip tie locking the door shut. Sadly the newer Browning Trail Cameras do not have the padlock slot for my zip ties anymore. I like zip tying the door shut because bears and other animals will mess with your camera and often open the door exposing the SD card and electronics to moisture. I also like the zip tie to keep people from opening the door and taking your SD card or just messing with your camera. Leave the camera alone people, that's what the zip ties help tell people.
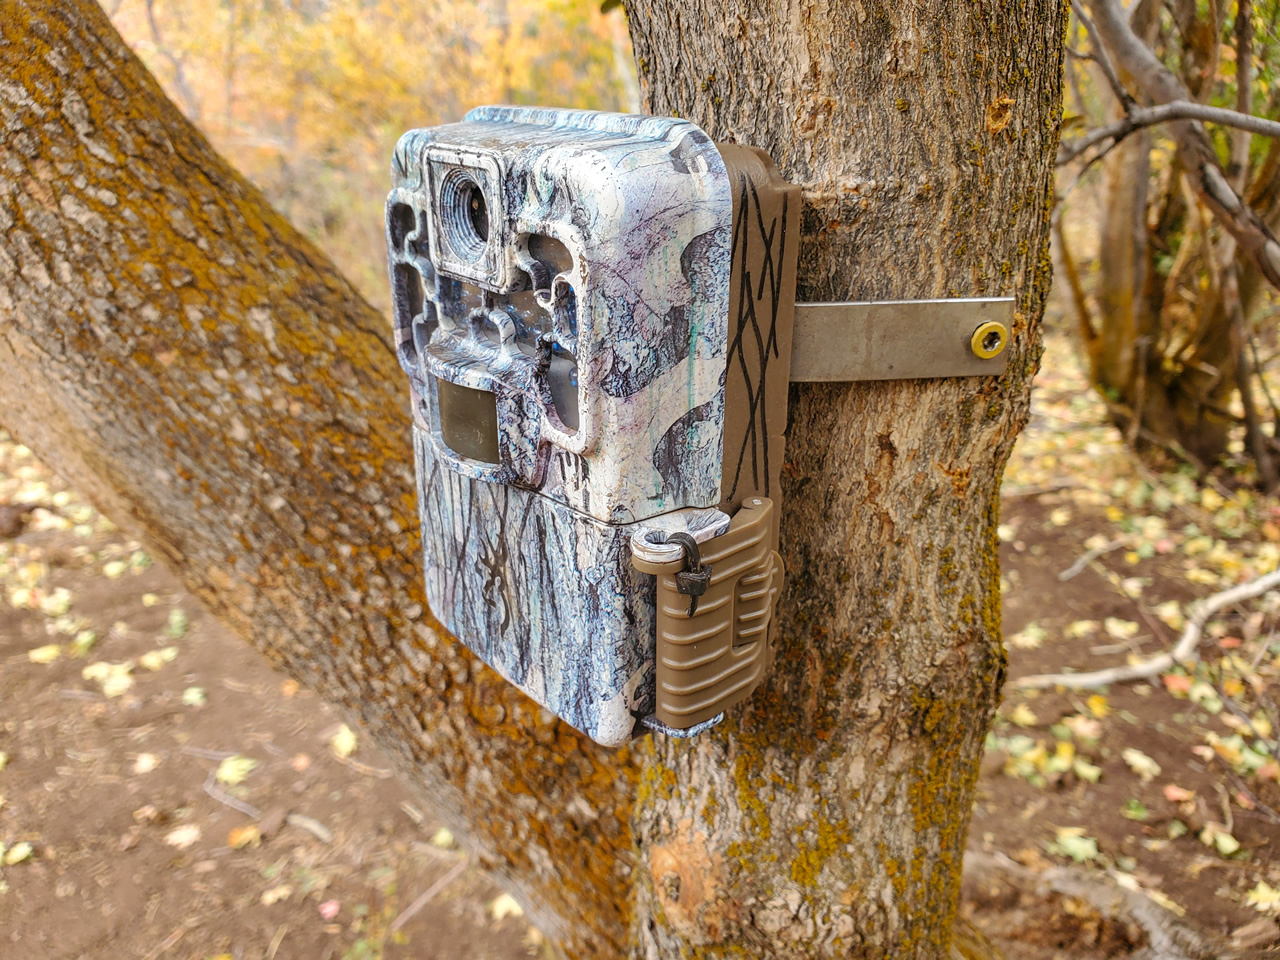
In this setup, I am using the metal strap and I am also securing the door shut with a plastic zip tie.
I like these metal straps for a number of reasons. Security-wise I think traditional straps around trees are the biggest factor for people finding cameras. A strap going all the way around a tree is a dead giveaway from any angle you look at the tree. My metal straps hide the cameras better and a thief is going to need some equipment to remove my metal strapped cameras without damaging the camera.
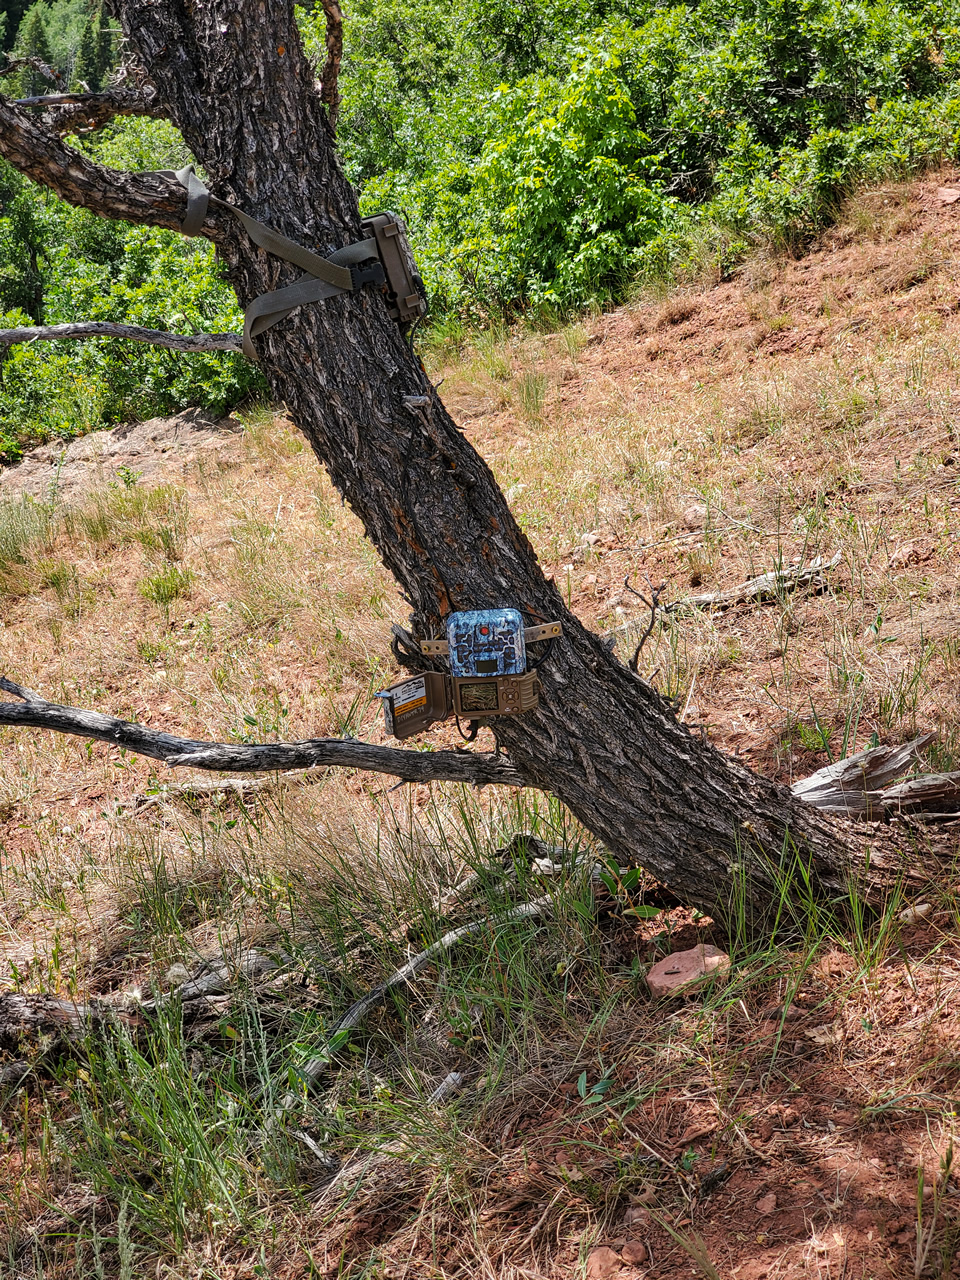
In this setup, I am using an external battery pack to keep the camera taking video longer. Notice that I am able to solidly mount this camera on an angle on this less than a straight mahogany tree. With regular tree camera straps, it is difficult to mount a camera on an angle different than the direction of the tree.
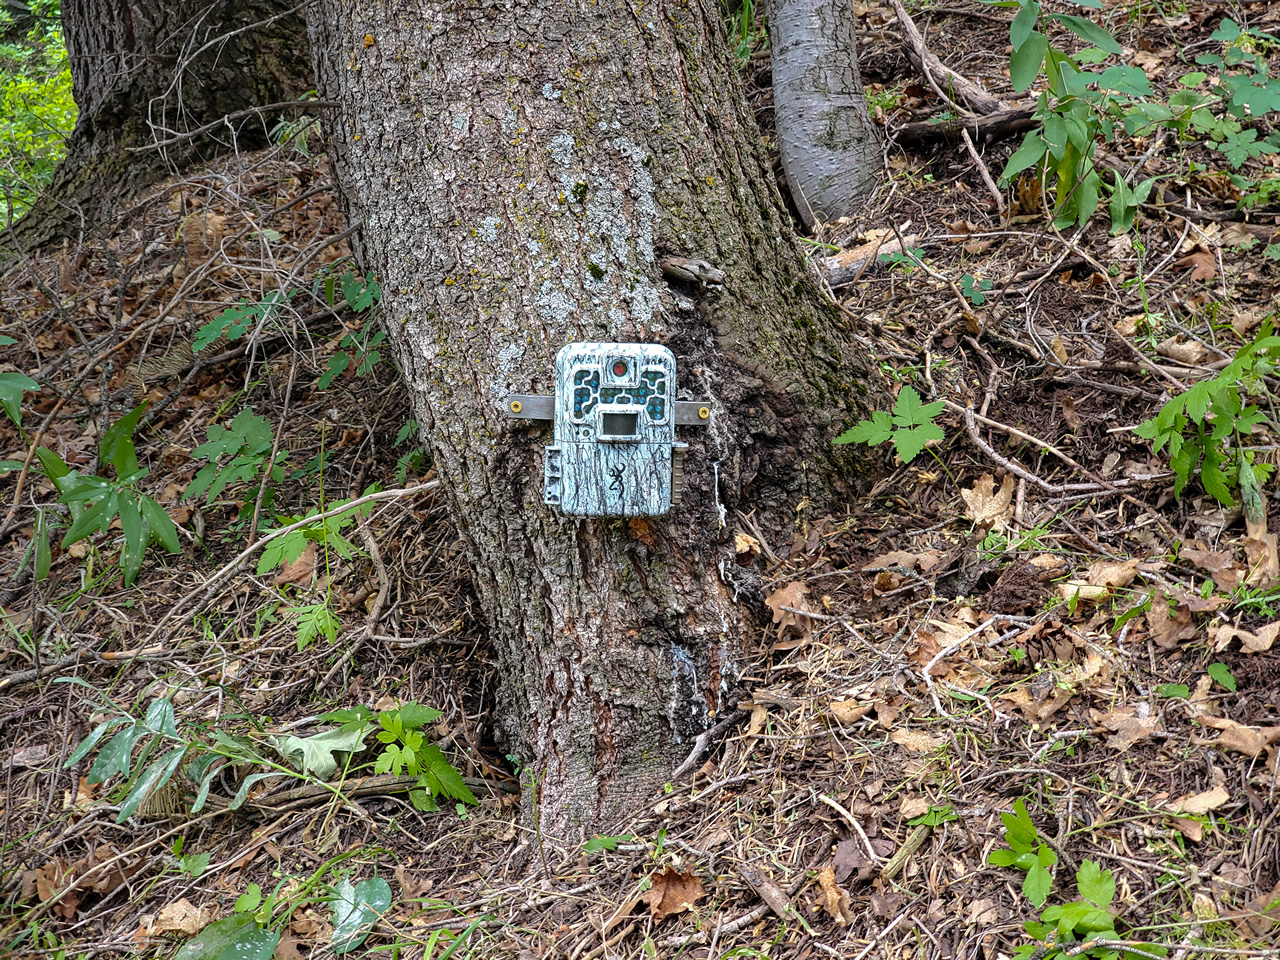
Here I have a camera mounted low on the trunk of a pine tree. From this height on the tree, I am unable to run a strap around the tree because of the sidehill being higher up on the uphill side of the tree.
- Details
- Written by: The DIY Hunter
- Category: Outdoor
- Hits: 40738


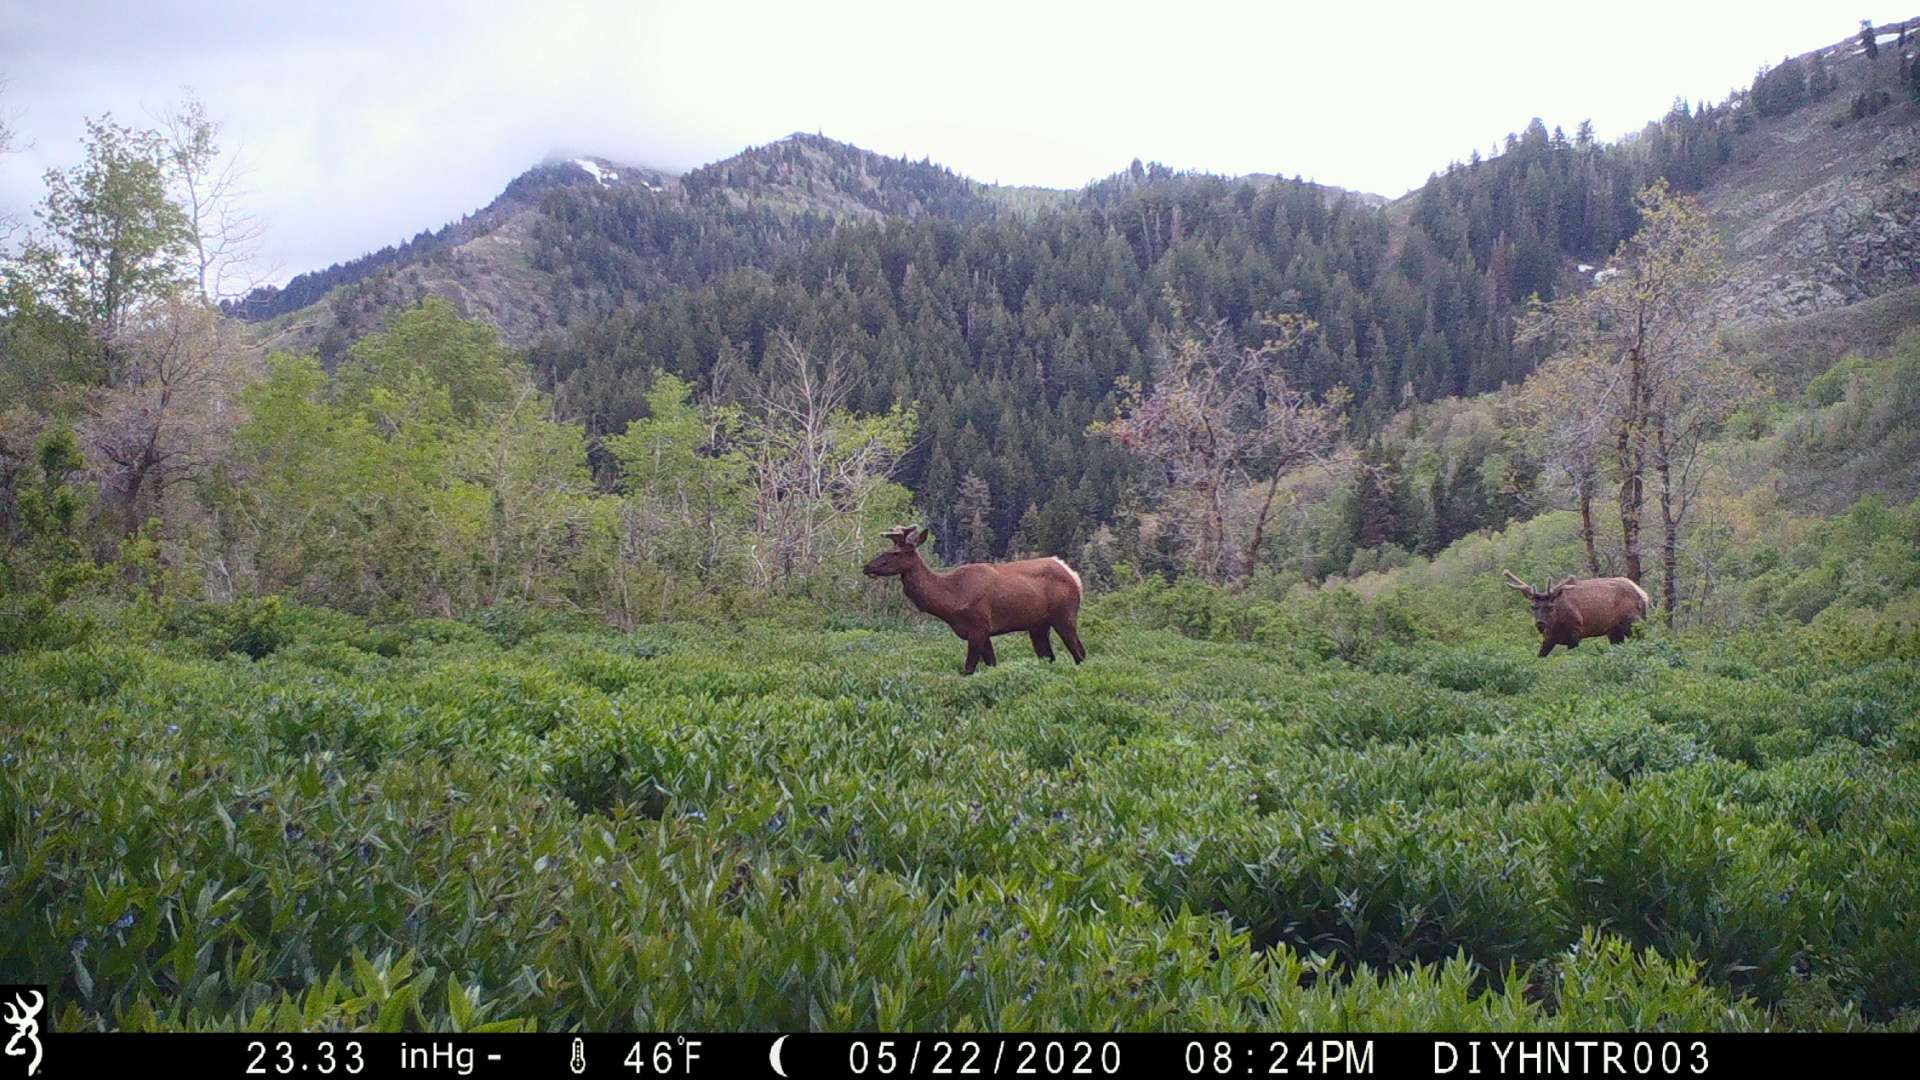
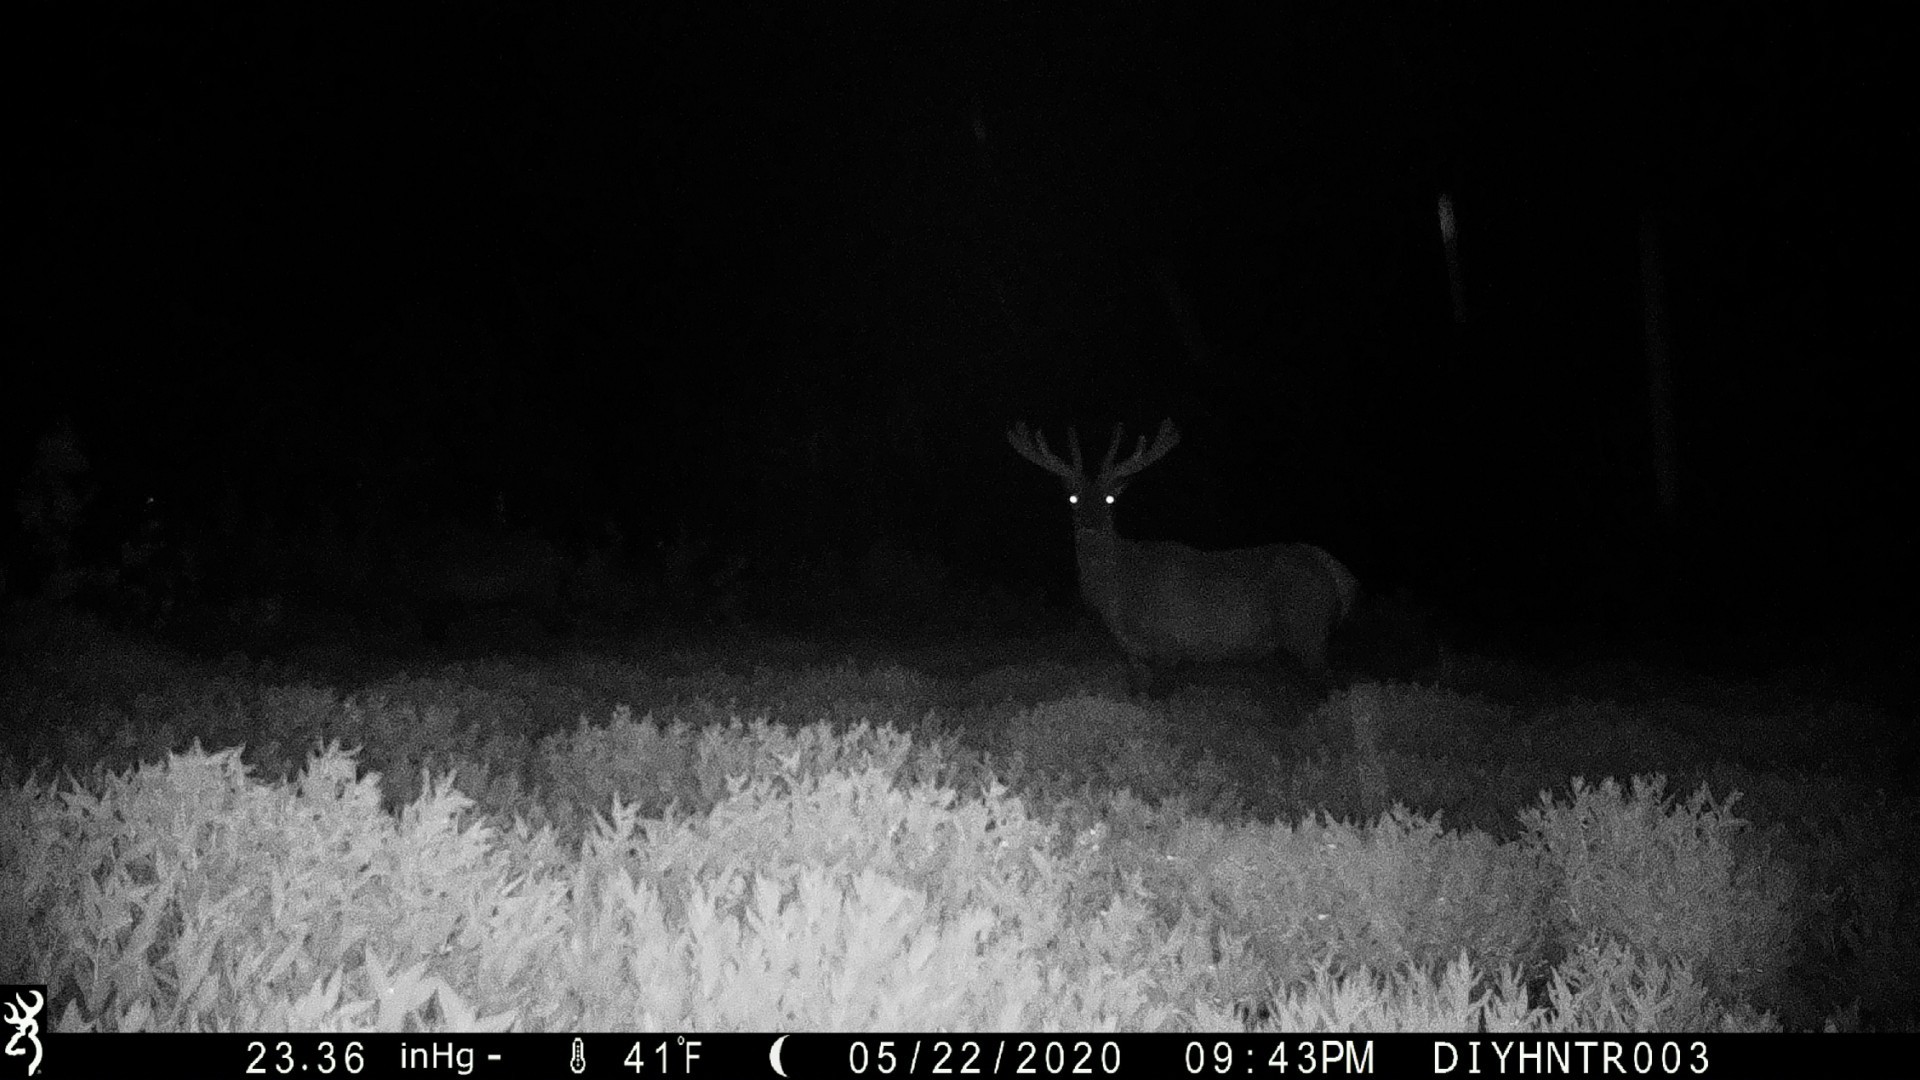
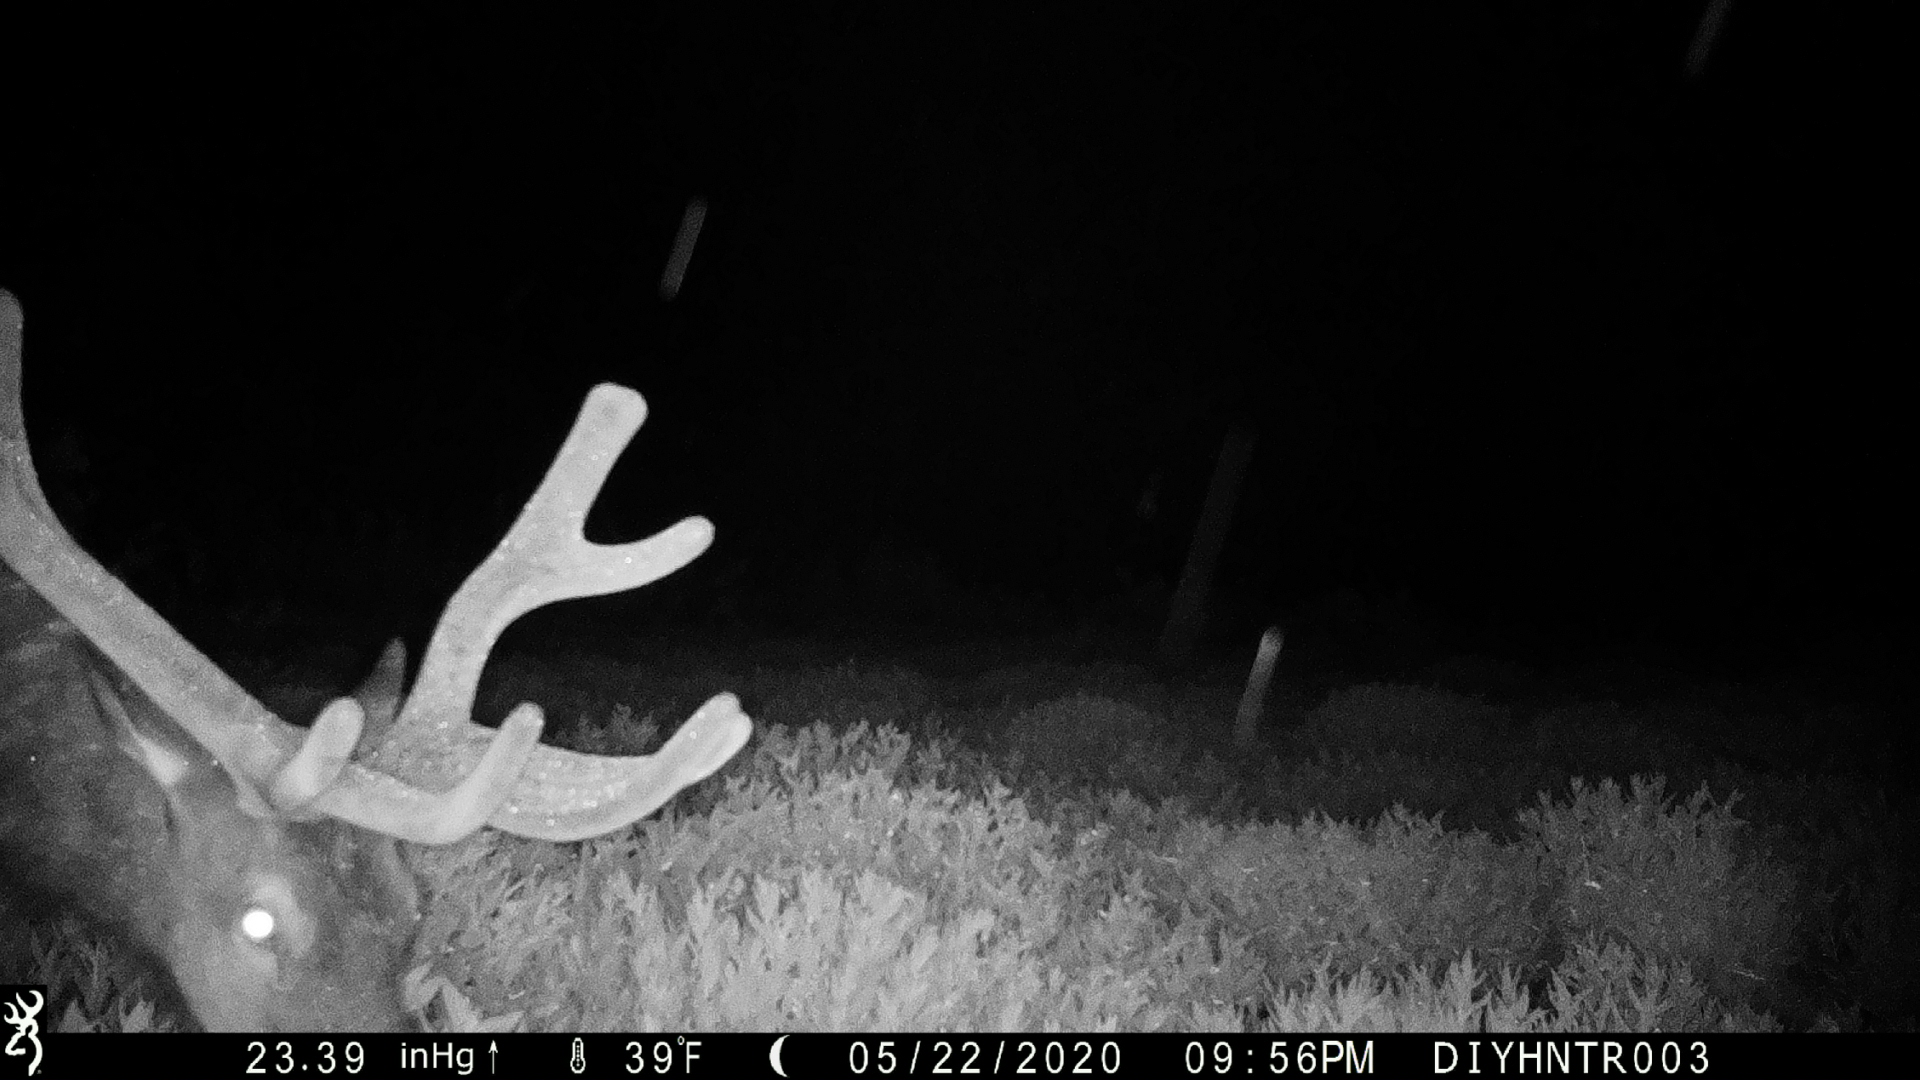
Like many people who love trail cameras, I have been eyeing the jump to cellular technology for a few years now and in March of 2020, I picked up my first cellular trail cameras, a couple of Browning Defender Wireless Cellular trail cameras. These cameras are pretty cool. So I thought I would share the things I have learned about them, things I had so many questions about before I used them.
The first thing I noticed about the camera is that it is a little larger than my favorite Recon Force cameras. The extra size comes from a battery pack that takes 16 AA batteries instead of 8 AA batteries. The face of the camera has really cool recessed grooves in a camouflage like pattern. This makes it so it doesn't have any large flat surfaces on the front to reflect light off and it's pretty cool looking as well. There is also a metal bracket on the bottom to thread 1/4" 20 accessories mounts instead of a molded plastic mount with metal insert embedded in the plastic.
Another great companion to this camera will be the Browning solar panel which should be available around July of 2020 (Covid-19 delayed). With a solar panel attached the camera can stay running indefinitely... or at least as long as a bear or other critter doesn't mess with the camera.
The cameras come in either a Verizon or AT&T version. They are the exact same camera but just have a sim card and controller board built-in for the specific carrier. One thing that may be confusing is that these cameras do not link to your current cell phone plan. They are completely independent of any cell plan. They are linked to a Browning Trail Cameras system (more on that system in a bit).
You should get the VZW or ATT version that has the best signal in the area you plan to use your camera. And that's the hard question, which camera would have the best signal in the area I want to place it? If in doubt, Verizon has a little larger network. The Verizon model had the strongest signal in the valley areas I have tried so far while up in the high country I tried the AT&T model has had a better signal.
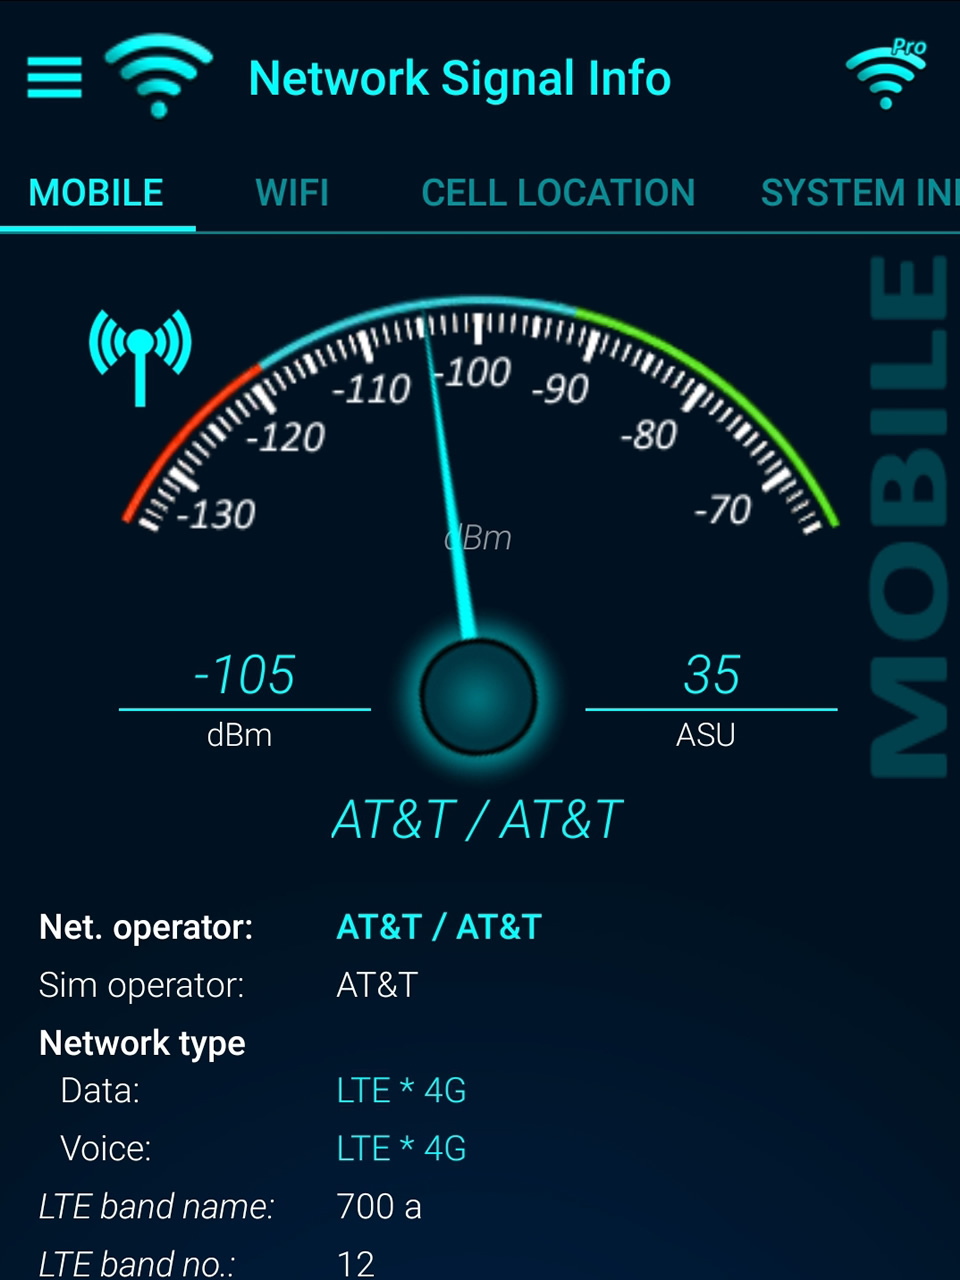
As shown in the image above is a free app I found on Google Play to check the signal strength of the carrier of your phone and in my case that is AT&T. If you and a buddy each had an AT&T and a Verizon phone you could use apps like is shown above to hike into the location you would like to place a camera and see which carrier would get the best signal strength.
To help me know if a particular area has good signal strength I've been looking at apps for my phone to find the signal strength of the two cell carriers. My personal cell carrier is AT&T and I have found a couple of good apps to monitor the strength of the AT&T signal but because my phone isn't on Verizon's network I have no idea which carrier is best for that spot. I can, however, use my phone to get a good idea if the signal strength is strong enough for an AT&T camera.
So far my cameras have worked almost everywhere I have tried them. The lowest signal strength I have tried being -118dBm and the camera worked. The smaller the negative number (the closer to zero) the better the signal. My preference it is to try to get to at least -100dBm or better.
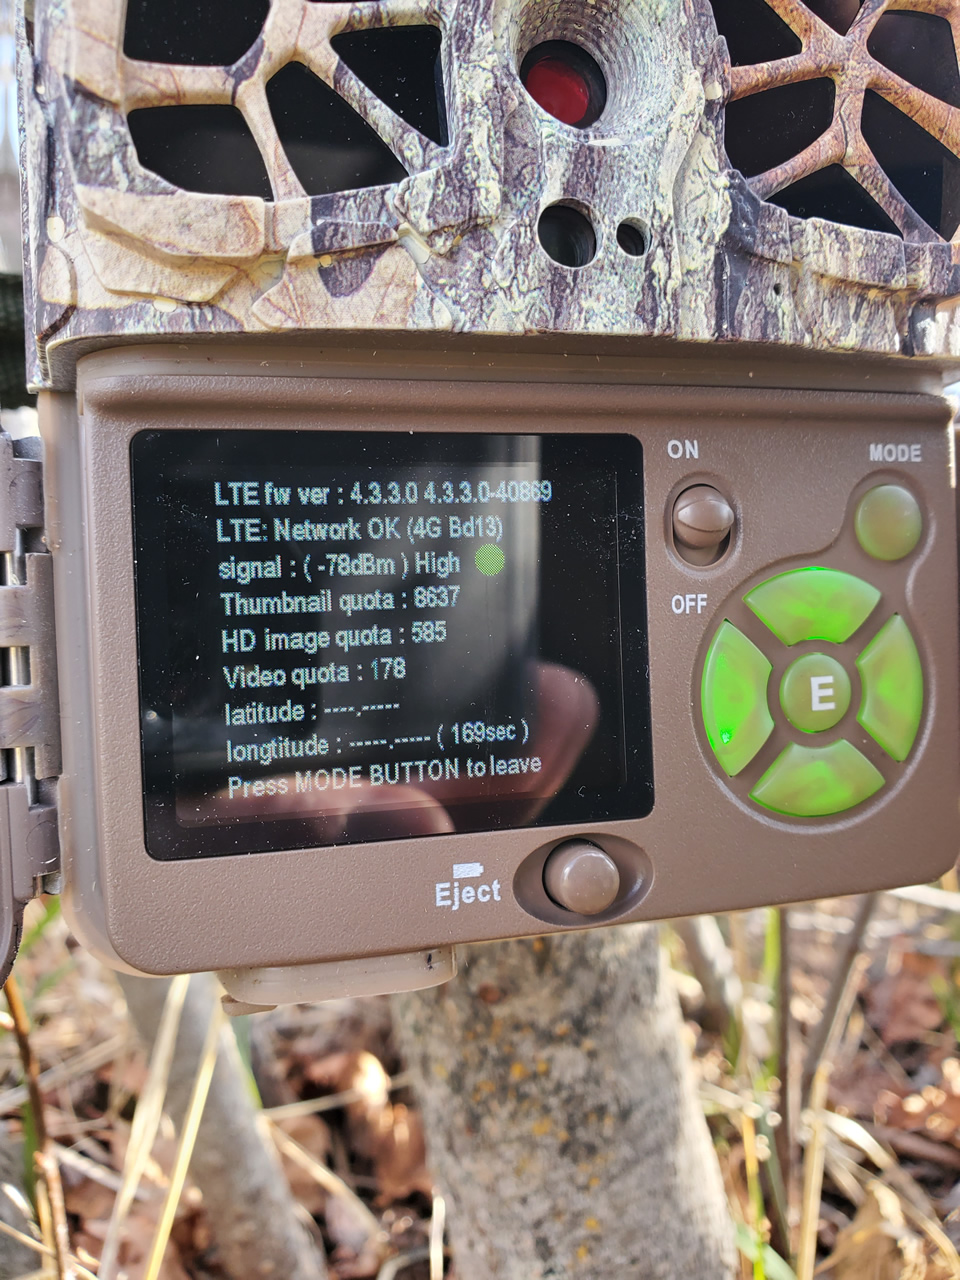
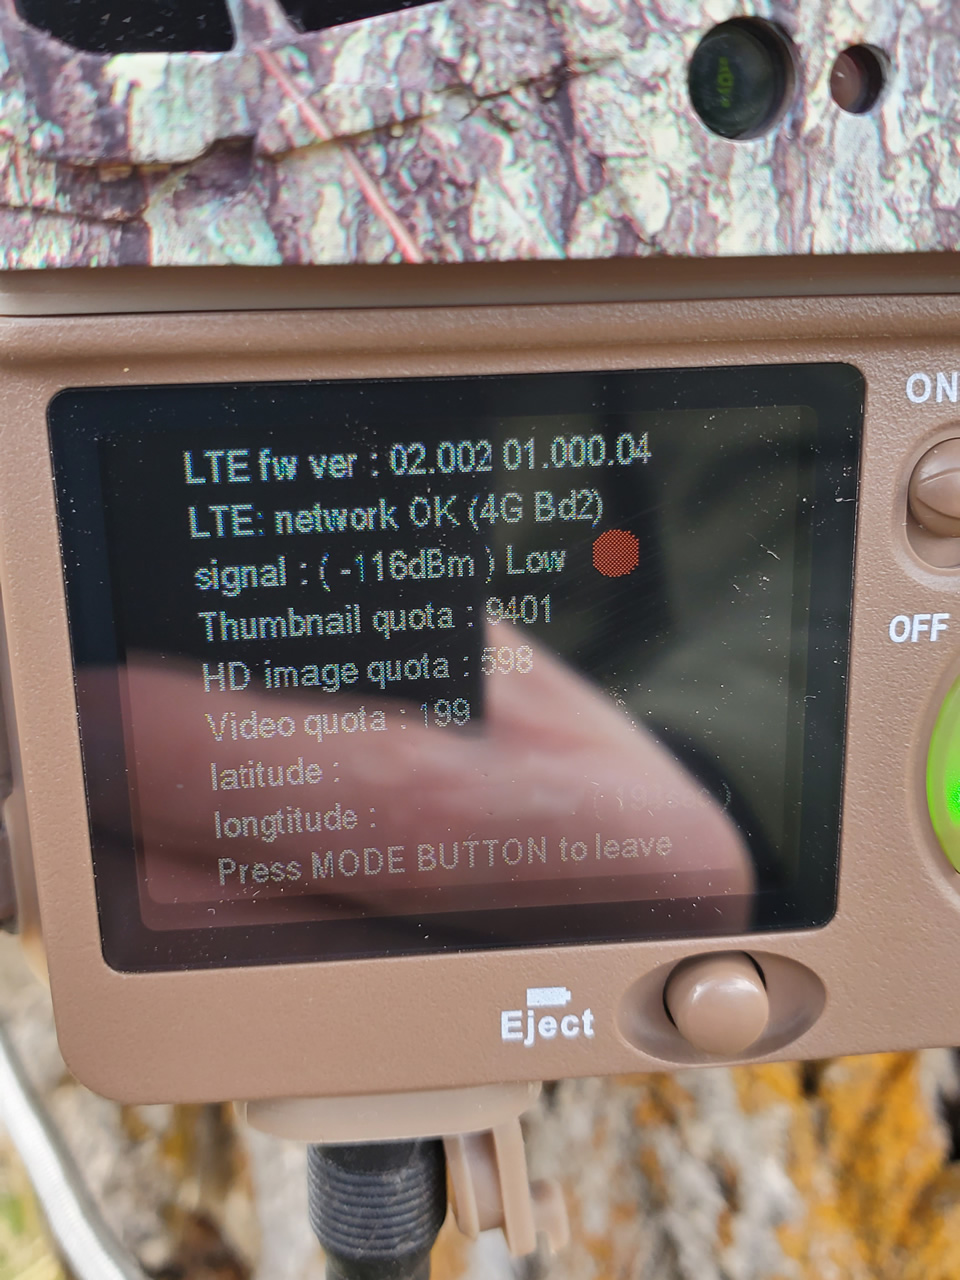
When setting up the camera in the field there is a setting to check the signal strength. Shown above is my Verizon camera showing high signal strength in this location and my AT&T camera with low signal strength. Even though this AT&T camera at this particular location shows a red "low" signal the camera still works great.
Feature-wise other than the cellular connectivity, the cameras have the features you have on the non-cellular versions of Browning Trail Cameras. The only thing that I have noticed that is different from my favorite Recon Force Advantage cameras is that the video is standard 30 fps instead of the extra high frame rate of 60fps. I do like the 60 fps for editing video to a half-speed slow motion but unless you are geeky like myself with video editing, 30 fps is awesome.
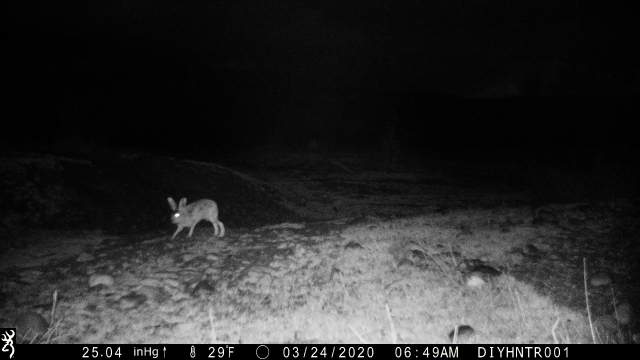
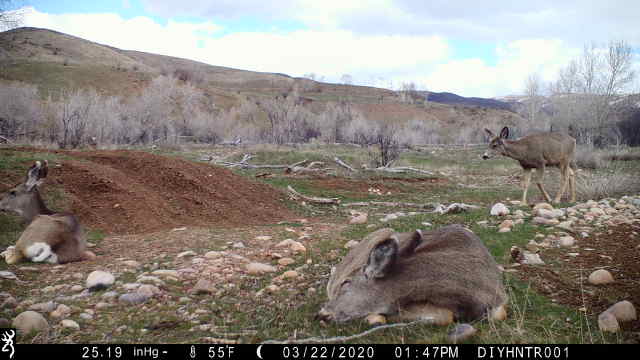
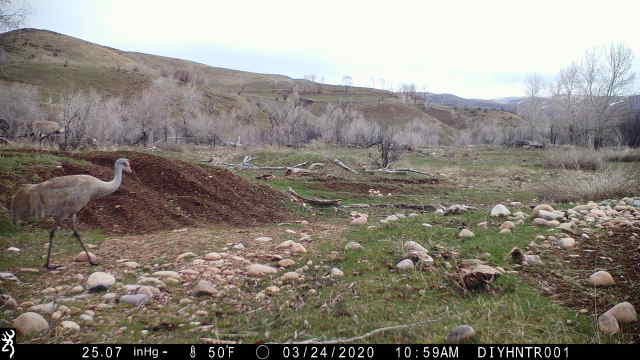
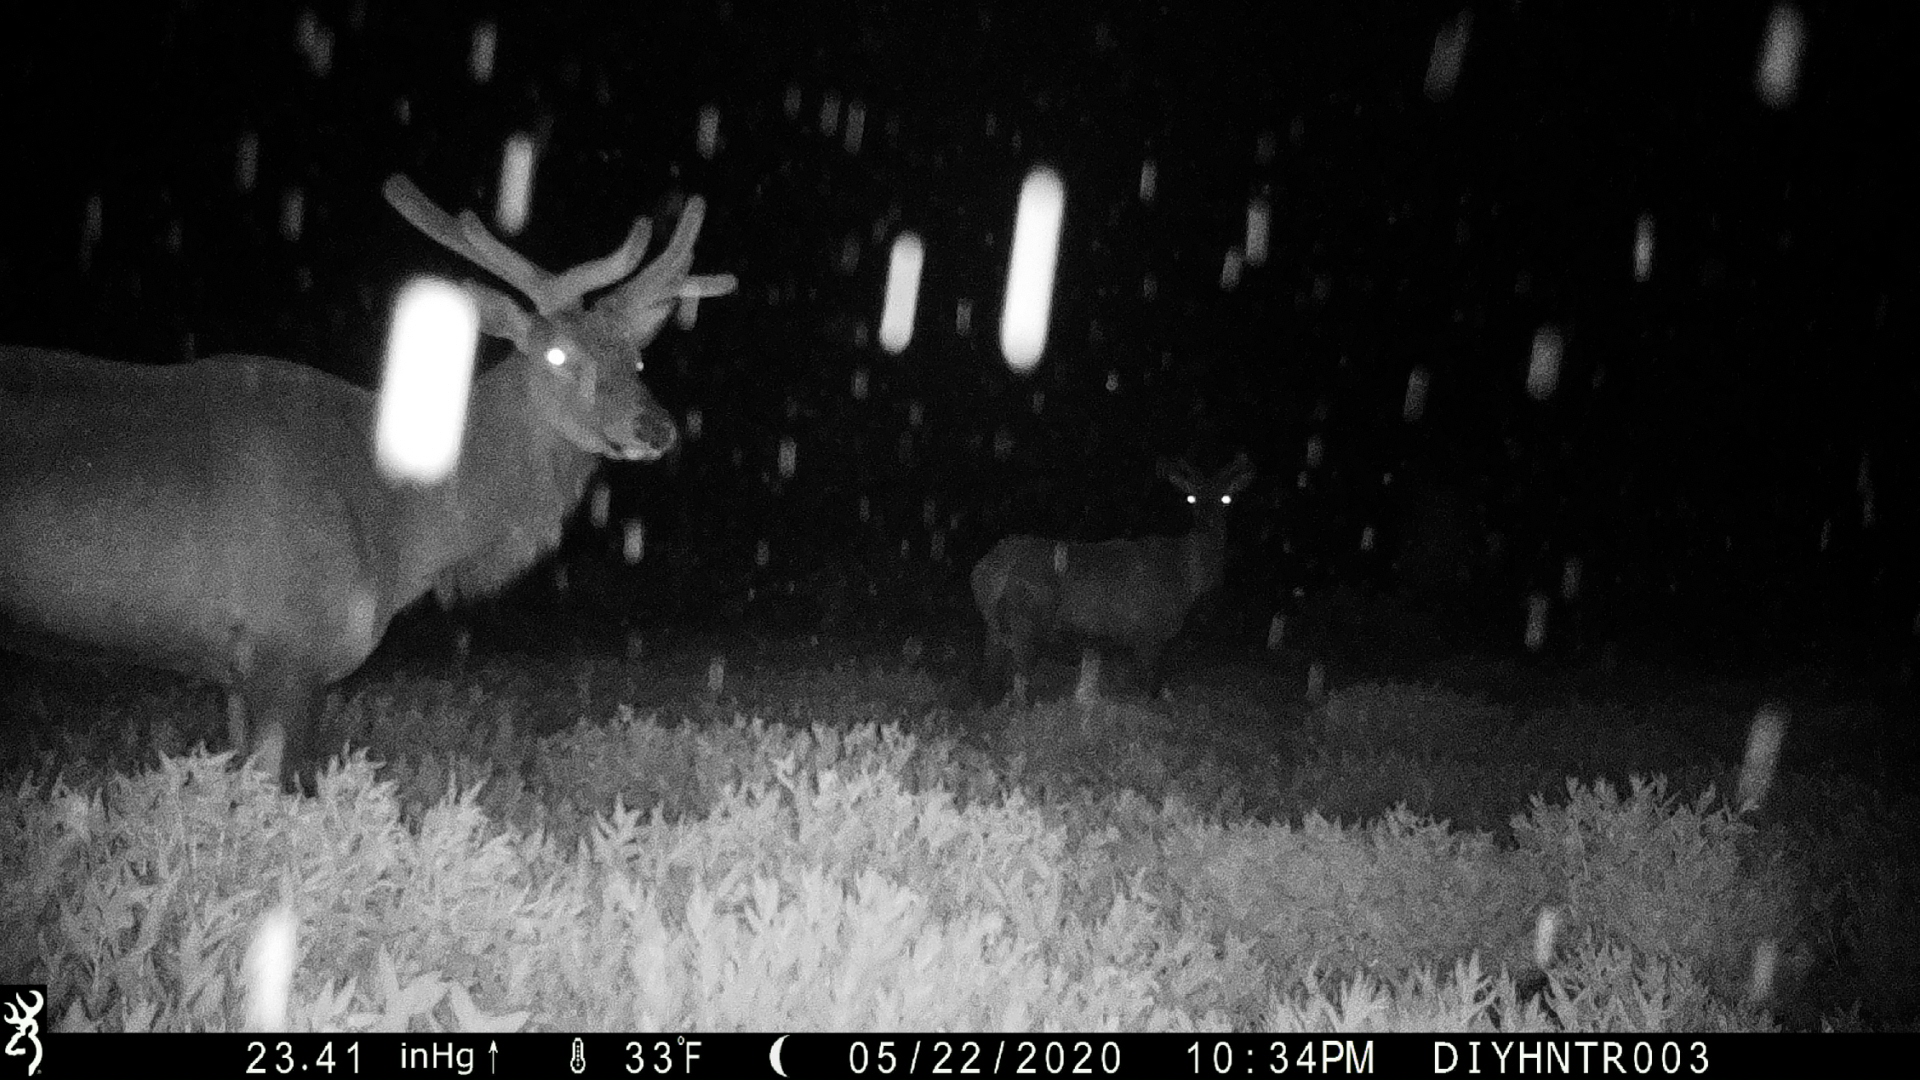
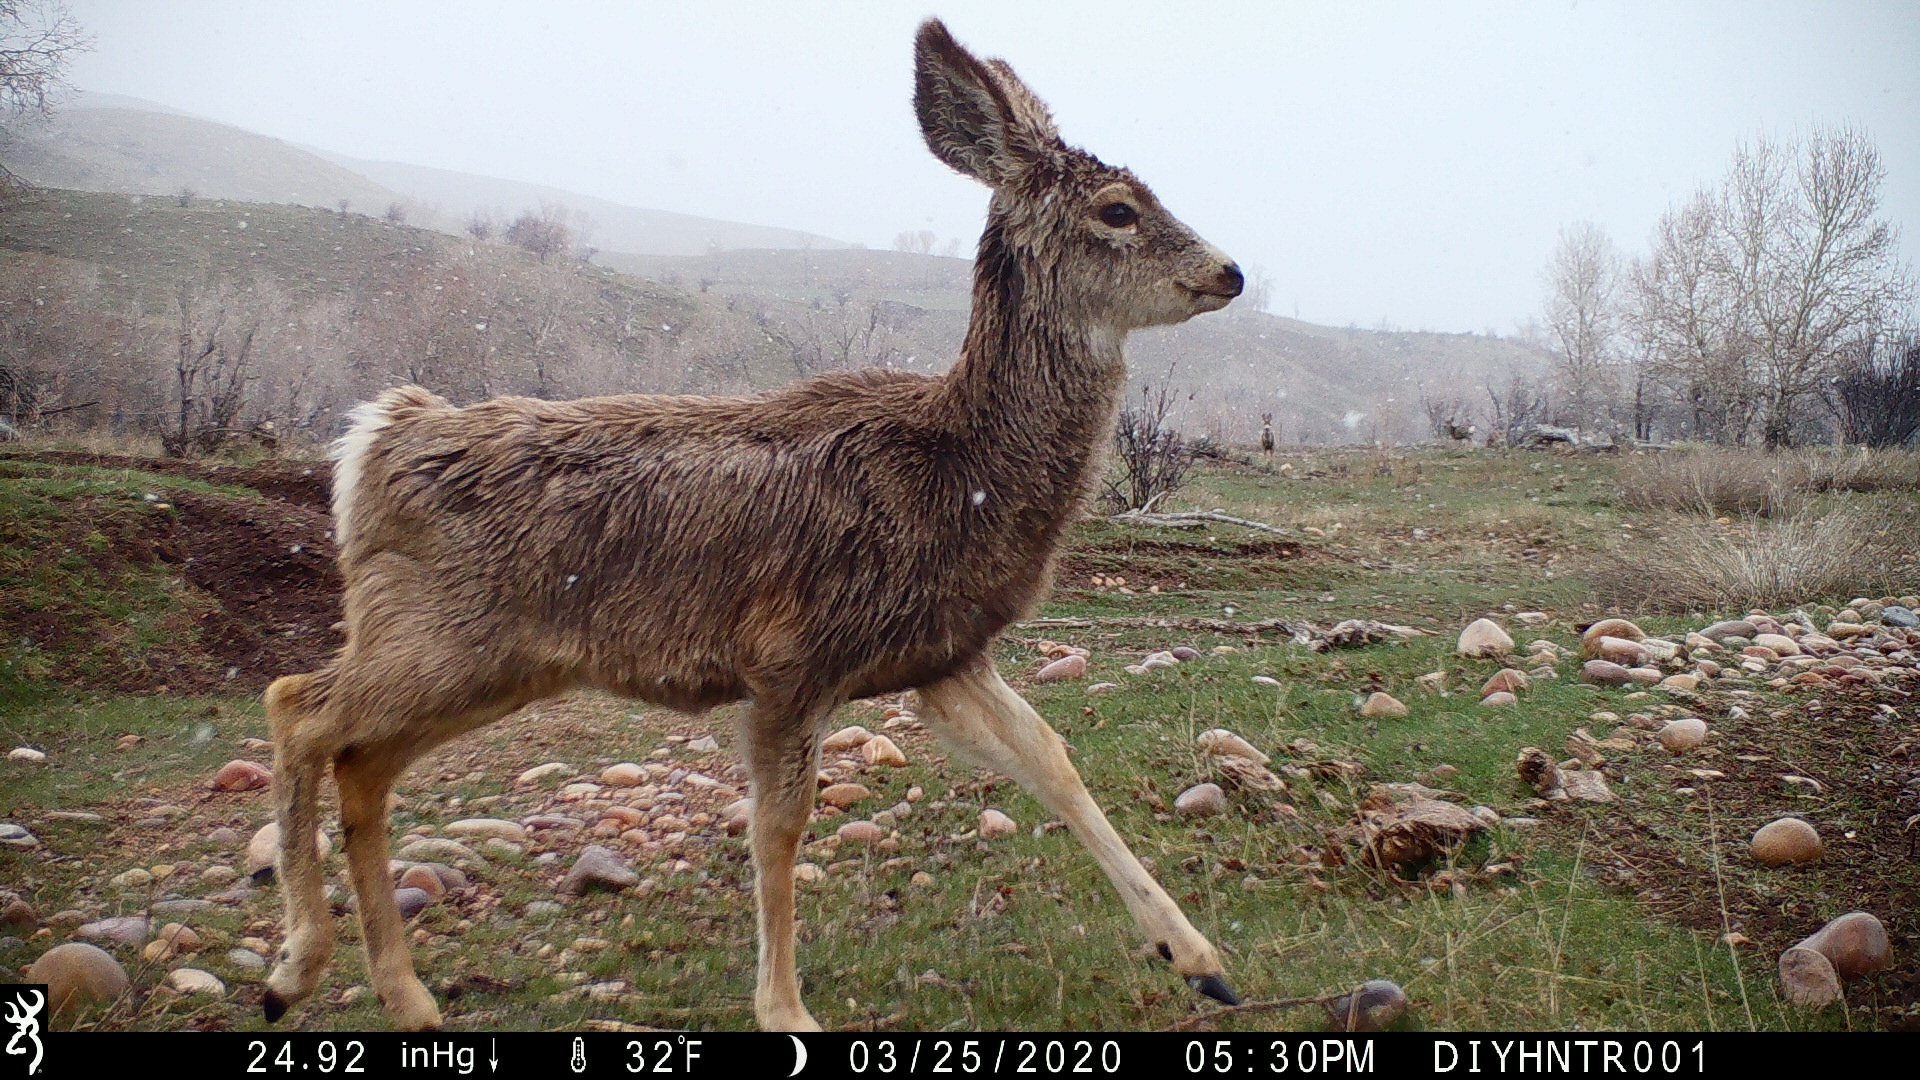
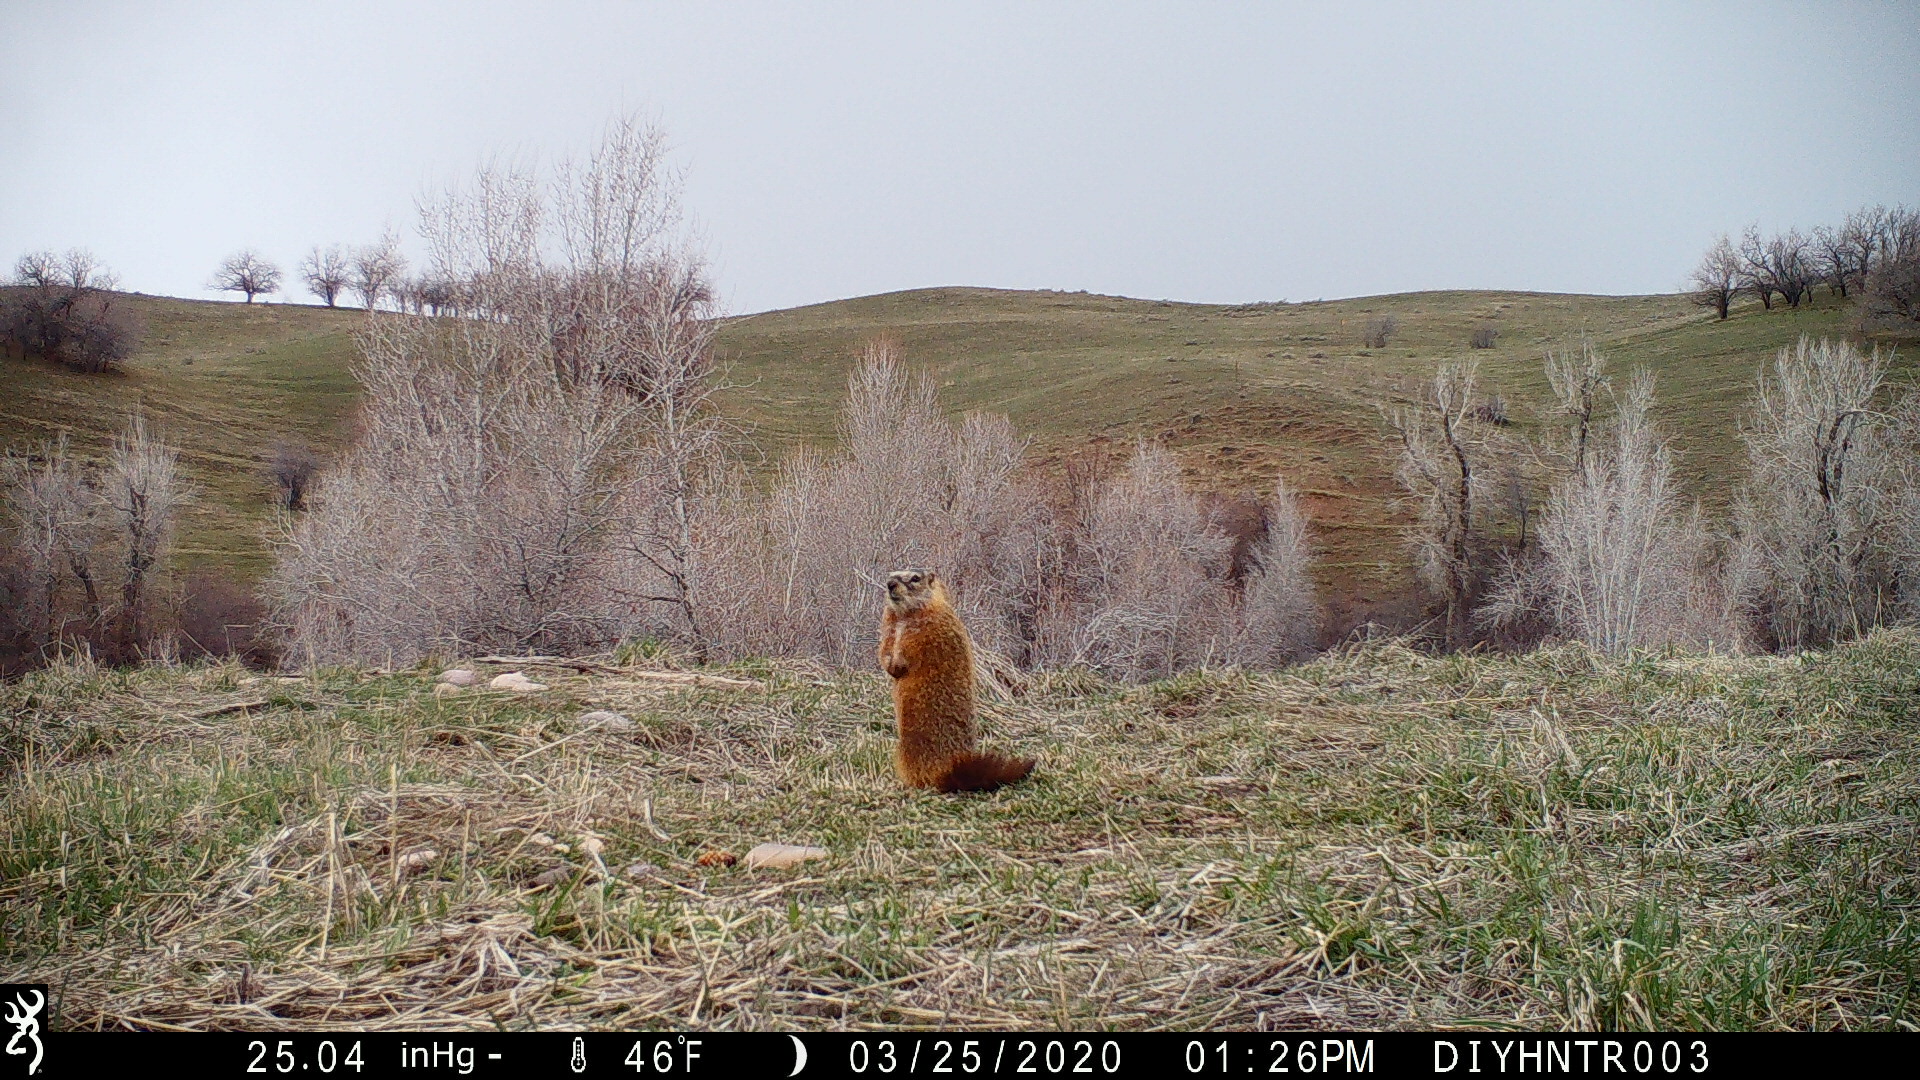
These images are sample low-resolution raw images (no filters applied) that transfer immediately to my phone when the camera captures them. Great quality for low-resolution images if you ask me. If I see an image I want in high resolution I just flag it in the app and on my next scheduled sync I have it. Pretty dang cool stuff. You should also note that any high-resolution image you transfer will have the latitude and longitude in the file properties, so if you want to keep your location secret before sending the image to your friends you will want to strip this information off the JPG file.
In video mode the camera will immediately transmit the first frame of the video clip as a thumbnail image. If I want to see the clip I can schedule for the camera to transmit the first 10 seconds of the video. The video transferred via cellular will also be downsized to 960x540 at 30fps. If I have the camera set to record longer than 10 seconds and I want to view the whole video clip or if I want to view the video in Full HD I need to physically go pull the SD card. Not a bad trade-off for how large video files can be.
I have been experimenting with the video setting and having the video length set to 10 seconds, Smart IR Video turned off and Photo Delay set to 1 Second. With the camera set like this, I can transfer all of the video footage the camera captures. If a critter is moving in front of the camera after 10 seconds I will get a 1-second chop before it starts recording again. I'll play with the settings more but that is one option I have been playing with.
Below is a sample of the video quality that gets transferred via cellular. They aren't the Full HD quality that you will get off the SD card but the video clips are pretty decent for viewing purposes. And when you pull the SD card you will have the Full HD version.
Speaking of playing with the settings. You can totally adjust all the settings of the camera from the Strike Force app on your phone or on the Strike Force Wireless website. If I decide I want to switch to images or the photo delay length, you name it, you can adjust it in the app and on the next sync with the camera, the camera will switch to your new settings. The app and Strike Force Wireless website also let you know the battery level, cellular signal strength and percentage of available space on the SD card.
Scheduled Syncs. You can schedule up to 8 sync times per day. I have all of my cameras set to sync every two hours from 8 am to 10 pm at night.
So what all gets synced? Any setting changes and any requests you schedule to get HD images or video clips will be transferred at the sync times. Sometimes it takes up to a half-hour after the sync for HD images and video to transfer. As I understand it the cellular service the cameras use is on a lower priority than your cell phone so transferring larger images and video might get bumped back a little in priority by the cell tower over a voice call and cell phone usage.
You also have the option to have thumbnail images sent immediately when captured or only on scheduled syncs. I have mine cameras set to immediately upload.
I have found that new settings for the camera will sync with the camera on the next immediate thumbnail send or on the next scheduled sync, whichever comes first. For instance, in the middle of the night, I had a tumbleweed blow in and get stuck right in front of my camera. The camera had many hundreds of images of this weed when I woke the next morning and was still capturing them. I set the camera to just take one image per trigger and a thirty-minute delay before being ready to trigger again. This setting was pushed to the camera within minutes on the next capture and totally slowed the flow of images, saving the use of my allotted number of thumbnail downloads on my wireless plan with Browning. After about a day the weed dislodged on its own and I set the camera back to 8-shot burst and 1-second delay.
I have been pleasantly surprised at the quality of the thumbnail images. While they are not high resolution they are pretty decent quality to see what is in the photo. If I like an image or video thumbnail I flag it in the app or on the website to download the HD image or video on the next sync.
I have found that the camera's work best if you set the image quality to any setting except "Ultra." In the ultra setting sometimes HD images will get skipped when you schedule to upload them. The Ultra setting really doesn't provide you much better quality of image over the High setting and that is only if you go and retrieve the SD card. HD images that are transferred via cellular service are the same 1920x1080 in size regardless the image quality setting.

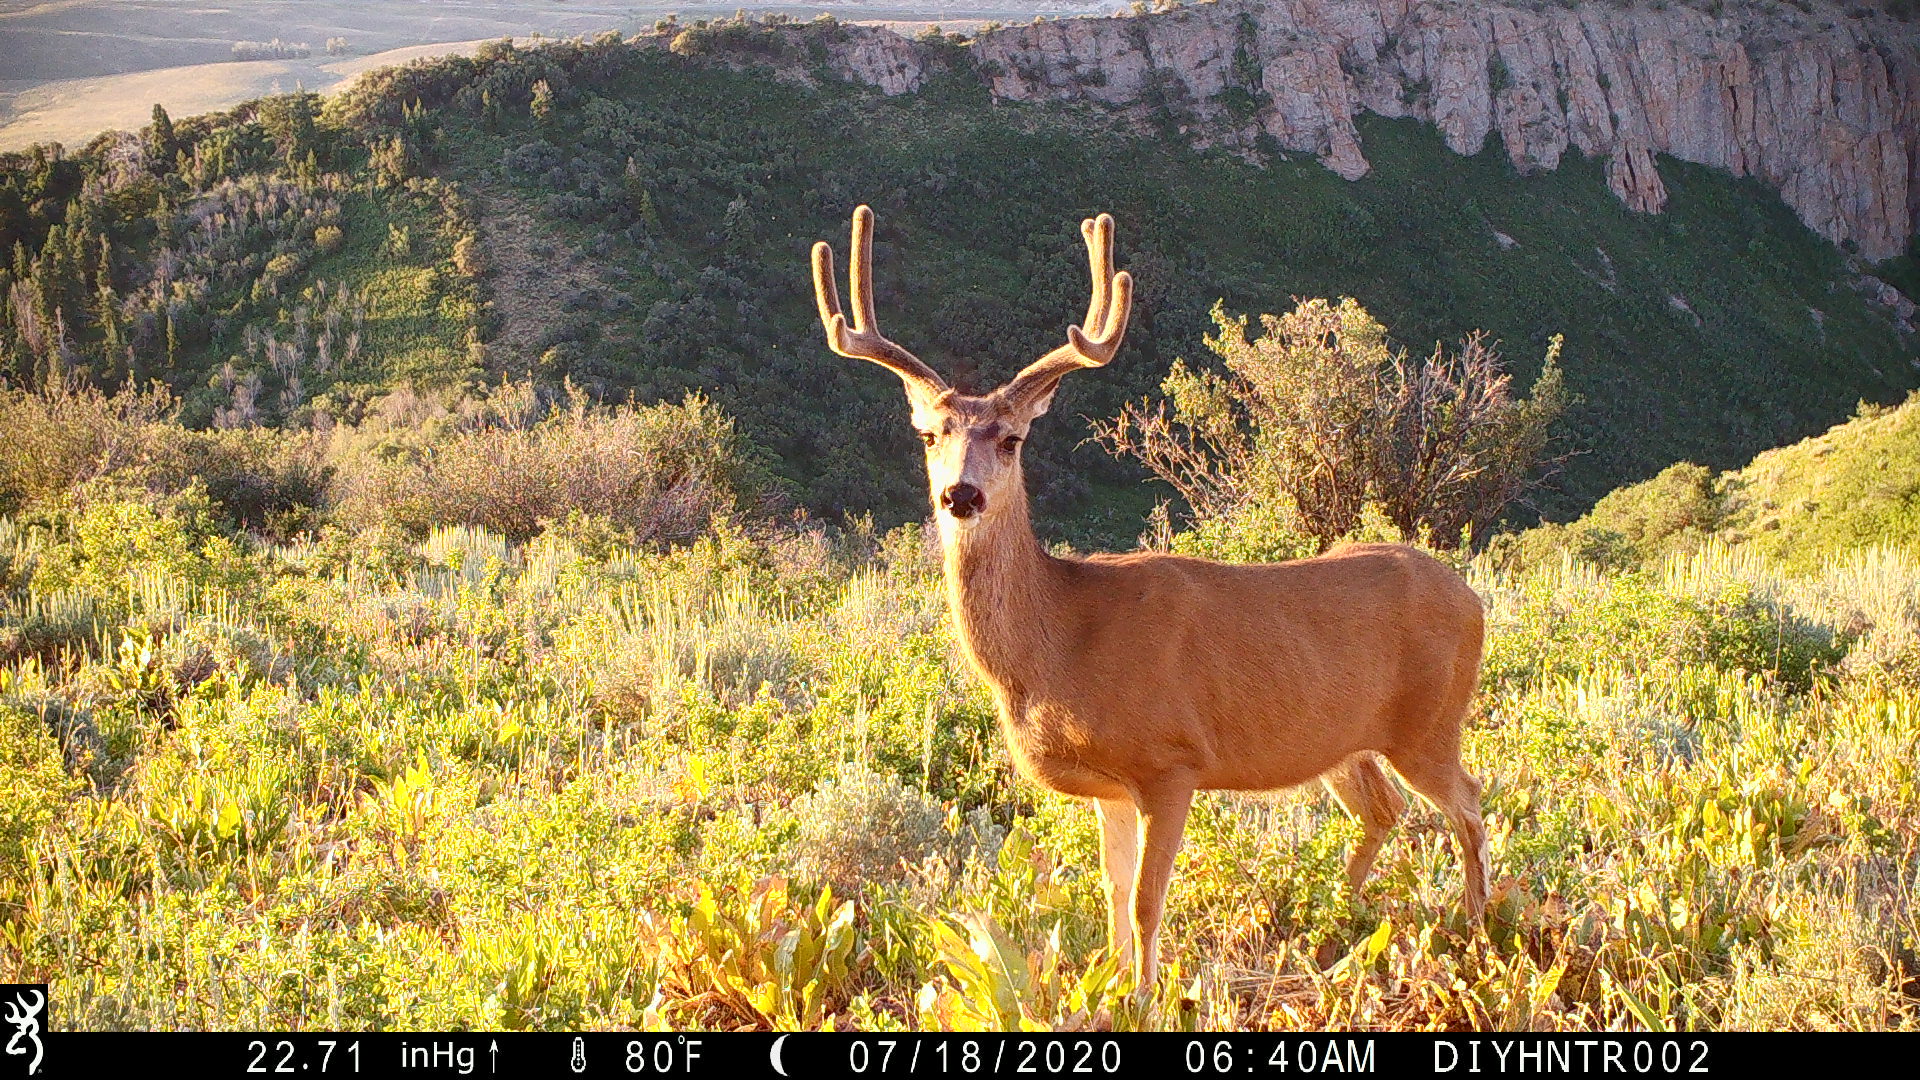
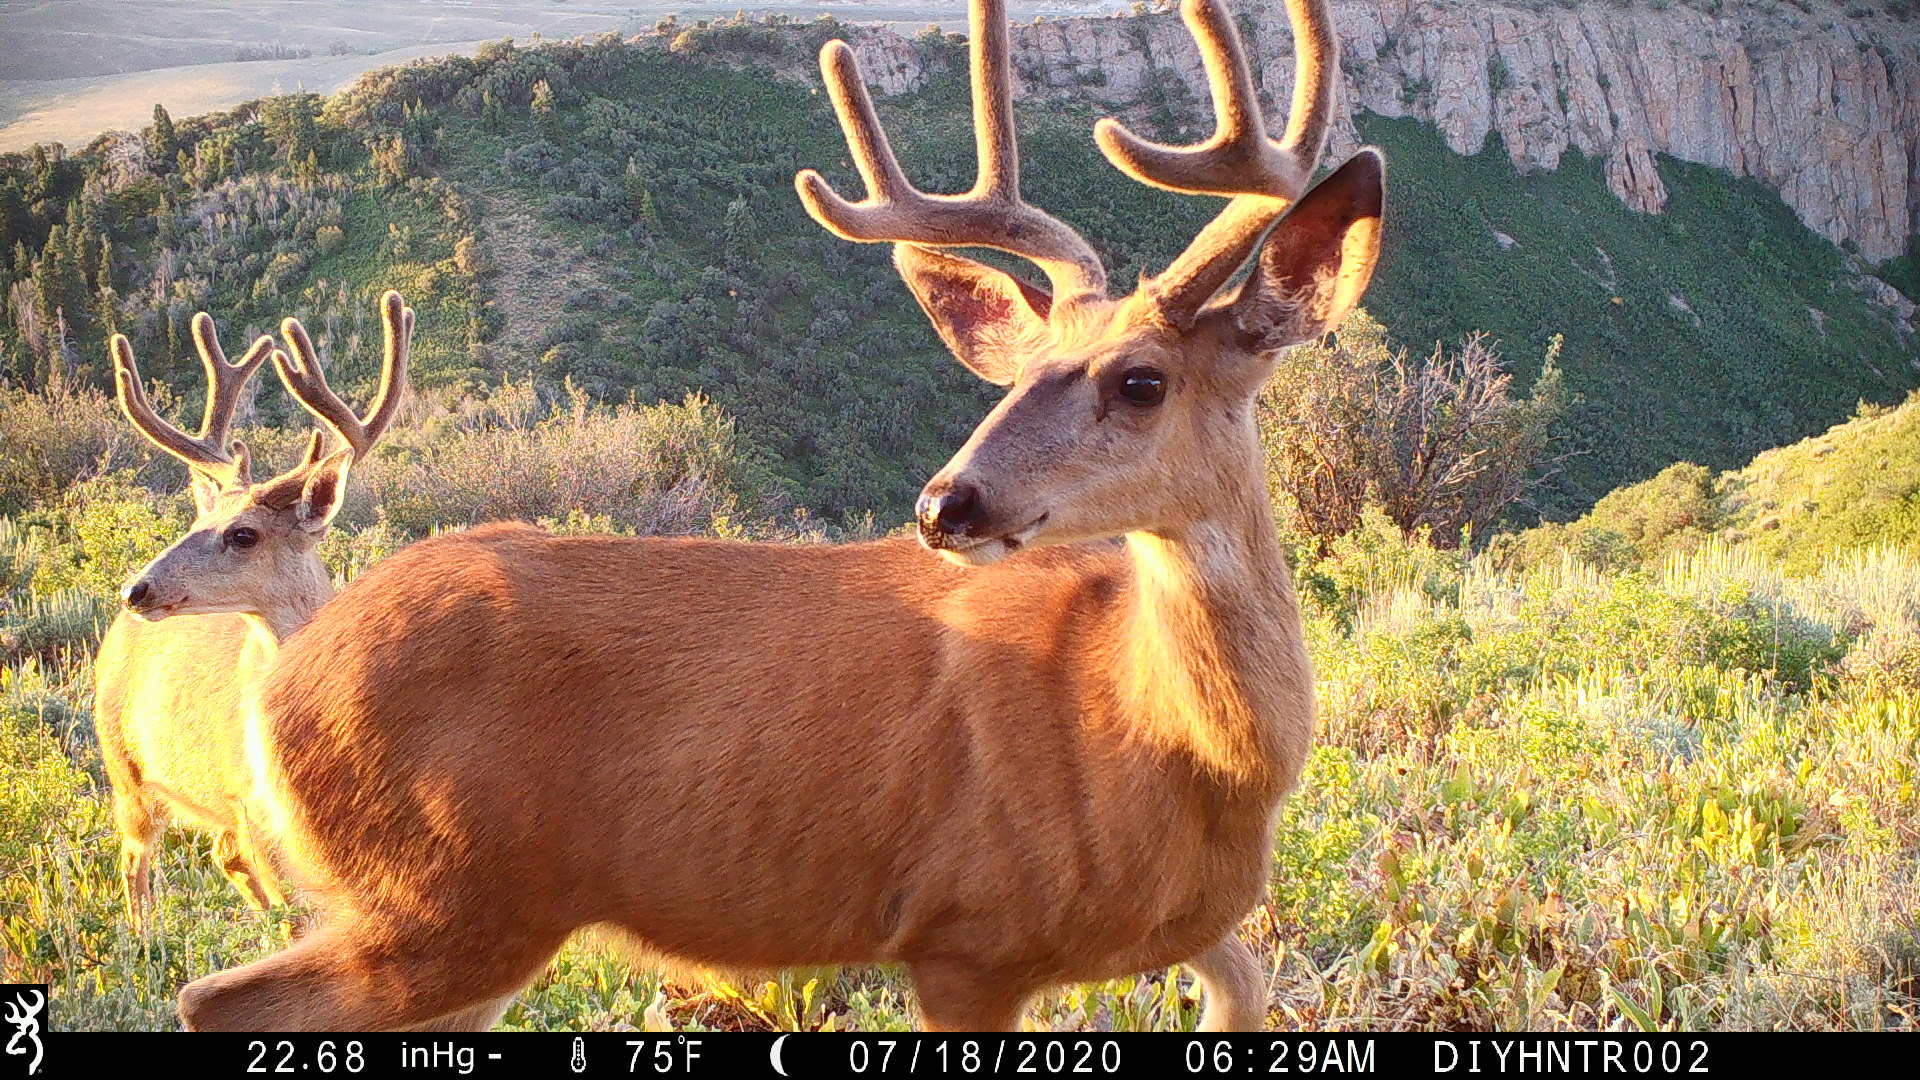
Click on the two images above to view the raw HD versions that I transferred via the Strike Force Wireless app on my phone.
To get the cellular to work you will need to set up an account at www.strikeforcewireless.com. On the website, you will then need to choose a monthly plan for the number of thumbnails, HD images and video uploads. Plans range from $15 to $50 per month. Depending on the plan you chose you can also add additional cameras to the plan for an additional $6 per month.
In the account settings on the website, you add cameras to your plan by entering the ICCID and IMEI numbers found on your camera. Once you have done this you are ready to start using your camera. It really only took me a couple of minutes to set up my account and have my first camera online transferring images.
After you have your account setup you can log in to the Strike Force Wireless app on your phone and control your cameras from your phone or from the website.
One thing that I hope gets fixed is that the audio codec on the videos won't work when posting the video directly to Instagram or Facebook. The video clip will have no audio unless you download it to a computer and re-encode the video with a video editor like Adobe Premiere. I can hear the audio fine within the Browning Strike Force app and using the VLC app on my phone. I'm betting Browning is working on this and maybe it is only an issue with Android or my phone. I'm using a Galaxy Note 10+.
I'm now waiting for a couple of solar panels to come in and the snow to melt so I can get up in the mountains with my Browning Defender Wireless Cellular Trail Cameras!
These cameras are real game changers. I'm so excited to get these cameras out this summer in areas I may not have the time to physically hike in and check every couple of weeks. Nice work Browning Trail Cameras!
Follow me on Instagram and Facebook to see the cool images and video these cameras are capturing for me.

The list of my three cameras in the Strike Force Wireless App.

Previewing a list of thumbnails from the Strike Force Wireless App.
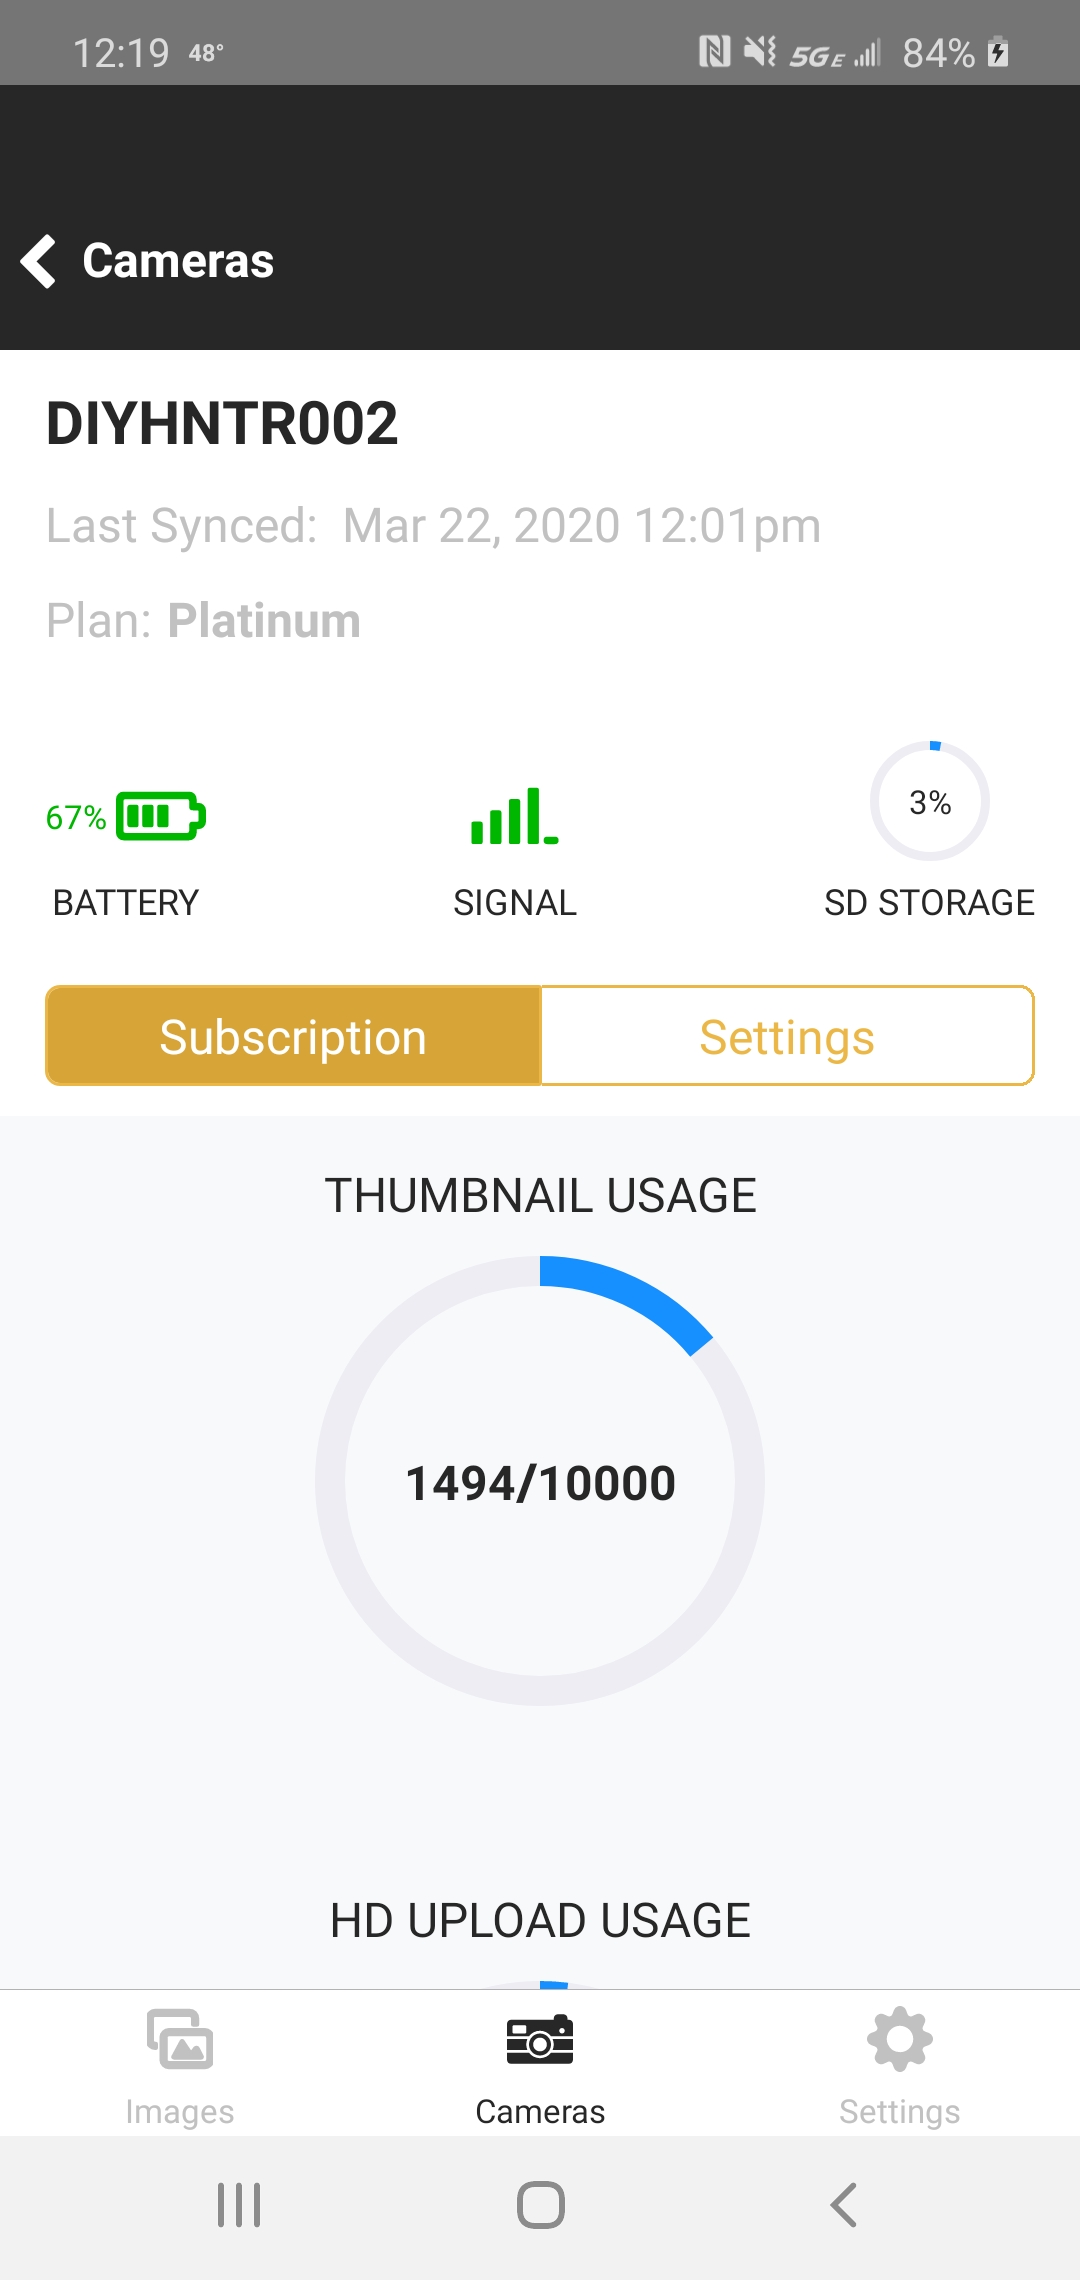
One of the many screens in the Strike Force Wireless app showing the battery level, signal strength and how much room is available on the SD card.