The DIY Hunter

Shot through electrical tape on the end of my X-Bolt 270 WSM rifle barrel

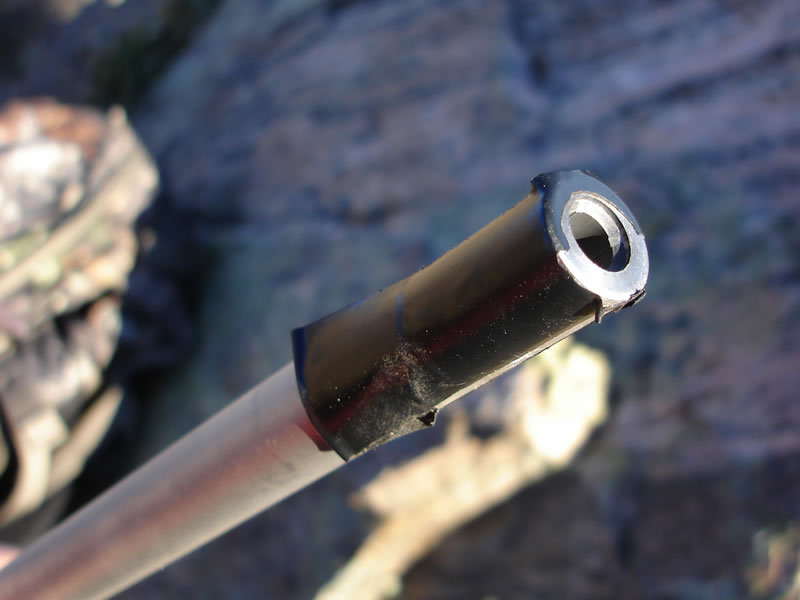
This is what the electrical tape looked like after I shot through the tape on the end of my X-Bolt 270 WSM rifle barrel to take my Mule Deer in 2010 at 457 yards.

The last few years I have been taping the end of my barrel to keep snow, water, mud and other debris out. I have read and been told that placing a balloon or tape over the end of my barrel would not affect the accuracy. I believed what I have heard but still in the back of my head I've been a little hesitant that maybe it would change things enough to affect the accuracy. However, when I logically think about it, the tape has to be blown out of the way long before the bullet ever gets to the end of the barrel. I should take some time someday and test accuracy on the range.

I carry a roll of electrical tape in my fanny pack that I have my range finder and binoculars in. I wear the fanny pack on my front side so I can quickly have access to items I need, like tape. When I tape my barrel I like to create a tab to use to pull the tape off with. I fold over about a half-inch of tape on top of itself then tape up and over the end of the barrel with about three inches of tape on both sides of the barrel.

I have always had time to remove the tape before taking any shots until this year. In the rush of the moment, I forgot that I still had tape across the end of my barrel when I shot my 2010 Mule Deer at 457 yards. The shot was dead on — absolutely no problem shooting through electrical tape placed across the end of my barrel.

Update October 2014
In 2014 I started using Rifle Jackets and love them. I no longer tape the end of the barrel or mess with scope covers. I use the rifle jacket and the whole rifle is protected from snow, rain and scratches. You can see more thoughts and photos of this product in Dallen's 2014 mule deer hunt.
 

Related journal entries:

Mounting the Scope on my X-Bolt

Browning X-Bolt Four Screw Per Base Scope Mounting System

View of the four screw per base scope mounting system on the Browning X-Bolt.


One Piece Alloy Bases and Rings, R-Rear, F-Front

The one piece alloy bases and rings manufactured by Talley for Browning have a F-Front and a R-Rear base.


X-Bolt One Piece Alloy Bases and Rings on X-Bolt

Top view of the bottom piece of the one piece alloy bases and rings on my X-Bolt.


Nikon Monarch 4-16xSF BDC Rifle Scope with lens cloth and fog eliminator.

Nikon Monarch 4-16xSF BDC Rifle Scope comes with cleaning lens cloth, fog eliminator, and some pretty nice lens caps.


Nikon Monarch 4-16xSF BDC rifle scope lens caps block bolt's movement with the standard low bases.

The scope comes with some pretty good flip-up lens caps however the lens caps block the bolt's movement with the standard low bases I'm using. I'll use a neoprene scope cover and clearance won't be a problem.

Tuesday while lying in bed sick with fevers from what I later learned was Strep Throat, I decided I wasn't as happy as I wanted to be with the Bushnell Elite 6500 scope on my X-Bolt. Fevers weren't going to stop me from getting the scope I wanted and I was able to navigate midwayusa.com with my little N810 pocket computer and get a Nikon Monarch 4-16x42SF BDC rifle scope ordered. I had been studying various scopes, features, prices and comparing in hand different scopes pretty extensively over the past week and decided that the Nikon Monarch 4-16x42SF BDC was the rifle scope I wanted for my X-Bolt and the big country I would be hunting with this rifle.

After being completely down for only a few days thanks to a shot from the doc, I made it out to purchase some new bases and rings at the employee store on Thursday. I opted to go with the standard height (low), matte finish set of the lightweight one piece Browning bases and rings that are manufactured by Talley. The scope had also arrived Thursday and I spent some time that night getting the rifle setup to shoot on Saturday.

Friday evening I spent a couple of hours working on mapping where I wanted to sight-in the zero distance of my rifle and achieve the desirable yardages for the additional aiming points in the BDC reticle. I laugh now but I set my rifle up on a table and set out a target through my garage and into the back yard at 50 yards so I could measure the distances between the aiming points in the reticle. I had the aiming points pretty well mapped out calculating the hold over distances and I had drawn up the cross-hair in Illustrator on the computer so I could print it out and place it on my rifle, when I found Nikon's Spot On ballistics program. What an awesome program! Kudos Nikon!

Using Spot On I was quickly able to load my bullet's information and print out various hold over charts and information. I can laugh now but I spent a good couple of hours fiddling with manually figuring out what Nikon has made a breeze. Now in my defense I hadn't really spent any time looking at Nikon's ads or website or I would have already noticed the Spot On information. I had made up my mind to purchase this particular Nikon BDC scope based on looking through one that's in the office for a photo prop.

I decided to sight my rifle in with a 200 yard zero. I normally go with a 300 yard zero, with a two and a half inch point of impact at 100 yards. With the 200 yard zero giving only a one inch high point of impact at 100 yards the fourth aiming circle in the BDC reticle is still an amazing 724 yards at 8,000 ft in elevation, with this flat shooting load.

After setting up my X-Bolt with this Nikon scope I found that it caused problems with shell ejection that took some tinkering to fix

For a few years now I have enjoyed using this scope on my X-Bolt. In 2013 I decided I wanted a change and passed down the Nikon Monarch to Dallen's A-Bolt 223 Rem. I am now using a X-Bolt 20 MOA Picatinny Rail and Vortex Viper HS LR Rifle Scope on my X-Bolt and love it.

Related Journal Entries

  • 2010 Oklahoma Whitetail Hunt — Hunting with 243 WSSM & 270 WSM Rifles
  • 2010 Elk Hunt — 5x5 Bull with X-Bolt 270 WSM
  • 2010 Mule Deer — Last Day Busted G2 Buck with X-Bolt 270 WSM
  • 270 WSM 140g Nosler Accubond handload
  • X-Bolt Photos and Comparison to A-Bolt
  • X-Bolt Accuracy at 300 Yards
  • X-Bolt Shell Ejection Problems - Solved

At the Range

Michelle Shooting my Marlin 39A Octagon Barrel 22 Rifle

Michelle (My wife) shooting my old Marlin 39A octagon barrel 22 rifle while I was sighting in my X-Bolt. This was my first rifle I purchase as a young kid. I earned money mowing my grandparents lawn to get the rifle. It's had many a thousand rounds through it over the years.


Adjustable Objective on the Nikon Monarch 4-16xSF BDC Rifle Scope

Adjustable Objective on the Nikon Monarch 4-16xSF BDC Rifle Scope. One of the main reasons I chose this scope was the generous amount of adjust-ability this scope offers to be able to fine tune the parallax of the range I am shooting at.


Adjustable Objective on the Nikon Monarch 4-16xSF BDC Rifle Scope

View of the side focus adjustable objective knob and the one piece bases and rings.


Windage and Elevation Turrets on the Nikon Monarch 4-16xSF BDC Rifle Scope

Caps off the windage and elevation adjustment turrets on the Nikon Monarch 4-16xSF BDC rifle scope.


Browning X-Bolt with the Nikon Monarch 4-16xSF BDC Rifle Scope

Nikon Monarch 4-16xSF BDC on my Browning X-Bolt Stainless Stalker at the range.


Nikon SpotOn Holdover Chart

Nikon SpotOn Ballistic Chart of my X-Bolt 270 WSM, shooting 140g Nosler Accubond handloads, with a 200 yard zero, at 8,000 ft. above sea level.

Bore Sighting Model 1885, 270 WSM

Bore sighting my Model 1885, 270 WSM by looking directly down the center of the barrel and setting the rifle scope's crosshairs to match.

Here are some simple ways to bore sight your hunting rifle scope, no gadgets or lasers required.

There are two ways that I bore sight my rifles that I have found will get me within six or so inches of being sighted-in at a hundred yards.

Look Through the Barrel Bore Sighting
The first method works on any rifle that you can remove the bolt or open the action and be able to see through the barrel from the back of the rifle. Bolt action and single shot rifles will work for this method. With your target set out at 100 yards place the rifle in a shooting sand bag or something that will hold the rifle very still. Open the action on a single shot or remove the bolt on a bolt action rifle. Position the rifle so when you are a step or two behind the rifle and look straight down the middle of the barrel you can see the middle of your target at 100 yards. Once you have the barrel pointing straight at the target carefully step up to the rifle and look through the scope without moving the rifle. Now adjust the scopes reticle to lineup with the center of your target.

You may want to go back and forth from looking through the barrel to looking through the scope a few times to make sure you are on. That's it! No lasers or fancy gadget required. I have always been within six inches of being sighted-in with this method. You may also wish to take your first shots at 25 yards, adjust as needed then move out to 100 yards. I have been just fine at going straight to 100 yards and have the bullets place on paper.

Mirror Bore Sighting
My second method works for any rifle regardless of the action type. This method works great for your windage adjustment but not so great for your elevation adjustment. However, I have found most of my initial scope adjustments to get a rifle sighted-in are windage adjustments not elevation adjustments.

In this method you will need to find yourself a mirror that you can get far enough away from to where you can see your reflection clearly while looking through the scope. Now position yourself in front of the mirror and look through your rifle scope directly at the reflection of the rifle. Point the rifle so that the barrel is pointing perfectly straight at it's self in the mirror. Once you have the barrel pointing straight adjust the scope's windage adjustment to line directly up with the barrel. Your rifle scope is now bore sighted for windage.

I could go into a lengthy ramble of how you can adjust for elevation but for most it is best to leave it alone until you get to the range or use the "look through the barrel method" if you can with your rifle. Just know that you might need to adjust the vertical shot placement a little more once you get to the range.

I started using the mirror method looking for a way to adjust for the large amount of windage adjustments I have to make on my Model 1885s. At least with my Model 1885 rifles the drilled and tapped front is not aligned perfectly with the rear. Using the mirror method is a great way to quickly adjust the windage with the windage adjustable rear base before I lock the base in place. Then I can use the "look through the barrel method" to get a more precise bore sighting. I used the mirror method on my X-Bolt and it worked great as you can see in the Accuracy of my New X-Bolt Stainless Stalker, 270 WSM entry.

If you need some targets to sight-in your rifle you can get DIY Hunting Rifle Target Downloads.