
- Details
- Written by: The DIY Hunter
- Category: Firearms & Shooting
- Hits: 6944
Mounting the Scope on my X-Bolt
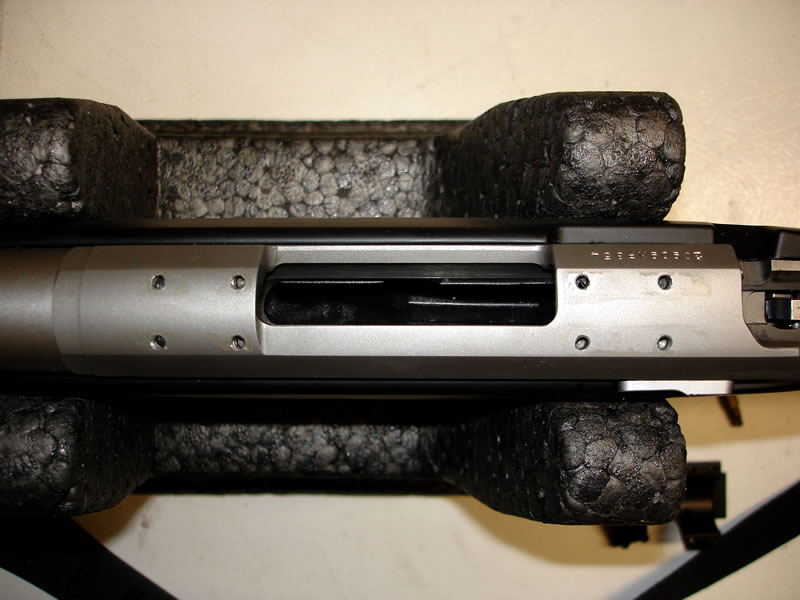
View of the four screw per base scope mounting system on the Browning X-Bolt.
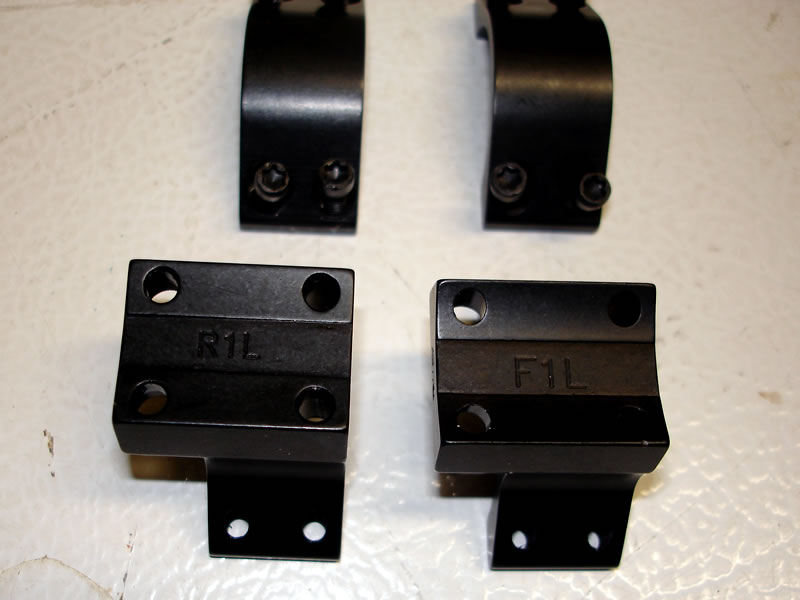
The one piece alloy bases and rings manufactured by Talley for Browning have a F-Front and a R-Rear base.
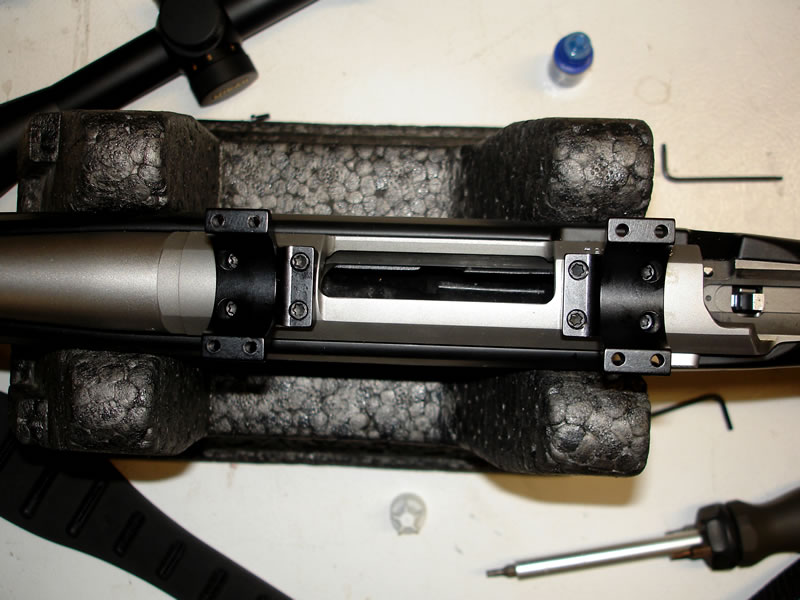
Top view of the bottom piece of the one piece alloy bases and rings on my X-Bolt.

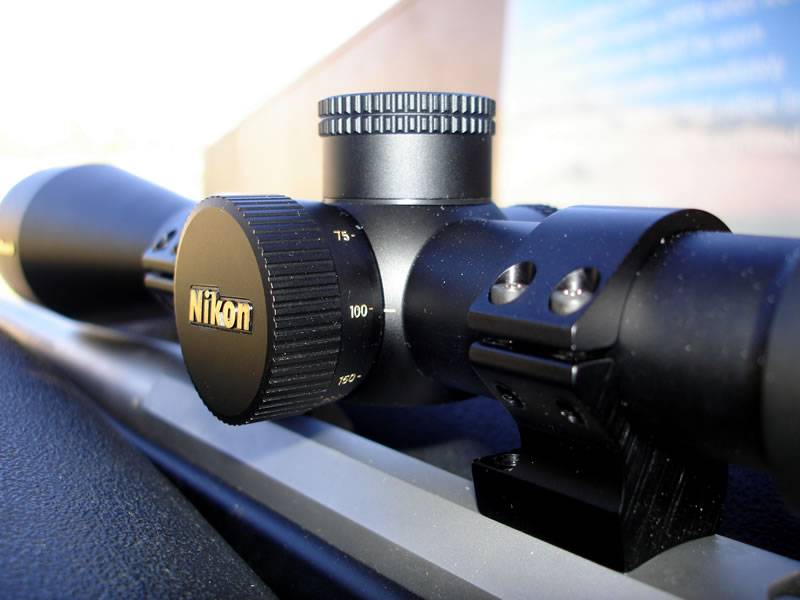
Nikon Monarch 4-16xSF BDC Rifle Scope comes with cleaning lens cloth, fog eliminator, and some pretty nice lens caps.
The scope comes with some pretty good flip-up lens caps however the lens caps block the bolt's movement with the standard low bases I'm using. I'll use a neoprene scope cover and clearance won't be a problem.
Tuesday while lying in bed sick with fevers from what I later learned was Strep Throat, I decided I wasn't as happy as I wanted to be with the Bushnell Elite 6500 scope on my X-Bolt. Fevers weren't going to stop me from getting the scope I wanted and I was able to navigate midwayusa.com with my little N810 pocket computer and get a Nikon Monarch 4-16x42SF BDC rifle scope ordered. I had been studying various scopes, features, prices and comparing in hand different scopes pretty extensively over the past week and decided that the Nikon Monarch 4-16x42SF BDC was the rifle scope I wanted for my X-Bolt and the big country I would be hunting with this rifle.
After being completely down for only a few days thanks to a shot from the doc, I made it out to purchase some new bases and rings at the employee store on Thursday. I opted to go with the standard height (low), matte finish set of the lightweight one piece Browning bases and rings that are manufactured by Talley. The scope had also arrived Thursday and I spent some time that night getting the rifle setup to shoot on Saturday.
Friday evening I spent a couple of hours working on mapping where I wanted to sight-in the zero distance of my rifle and achieve the desirable yardages for the additional aiming points in the BDC reticle. I laugh now but I set my rifle up on a table and set out a target through my garage and into the back yard at 50 yards so I could measure the distances between the aiming points in the reticle. I had the aiming points pretty well mapped out calculating the hold over distances and I had drawn up the cross-hair in Illustrator on the computer so I could print it out and place it on my rifle, when I found Nikon's Spot On ballistics program. What an awesome program! Kudos Nikon!
Using Spot On I was quickly able to load my bullet's information and print out various hold over charts and information. I can laugh now but I spent a good couple of hours fiddling with manually figuring out what Nikon has made a breeze. Now in my defense I hadn't really spent any time looking at Nikon's ads or website or I would have already noticed the Spot On information. I had made up my mind to purchase this particular Nikon BDC scope based on looking through one that's in the office for a photo prop.
I decided to sight my rifle in with a 200 yard zero. I normally go with a 300 yard zero, with a two and a half inch point of impact at 100 yards. With the 200 yard zero giving only a one inch high point of impact at 100 yards the fourth aiming circle in the BDC reticle is still an amazing 724 yards at 8,000 ft in elevation, with this flat shooting load.
After setting up my X-Bolt with this Nikon scope I found that it caused problems with shell ejection that took some tinkering to fix.
For a few years now I have enjoyed using this scope on my X-Bolt. In 2013 I decided I wanted a change and passed down the Nikon Monarch to Dallen's A-Bolt 223 Rem. I am now using a X-Bolt 20 MOA Picatinny Rail and Vortex Viper HS LR Rifle Scope on my X-Bolt and love it.
Related Journal Entries
- 2010 Oklahoma Whitetail Hunt — Hunting with 243 WSSM & 270 WSM Rifles
- 2010 Elk Hunt — 5x5 Bull with X-Bolt 270 WSM
- 2010 Mule Deer — Last Day Busted G2 Buck with X-Bolt 270 WSM
- 270 WSM 140g Nosler Accubond handload
- X-Bolt Photos and Comparison to A-Bolt
- X-Bolt Accuracy at 300 Yards
- X-Bolt Shell Ejection Problems - Solved
At the Range

Michelle (My wife) shooting my old Marlin 39A octagon barrel 22 rifle while I was sighting in my X-Bolt. This was my first rifle I purchase as a young kid. I earned money mowing my grandparents lawn to get the rifle. It's had many a thousand rounds through it over the years.
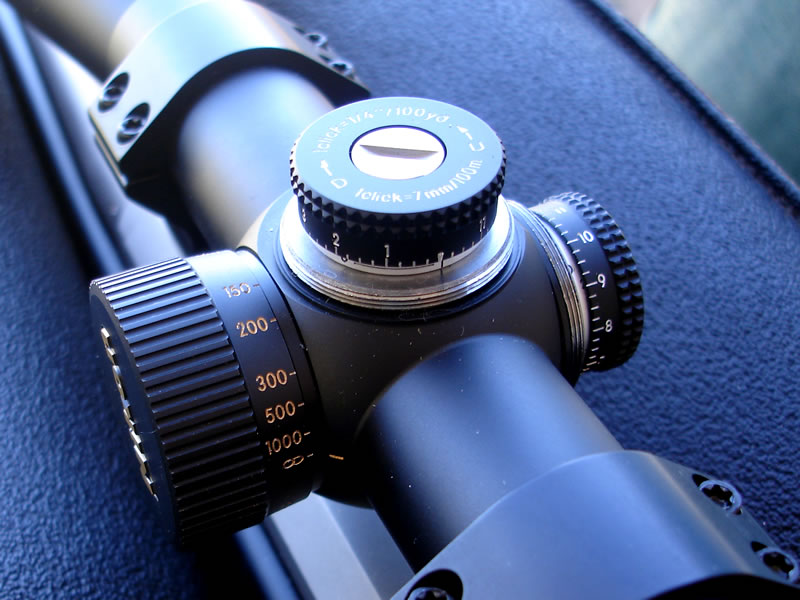
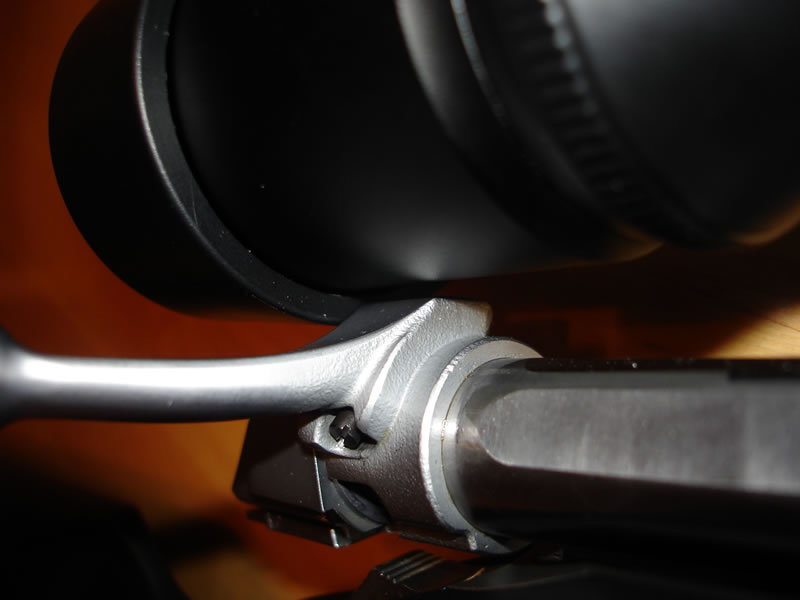
Adjustable Objective on the Nikon Monarch 4-16xSF BDC Rifle Scope. One of the main reasons I chose this scope was the generous amount of adjust-ability this scope offers to be able to fine tune the parallax of the range I am shooting at.
View of the side focus adjustable objective knob and the one piece bases and rings.
Caps off the windage and elevation adjustment turrets on the Nikon Monarch 4-16xSF BDC rifle scope.

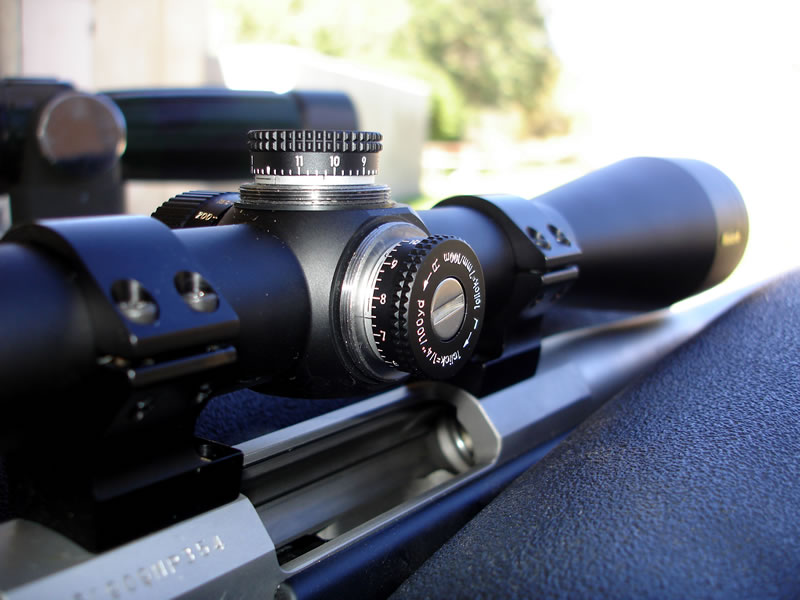
Nikon Monarch 4-16xSF BDC on my Browning X-Bolt Stainless Stalker at the range.
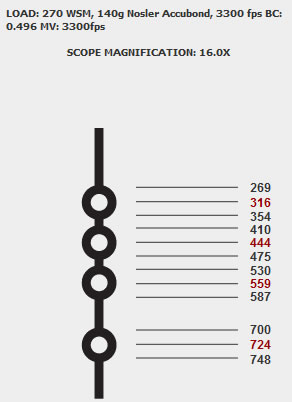
Nikon SpotOn Ballistic Chart of my X-Bolt 270 WSM, shooting 140g Nosler Accubond handloads, with a 200 yard zero, at 8,000 ft. above sea level.
- Details
- Written by: The DIY Hunter
- Category: Firearms & Shooting
- Hits: 9247
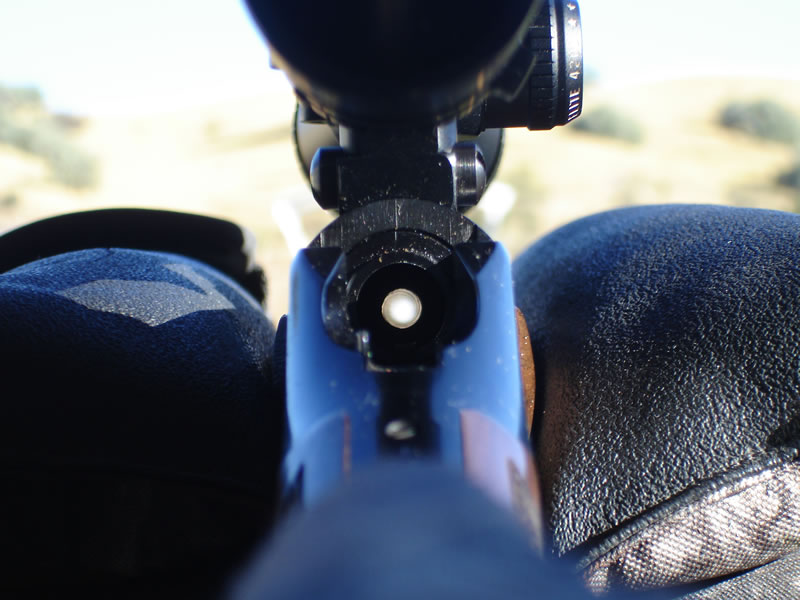
Bore sighting my Model 1885, 270 WSM by looking directly down the center of the barrel and setting the rifle scope's crosshairs to match.
Here are some simple ways to bore sight your hunting rifle scope, no gadgets or lasers required.
There are two ways that I bore sight my rifles that I have found will get me within six or so inches of being sighted-in at a hundred yards.
Look Through the Barrel Bore Sighting
The first method works on any rifle that you can remove the bolt or open the action and be able to see through the barrel from the back of the rifle. Bolt action and single shot rifles will work for this method. With your target set out at 100 yards place the rifle in a shooting sand bag or something that will hold the rifle very still. Open the action on a single shot or remove the bolt on a bolt action rifle. Position the rifle so when you are a step or two behind the rifle and look straight down the middle of the barrel you can see the middle of your target at 100 yards. Once you have the barrel pointing straight at the target carefully step up to the rifle and look through the scope without moving the rifle. Now adjust the scopes reticle to lineup with the center of your target.
You may want to go back and forth from looking through the barrel to looking through the scope a few times to make sure you are on. That's it! No lasers or fancy gadget required. I have always been within six inches of being sighted-in with this method. You may also wish to take your first shots at 25 yards, adjust as needed then move out to 100 yards. I have been just fine at going straight to 100 yards and have the bullets place on paper.
Mirror Bore Sighting
My second method works for any rifle regardless of the action type. This method works great for your windage adjustment but not so great for your elevation adjustment. However, I have found most of my initial scope adjustments to get a rifle sighted-in are windage adjustments not elevation adjustments.
In this method you will need to find yourself a mirror that you can get far enough away from to where you can see your reflection clearly while looking through the scope. Now position yourself in front of the mirror and look through your rifle scope directly at the reflection of the rifle. Point the rifle so that the barrel is pointing perfectly straight at it's self in the mirror. Once you have the barrel pointing straight adjust the scope's windage adjustment to line directly up with the barrel. Your rifle scope is now bore sighted for windage.
I could go into a lengthy ramble of how you can adjust for elevation but for most it is best to leave it alone until you get to the range or use the "look through the barrel method" if you can with your rifle. Just know that you might need to adjust the vertical shot placement a little more once you get to the range.
I started using the mirror method looking for a way to adjust for the large amount of windage adjustments I have to make on my Model 1885s. At least with my Model 1885 rifles the drilled and tapped front is not aligned perfectly with the rear. Using the mirror method is a great way to quickly adjust the windage with the windage adjustable rear base before I lock the base in place. Then I can use the "look through the barrel method" to get a more precise bore sighting. I used the mirror method on my X-Bolt and it worked great as you can see in the Accuracy of my New X-Bolt Stainless Stalker, 270 WSM entry.
If you need some targets to sight-in your rifle you can get DIY Hunting Rifle Target Downloads.
- Details
- Written by: The DIY Hunter
- Category: Firearms & Shooting
- Hits: 5129
|
|
|
Here are the basic supplies I use to clean the bore of my rifles along with a shooting rest to hold my rifle while I clean the bore.
|

I have read many a comment and article on how frequent and what process different shooters use to clean their rifle barrels. It seems that everyone has their own opinion on how and when they clean their rifle's bore.
I have in the past done the tedious process of cleaning the barrel after every shot, over and over to break-in a new rifle... And then I have done very little cleaning to a new rifle barrel.
What I have found is that if I give the rifle a good cleaning or two removing all the copper fouling during the first twenty or so shots that it is plenty for breaking-in my new rifle barrels. A new rifle will have already been test-fired at the factory so I clean the rifle's bore removing all copper fouling before I fire a single round and one or two more cleanings within the first twenty rounds. Then I often shoot hundreds of rounds between cleanings and often clean only because its the offseason and am looking for a reason to open the safe and spend time with my rifles.
Now, if I ever switch from a molly coated to an uncoated bullet or vice versa I always clean and remove all the copper fouling. And if a rifle isn't likely to be shot in a long while I will run a patch soaked in Kroil through the bore.
I do feel that cleaning can actually do damage to the riflings if not done properly with the right chemicals and equipment. I really like Bore Tech's Eliminator bore cleaner as it does a great job at removing copper fouling and I don't have to worry about ammonia and the possibility that it could damage the bore. After using the bore cleaner I run a couple of dry patches through the barrel and then a patch with Kroil on it and I'm finished.
I also use a good cleaning rod and rod guides designed for my individual rifles. I use correctly sized Dewey cleaning rods and Sinclair International's cleaning-rod guides. The correctly sized rod guide keeps the cleaning rod lined right up with the bore. Not using a rod guide or an incorrectly sized guide will likely lap and damage the throat of my barrel, in turn throwing accuracy right out the door.
I have really found no accuracy difference in how a rifle shoots based on how often I clean and removed the copper fouling. Yes, I believe barrels can lose accuracy if they get too much copper fouling, however, as infrequently that I clean my rifles it's still frequent enough to keep them more than accurate. My rifles all shoot just as good with ten rounds or 200 rounds having been fired between cleanings of the bore.
The most important thing I have found is that I really enjoy spending my time shooting rifles, not spending my time cleaning them. I have also found that the first shot out of a clean bore is often going to be a little off course. I find that after a barrel is cleaned it needs to get fouled up properly to get consistent accuracy. After cleaning the bore I always consider that my first shot is a fouling shot before I start looking for tight bullet groups.
Update: April 2017
I have adding another step to my cleaning process to polish out a rough bore and increase accuracy.