
- Details
- Written by: The DIY Hunter
- Category: Firearms & Shooting
- Hits: 53010

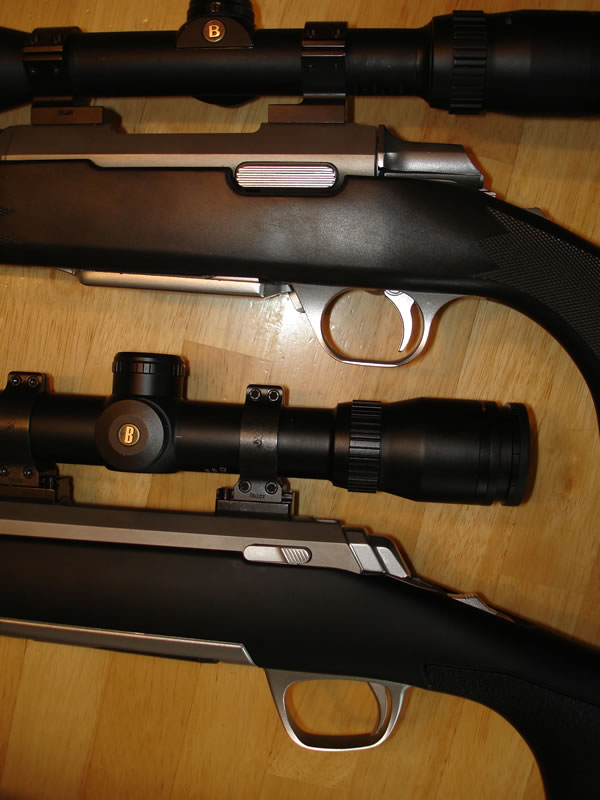
X-Bolt (Top) with detachable rotary magazine.A-Bolt (Bottom) with hinged floorplate and detachable leaf spring magazine.
A-Bolt (Top) X-Bolt (Bottom)The A-Bolt having a larger bolt release button.
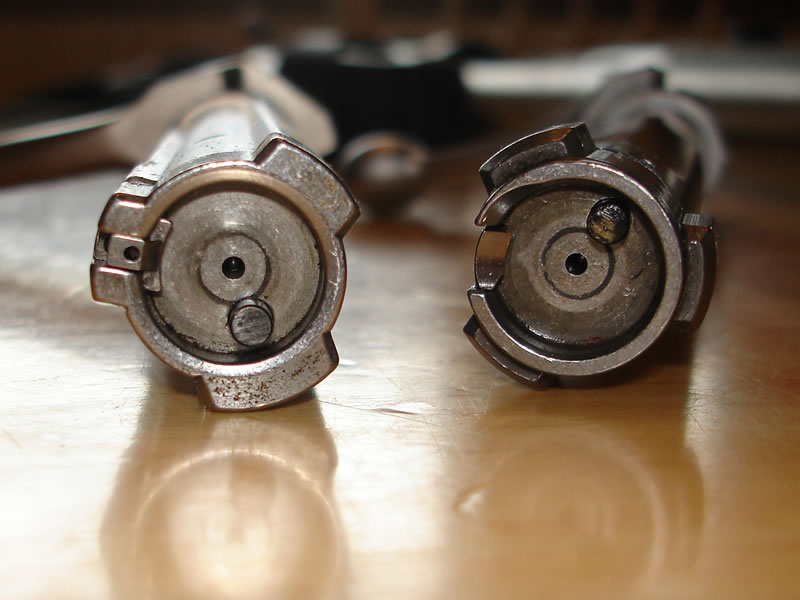
A-Bolt (left) X-Bolt (Right) Both bolts having three lugs forming a "A" shape.

X-Bolt SA (Top) and A-Bolt SSA (Bottom)The A-Bolt bolt rotates inside a three grooved sleeve through the middle section of the bolt. Where the X-Bolt's entire front half of the bolt rotates.
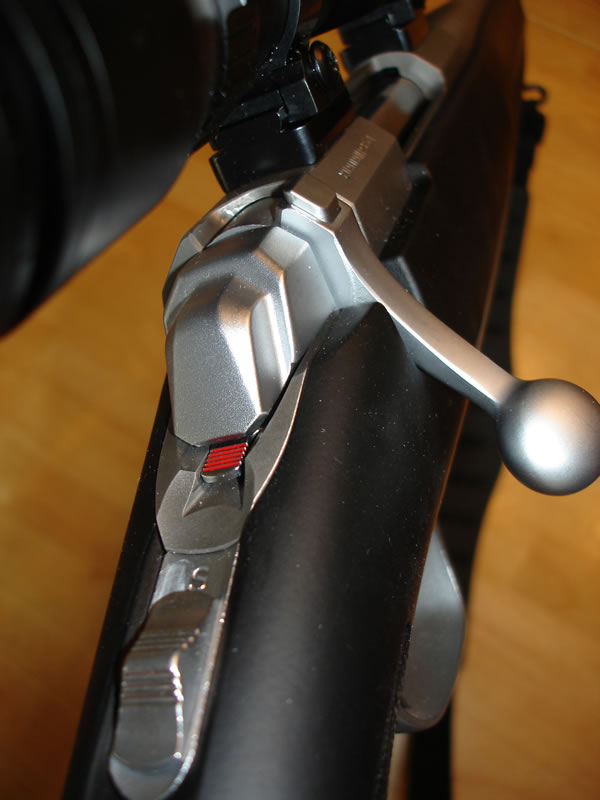
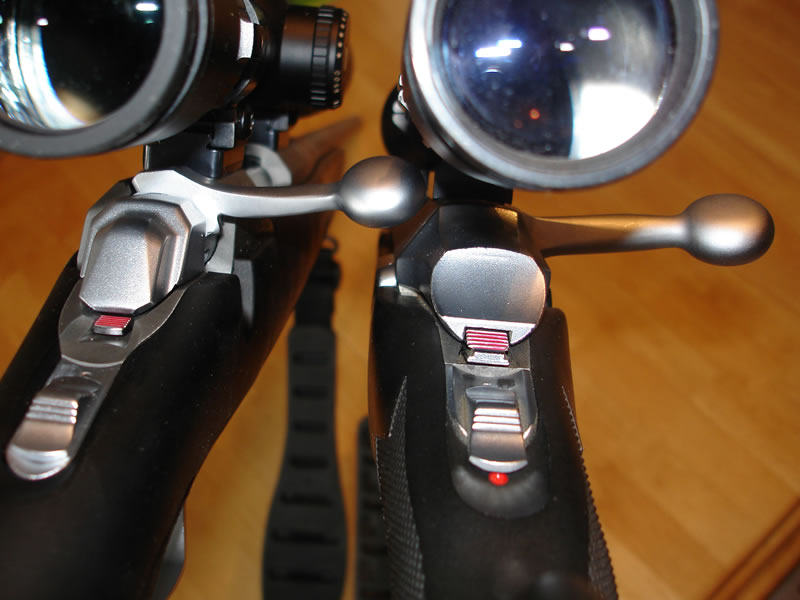
X-Bolt safety in fire position showing the bolt unlock button (at the top of the bolt handle) in the down position.
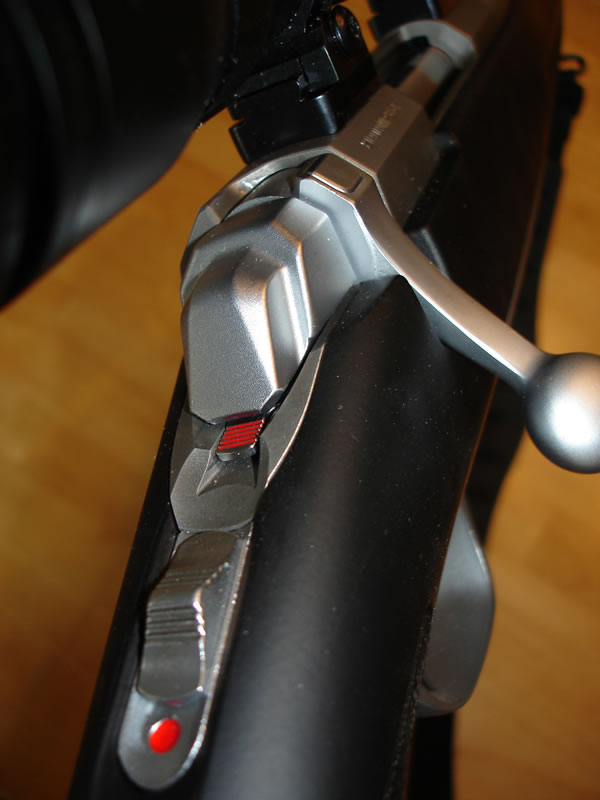
X-Bolt safety in safe position showing the bolt unlock button (at the top of the bolt handle) in the up position.
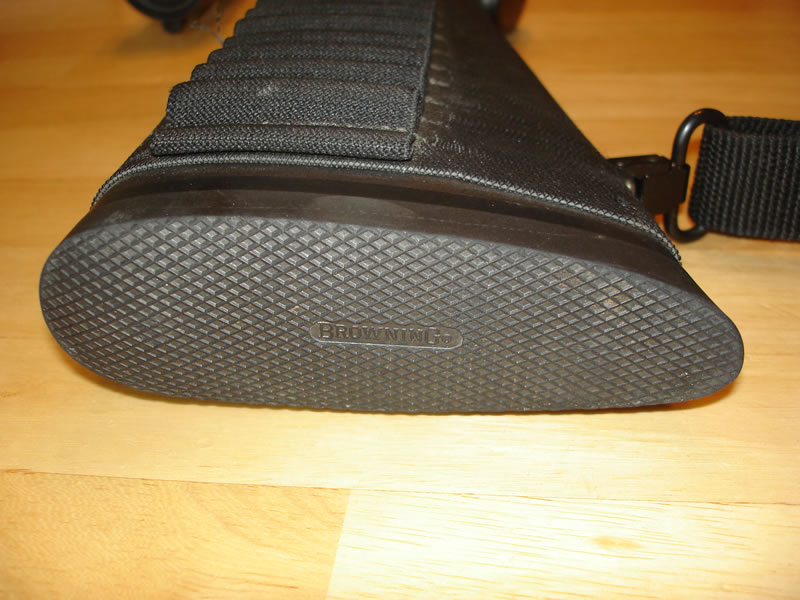
A-Bolt's hard rubber recoil pad.
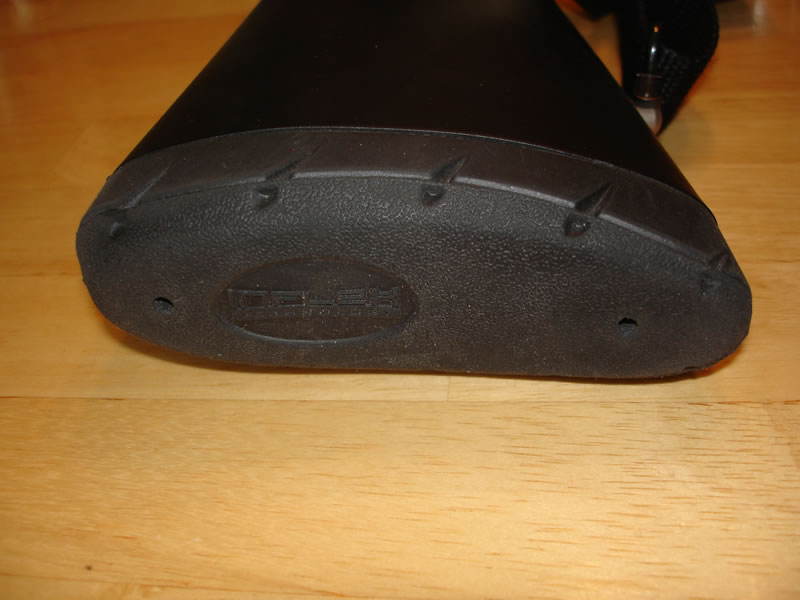
X-Bolt's softer recoil absorbing, Inflex recoil pad. A great option this recoil pad system offers is the abilty to easily add length via spacers to the X-Bolt's length of pull. See: Easily Adjust the Length of Pull on a Browning X-Bolt Rifle
X-Bolt (Left) and A-Bolt (Right) Showing the bolts in their top position, 60 degrees up from the bottom closed position, offering excellent bolt handle clearance with the rifle scope.
X-Bolt SA (Top), A-Bolt SSA (Bottom)
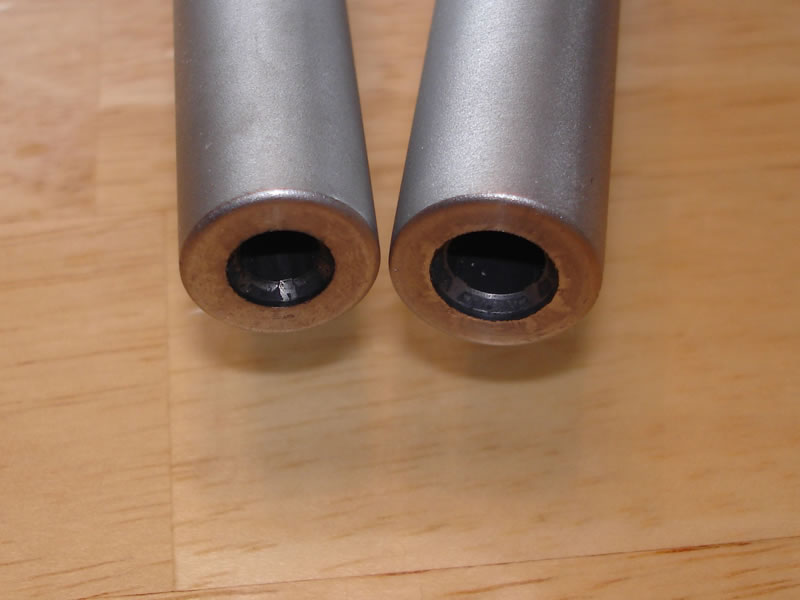
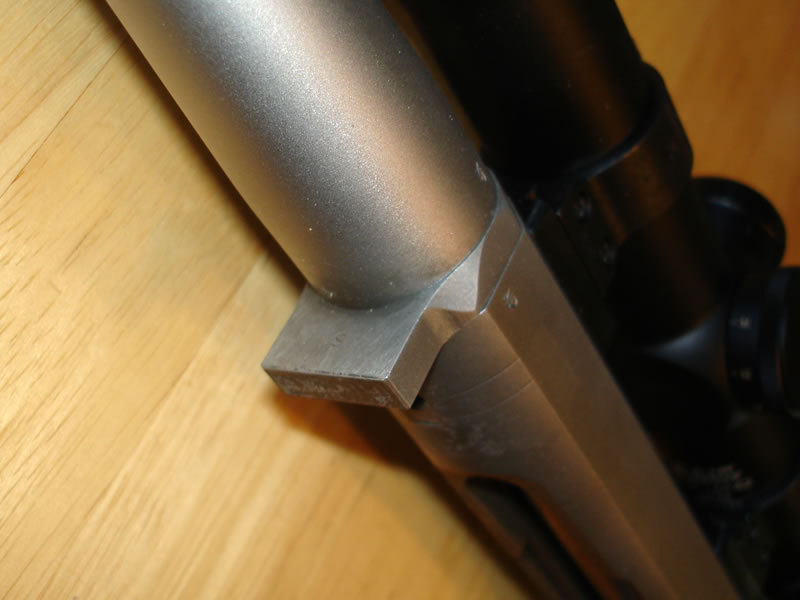
A-Bolt (Left), X-Bolt (Right) Recessed muzzle crowns.
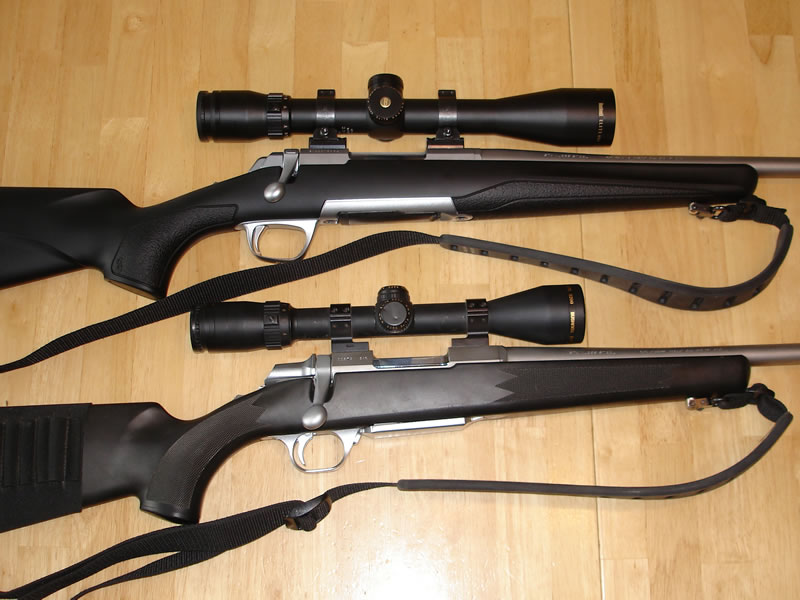
Right side view of Short Action (SA) X-Bolt (Top) and Super Short Action (SSA) A-Bolt (Bottom).
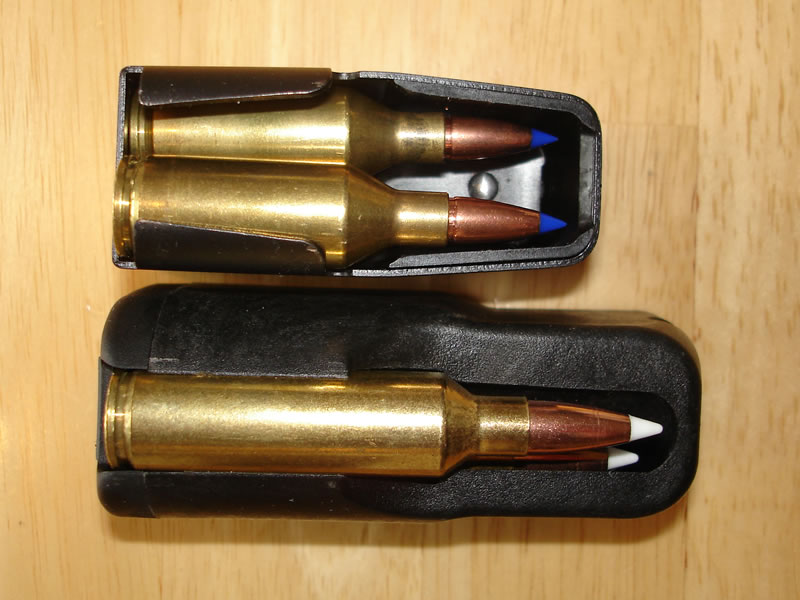
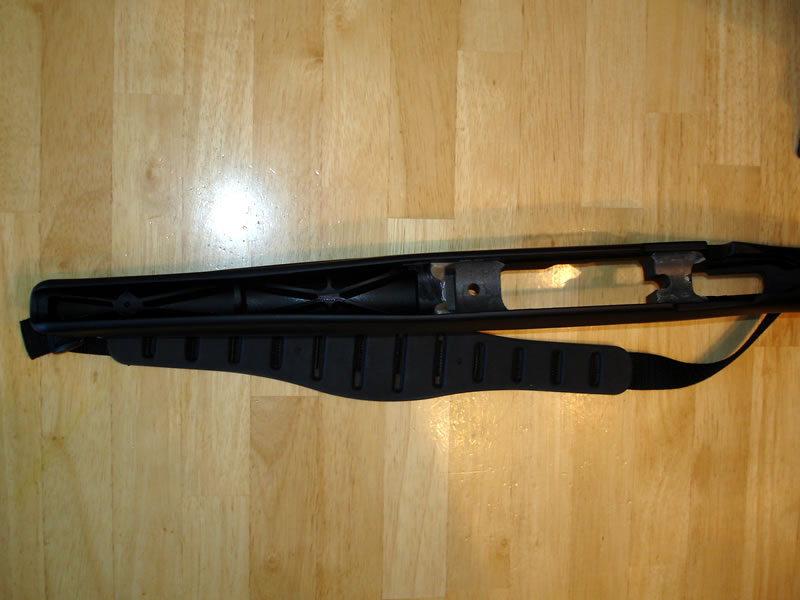
A-Bolt leaf spring magazine with alternating 243 WSSM cartridges. (top)X-Bolt magazine with rotary magazine and 270 WSM cartridges.
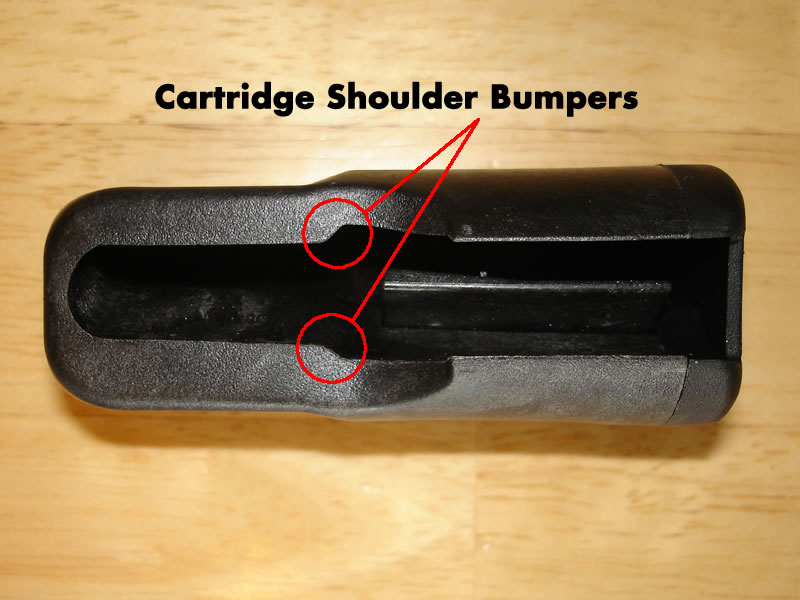
The X-Bolt rotary magazine has a ridge-line going through the magazine providing a "bumper" against the shoulder of the cartridge that prevents the bullet tips from being damaged during recoil.
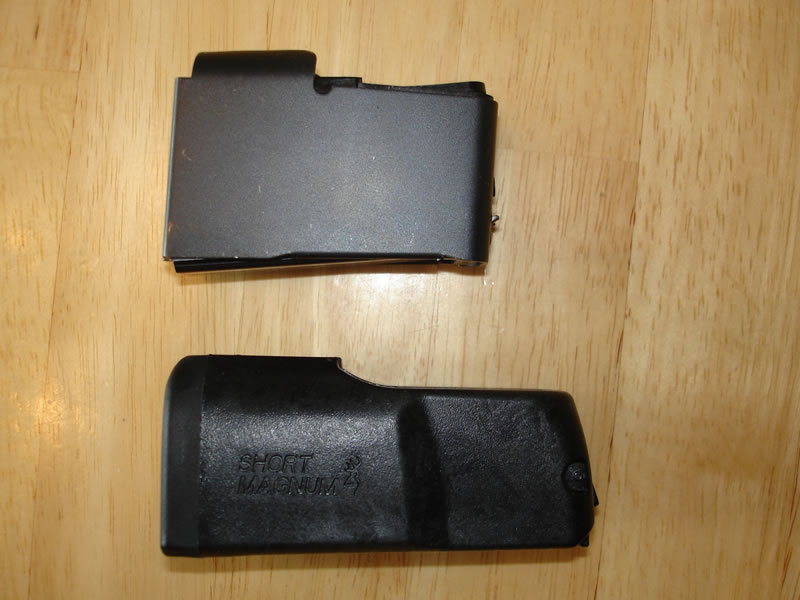
Side view of a Super Short Action A-Bolt Magazine (Top) and a Short Action X-Bolt Magazine (Bottom).
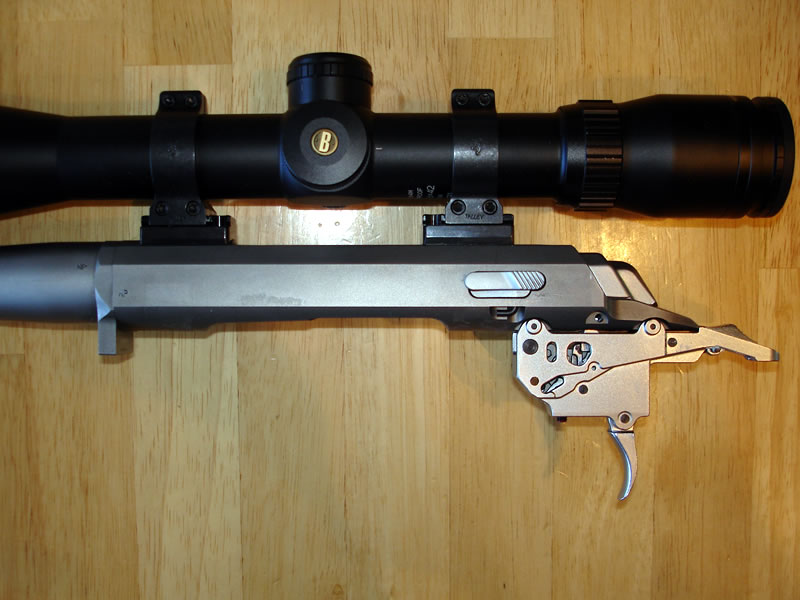
X-Bolt Action and Trigger Assembly
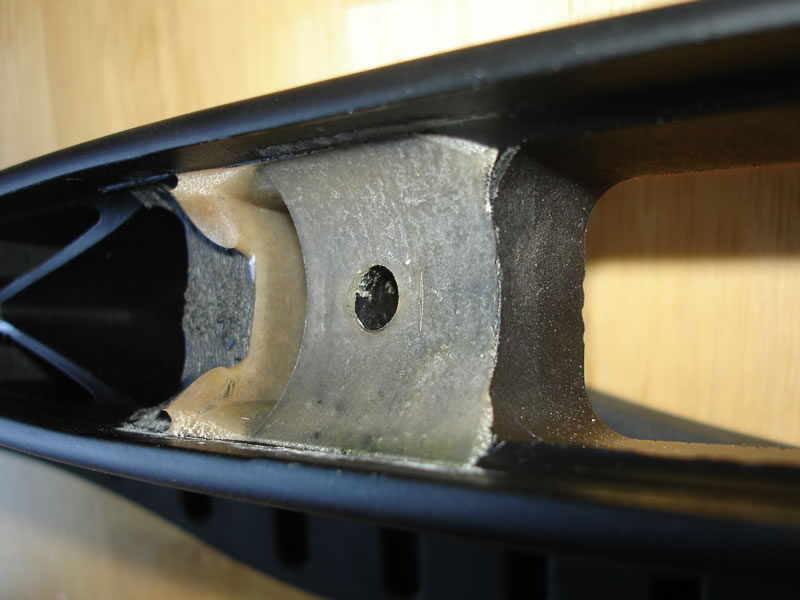
X-Bolt Recoil Lug Bedding at Front of the Action.
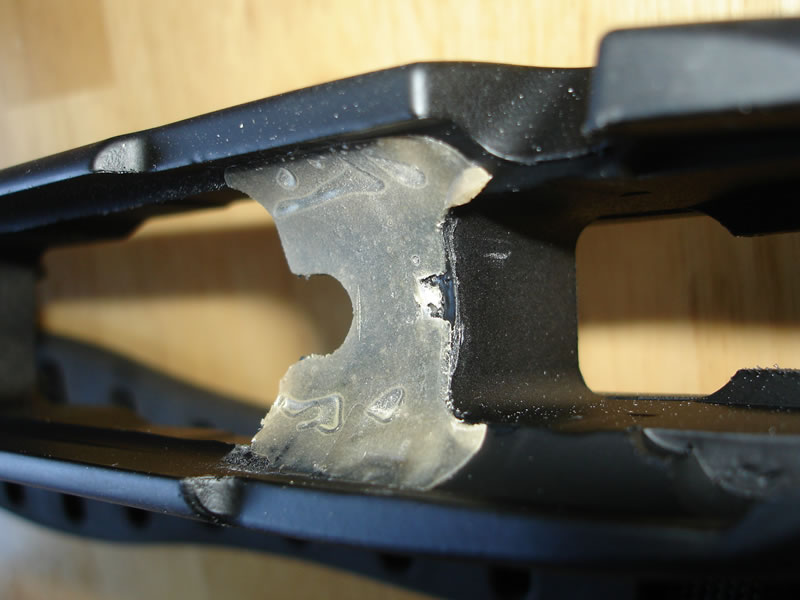
X-Bolt Bedding at Rear of the Action.
View of the inside of the forearm of X-Bolt stock.
X-Bolt recoil lug.
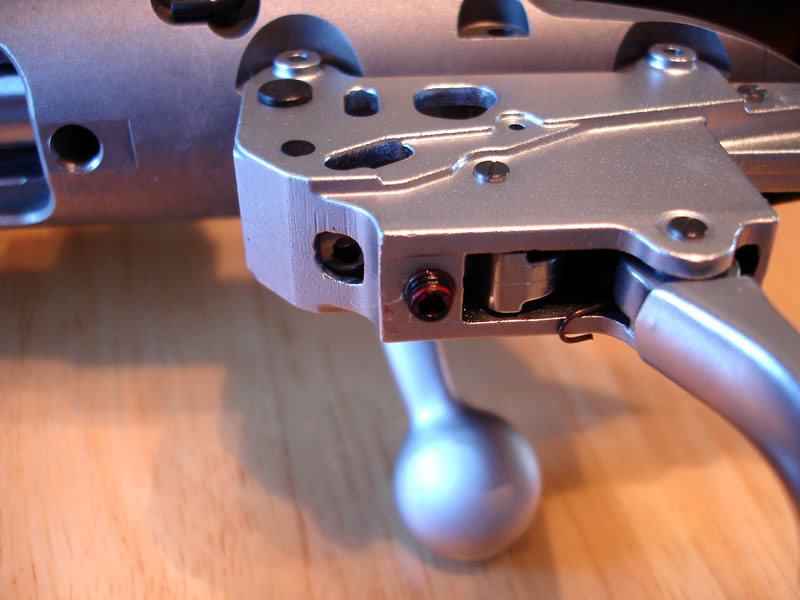
X-Bolt trigger adjustment screw.
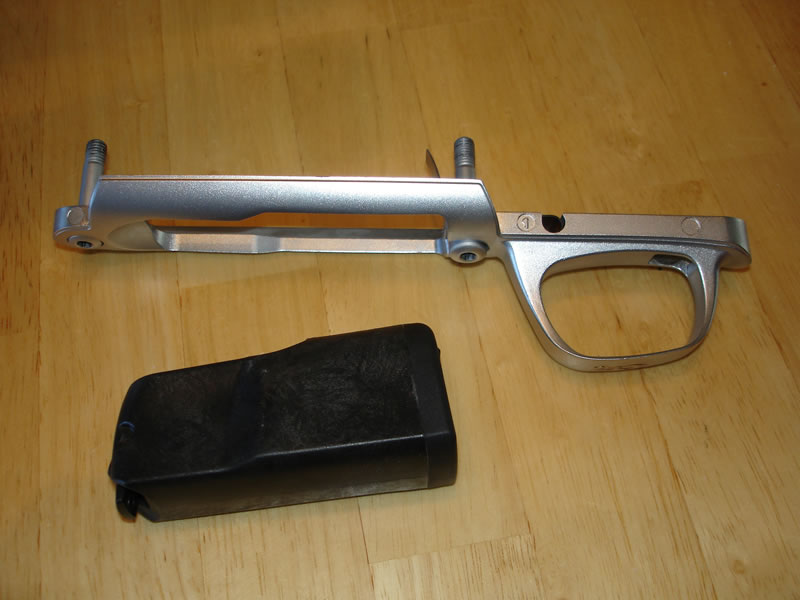
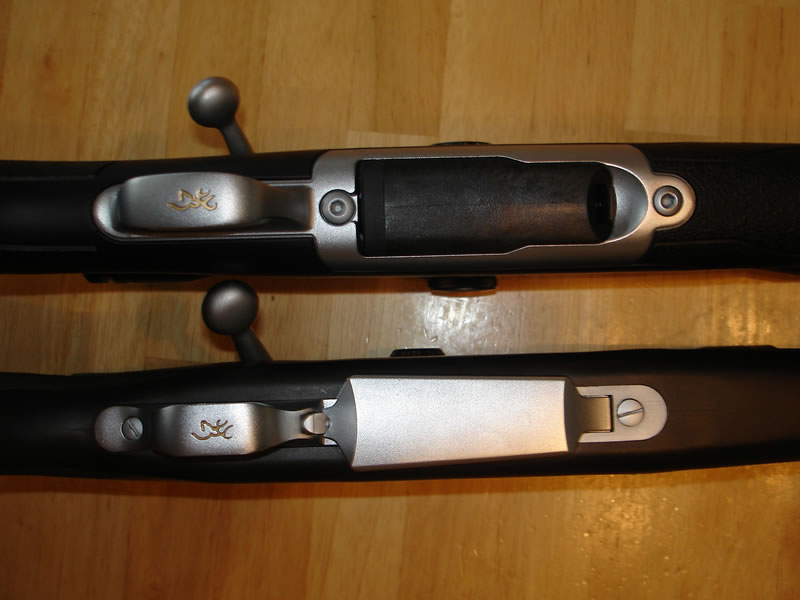
X-Bolt metal alloy trigger guard assembly and composite magazine.
A-BOLT UPDATE: In 2012 Browning introduced the AB3 (A-Bolt III) and has been fazing out the A-Bolt II shown in this article. Check out my X-Bolt vs AB3 (A-Bolt III) Comparison article to see the new AB3 and X-Bolt comparisons.
Now that I own a X-Bolt I took a few photos and wrote some descriptions of the differences between these two Browning bolt action rifles.
Because I only have Super Short Action (SSA) A-Bolts and my X-Bolt is a Short Action (SA) the photos show the X-Bolt with a longer bolt, action, magazine etc. which would not be the case if they were both the same action length.
The first thing that comes to mind that is different between the rifles is the trigger system. The trigger on the X-Bolt is amazing for a factory trigger, not that the A-Bolt trigger is bad, it has a great factory trigger, the X-Bolt's trigger is just better.
I have been really impressed with how the X-Bolt trigger feels when you shoot. Both the A-Bolt and the X-Bolt have a trigger adjustment screw that can be accessed by removing the trigger guard assembly. I always back my trigger adjustment screws out to get the lowest trigger weight available. It's a simple procedure just follow the directions in the owners manual.
Both the X-Bolt and A-Bolt have top tang safeties that are easily operated with your thumb. The Safety is in the perfect spot to operate and still keep your head and hands in alignment as you are preparing to take a shot. No taking your eye or hand off the rifle to take the safety off. I really like top tang safeties.
The X-Bolt has a bolt unlock button on the top of the bolt handle. By pressing this button when the rifle has the safety on you can open the bolt and remove the unfired cartridge.
The magazine on a X-Bolt is a composite drop-out variety. The magazine also has some really nice features. It is a rotary style that places the cartridge in straight alignment with the chamber for a smooth straight shot to the chamber. The X-Bolt magazine also has shoulders or a ridge line that prevent the the tips of your bullets from getting smashed into the front of the magazine when the rifle recoils. This ridge-line in the magazine stops the cartridge by preventing the shoulder of the cartridge from moving forward.
A-Bolt magazines are metal with a leaf spring and a stacked alternating cartridge design. The magazine snaps into a hinged floorplate.
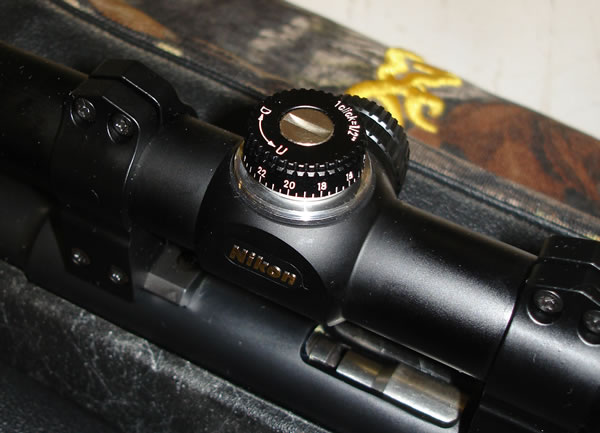
The X-Bolt has four screws per base while the A-Bolt has two. In theory with four screws per base it will give you a more solid mounting for your rifle scope.
Both rifles are made in Browning's Miroku Japan Factory and Miroku is know for making good rifle barrels.
Both rifles have recessed muzzle crowns to prevent damage to the rifling at the tip of the muzzle.
Both my X-Bolt and my A-Bolts have been bedded with free floating barrels. The X-Bolt was bedded at both the recoil lug at the end of the barrel and at the back of the action. I have not had to do anything with bedding to get my barrels free floated, they're bedded and free floated right out of the box.
Both the X-Bolt and A-Bolt Composite stocks have a right hand palm swell which not only feels nice but also helps with a more comfortable alignment for your index finger and the trigger.
The X-Bolt has a recoil pad that is designed to deflect the stock down and away from your face. The A-Bolt has a hard rubber recoil pad. In fact I don't really think it could be called a recoil pad, it's more like a black rubber eraser.
Most of the X-Bolt line currently has more of a Euro styling in the stock where the A-Bolt has a more traditional lines and checkering.
I believe the X-Bolt is lighter but, upon reviewing browning.com it appears that a comparable A-Bolt to X-Bolt has the A-Bolt at about 2 ounces lighter than the X-Bolt??? I really think it should be the other way around. I'll see if I can get two comparable models and weigh them myself to see.
I own a couple of A-Bolt rifles and an X-Bolt and really like all of them. If push were to come to shove I would chose the X-Bolt over the A-Bolt. Mainly because of the trigger, the bolt unlock button and the magazine's cartridge shoulder "bumpers".
When the X-Bolt was first introduced I had a bad taste in my mouth about the "plastic" magazine. I thought it should be metal but now that I have an X-Bolt I am very happy with the plastic magazine and can see how it is a better material for the task. The plastic provides a very smooth surface for the cartridges to slide along, self lubricating is one way I have heard it described and the plastic is actually stronger in my opinion. Could you imagine standing on a X-Bolt plastic magazine and a metal A-Bolt magazine or better yet driving a truck over the two? The A-Bolt metal magazine would get all bent out of shape and the X-Bolt plastic magazine would be just fine.
Now when shooting off the bench the A-Bolt is easier to single feed a cartridge by opening the action and just placing/setting the cartridge in on top of the magazine and then just close the bolt. The X-Bolt's magazine protrudes up higher into the open action thus when you single feed a cartridge you have to push it forward near the chamber with your fingers before attempting to close the bolt... so for shooting off the bench on the range or on a varmint hunt, I like the A-Bolt better. Now for big game hunting I prefer the ultra smooth feeding straight into the chamber X-Bolt magazine system.
The X-Bolt has been designed with a sleeker lower profile than the A-Bolt. One problem this can create is with shell ejection using a scope that has a long windage turret and the short, fat WSM cartridges. The long turret, WSM combination can prevent shells from ejecting from the X-Bolt.
I get great out-of-the-box accuracy with my A-Bolt rifles and my new X-Bolt's accuracy has also been great. However out-of-the-box I think the X-Bolt could give a little better accuracy because of the trigger, not that the A-Bolt trigger is bad but I think the X-Bolt's trigger is even better. I do wish that the X-Bolt came in a Super Short action with a bolt and magazine to handle a 243 WSSM but alas it doesn't. :(
- X-Bolt vs AB3 (A-Bolt III) Comparison
- Read about the Accuracy of my New X-Bolt Stainless Stalker, 270 WSM on it's first trip to the range.
- View photos of the drilled and tapped X-Bolt receiver in my article titled: Setting Up The Nikon Monarch 4-16x42SF BDC Rifle Scope On My X-Bolt
- See my thoughts and solutions on X-Bolt shell ejection problems with rifle scopes that have long windage turrets - X-Bolt Shell Ejection Problems - Solved
- X-Bolt 20 MOA Picatinny Rail and Vortex Viper HS LR Rifle Scope
- Details
- Written by: The DIY Hunter
- Category: Firearms & Shooting
- Hits: 8307

Nikon 1x20 Buckmaster Scope and CVA Firebolt on the Shooting Bench
I took my muzzleloader to the range on the same day I shot my new X-Bolt. I was pretty excited about my X-Bolt and how well it shot. In my excitement to shoot my X-Bolt, I forgot patches for the muzzleloader. To get the best accuracy shot after shot, I like to run a patch lubed with Bore Butter through the barrel between shots. Accuracy was not going to be it's best with the muzzleloader today without the patches.
When I started shooting the muzzleloader I was sailing them over the target. I got the windage adjusted fairly close and started taking a shot and adjusting it lower and lower until I got the final shot a few inches high and to the right. There was a strong L-R wind so I think I am pretty close to being where I want it sighted in, maybe just a little lower and I'll chalk the last shot going right to the wind and excessive fouling as I didn't have my patches.
This was my first experience with a 1x scope and thus being a scope I thought I could just start at 100 yards. One power scopes are scopes but... it really didn't sink in how small everything was still going to be looking through the scope. If I were to do it over I would start sighting it in at 50 yards then go out to 100 yards.
With it only being a one power scope the reticle covered the two inch dot on the target. This makes it a little difficult knowing for sure you are holding right on the dot. However a reticle covering a two inch dot is sure a heck of a lot better than open sights covering the entire lower half of the target. Next time I will take a target with a single 4-6 inch black dot to shoot at.
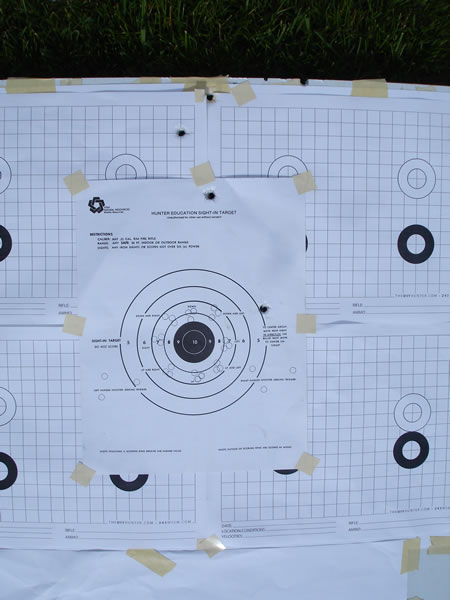
Target showing bullet placements using Nikon 1x20 Buckmaster Scope on CVA Firebolt muzzleloader. An adjustment was made after every shot to bring the bullet placement down.
I was excited to find no parallax issues with the scope. I was not sure what distance the focal plane of the target and the crosshairs would align. Never having used a 1x scope I was a little worried that the crosshairs would float all over the target. I placed the muzzleloader in a shooting sand bag to hold the muzzleloader steady. Then I would move my head around looking through the scope. I found that the crosshairs did not float around on the target. Perfect! No parallax issues at 100 yards. Just what I wanted. Now it was a little unnerving seeing the front sight in the scope floating all around. I might think about removing the sights. It is a little distracting to say the least.
I really like the solidly made Warne scope rings and bases. So I ordered some from Midwayusa.com for this scope and muzzleloader. I went with a High set because I didn't want the rear sight being in line with the scope and blurring the optics. I'm really glad I went with the High set of rings. As you can see in the pictures the bolt handle just misses the scope by about 1/32 of and inch. I had not taken this clearance issue into account when I ordered the rings. I've been a little spoiled with the 60 degree bolt throws on my A-Bolt's and now X-Bolt, where scope clearance is never an issue. I'm really glad I didn't order the Medium height ring now. Even though it is a narrow amount of clearance it isn't on a high powered rifle, only a very slow cycling, load through the muzzle, muzzleloader. I can live with the narrow clearance.
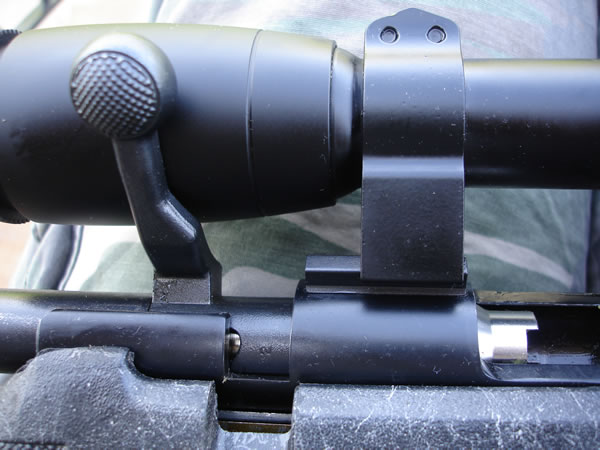

Bolt clearance with Warne High Rings and a Nikon 1x20 Buckmaster Scope on CVA Firebolt muzzleloader.
After a few shots, I was really liking this scope on my muzzleloader. The optics are very clear, I had no parallax issues, the scope adjusted nicely and the eye relief is very generous (a nice feature for heavy recoiling muzzleloaders). It's a great quality scope for the price. Now I am just going to have to wait to hunt with it for at least another year because I didn't draw the muzzleloader permit this year. :(
RELATED ARTICLES
- Best 1x Muzzleloader Scope
- Setting Up My New CVA Accura V2 With Nitride Rust Proof Finish
- Nikon Buckmaster 1x20 Muzzleloader Scope
- Details
- Written by: The DIY Hunter
- Category: Firearms & Shooting
- Hits: 9227
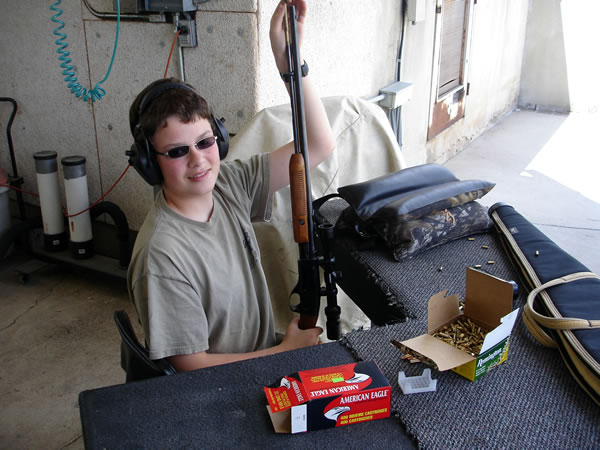
Dallen came with me and shot his 22 LR, Remington Fieldmaster Model 572 at clay pigeons on the hill while I worked with my rifle.
With drawing the buck/bull combo tag for 2010 I really wanted to get a lighter weight rifle that could pack a real solid punch out to 600 yards. I feel plenty confident with my 243 WSSM A-Bolts out to that range but, with the Triple shocks bullets I'm using I would feel more comfortable if I was shooting 400 yards or less. I would rather have a plain vanilla bullet out past 400 yards with the 243 WSSM to get the bullet expansion I would like to have. I could take my 270 WSM, Model 1885 and I have in the past. It has plenty to offer out to 600 yards and beyond. It fact my 140g Nosler AccuBond handload in this rifle is going 3450 fps. With this rifle and load at 600 yards there would be plenty of bullet penetration and expansion but, this rifle is on the heavy side.
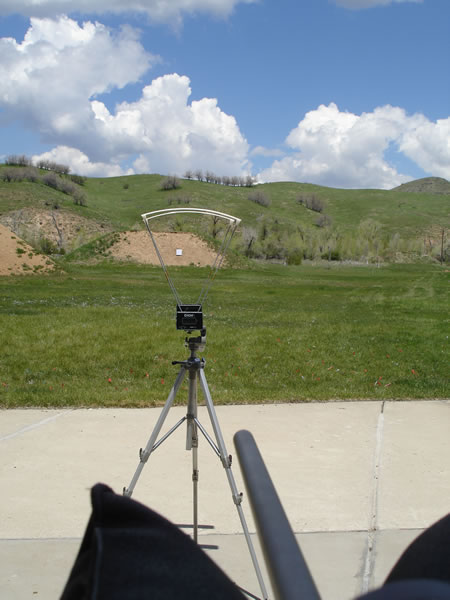
View down range from my New 270 WSM X-Bolt
I have shot the X-Bolt a time or two and have just loved the accuracy. The factory trigger has just been amazing and as I have learned from my A-Bolts and Model 1885s, Miroku knows how to make a barrel. The X-Bolt magazine has a couple of features I really like also. It has shoulder stops that prevent the tips of the bullet from getting smashed into the front of the magazine when the gun recoils. The magazine also aligns the bullet straight with the bore unlike many others that stack bullets in a alternating fashion. The rifle is also very light. Just perfect for the backpacking hunts that I so enjoy taking. I kind of wish it had a 24 or 25 inch barrel. I will admit that I enjoy getting as much velocity as I can and barrel length will give or take away that velocity. However I also understand that this rifle would weigh more because of the length. The barrel would also be less rigid unless the barrel contour were enhanced. Stiffer barrels make for less vibration which equals better accuracy. If the barrel were longer like I would like then it would need a heavier contour to make up for the added vibration to get the same stiffness and accuracy.

First shots through my 270 WSM X-Bolt Stainless Stalker
This year happens to be my 10th year working for Browning. Human Resources contacted me a month or so ago and informed me of the fact and that I could choose a gift for my service award. There were various prizes like a MAC "i" something or other, jewelery and the like, or...credit towards a Browning purchase. Well, that's a no brainer. I couldn't even argue with myself about getting an X-Bolt, I'll just worry about having money to feed the family later... The planets had aligned and I had to get the X-Bolt, although strangely my wife doesn't see nor understand the alignment thing. Before the end of the next day I had my 270 WSM X-Bolt Stainless Stalker on order.
Two weeks later my rifle came in. I had decided to swap some rifle scopes around on my rifles. I wanted my favorite scope to go on my new rifle. The Bushnell Elite 6500 that I just placed on my 270 WSM Model 1885 for the cow elk hunt. I wanted that scope to be on my new X-Bolt. A Bushnell Elite 4200 would go on my Model 1885.
When I mounted my scopes I bore sighted my rifles a little different than I normally do. You will see in a minute the technique worked great.
Across the hall from my work office is a bathroom of sorts, really only a shower room with a sink and mirror. Anyway, as I mounted the scopes I would look across the hall into this mirror. In the mirror I could see exactly where the barrel was pointing. So I just started adjusting the scope until the barrel was pointing straight in-line with itself and the crosshairs. It worked really good for my Model 1885, because I have to adjust the windage by a fair amount with the rear base, before I lock the base into position.
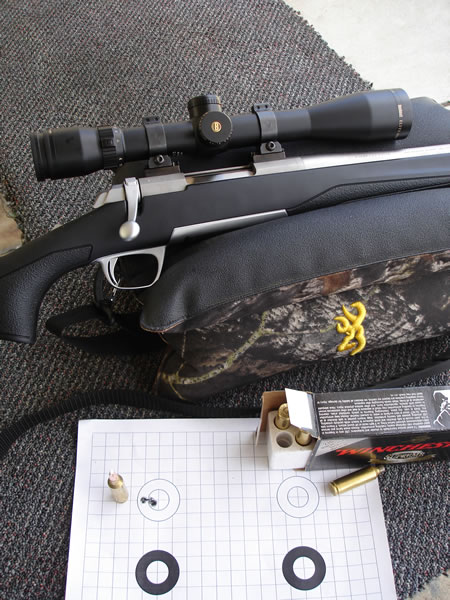
270 WSM X-Bolt, Bushnell Elite 6500, and 140g AccuBond Handload
In case my boss were to ever read this. The scope mounting was of course, all accomplished while on my breaks. I just love working in an environment where firearms are the norm at work!
Next, I spent a couple of hours off and on cleaning the bore by running Bore Tech's Eliminator through the barrel. It took a while to get all the copper fouling out from the proofing rounds that were fired through it at the factory.
Now it was time to get it on the range. I was going to try my 140g Nolser AccuBond loads that I worked up for my Model 1885. The load wasn't hot at all on my Model 1885 so I felt safe in using it in my X-Bolt. It was a windy, partly cloudy day with the temperature right around 50-55 degrees. The wind was blowing left to right across the target.
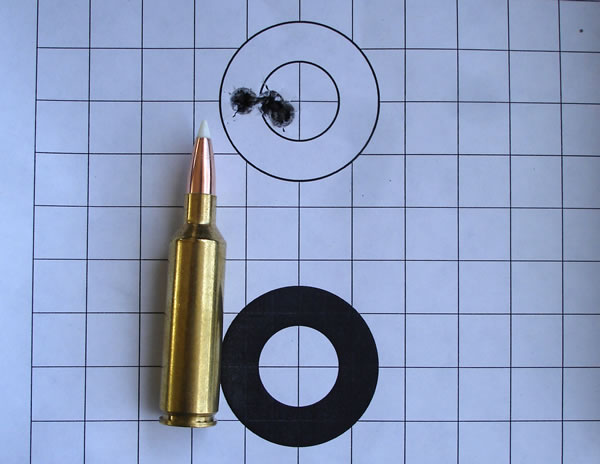
270 WSM, 140g AccuBond Handload, First Three Shot Group with a L-R wind.
As the barrel was squeaky clean and still had remnants of Kroil in it, I took three quick shots to get the barrel fouled up good. These shots placed on the target within just a few clicks of being right where I wanted. The mirror bore sighting technique worked very well.
I made a couple adjustments to the scope and then concentrated on being as steady as possible and fired three more shots. As you can see in the photos my first two shot were right on top of one another and the third was just to the side of them. Not too bad, for a magnum rifle, on a windy day. Even though I like longer barrels, I'll take a shorter barrel that shoots this good any day, because when it's all said and done the deer really isn't going to know the difference.
- You can download printable targets for sighting in your rifle just like the targets I use.
- Thanks to the passing clouds my chronograph only recorded three velocities from the six fired shots 3254, 3191, and 3184 fps. So roughly 3200 fps from a 23 inch barrel on a 50 degree day. I'll chronograph the load some more to get a little better data. Update: I have shot this load several more times at the range and the velocities have all been in the 3300 fps range. The clouds or something was making the chronograph give incorrect readings this day. This handload can be found in my 270 WSM Handloads and Ballistics article.
- Learn more about the X-Bolt Features in my entry X-Bolt vs A-Bolt Comparison.
- August 28, 2010, I now have better data on the velocity of the 140g Nosler Accubond from my 23" barrel X-Bolt in my journal entry: At the Range with My X-Bolt 270 WSM and 243 WSSM 95g Nosler Partition
- September 19, 2010: At the range with My X-Bolt 270 WSM at 300 Yards
- June 2013: I now have my X-Bolt setup with a 20 MOA rail and Vortex Viper HS LR 4-16x50 rifle scope.
Here are my first hunts with my X-Bolt Stainless Stalker in 270 WSM